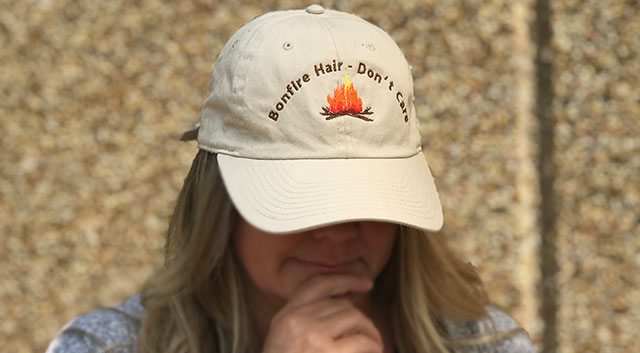
Bonfire season is upon us! What better way to show your excitement than this fun hat?! Use Designer's Gallery Creator Level 2 to create this cute project and make them for all your friends! Download printable instructions.
Materials:
- Creator™ Level 2 - installed and activated
- Blank baseball cap
- Baby Lock Cut Away Soft stabilizer
- Temporary spray adhesive
- Embroidery bobbin thread
- Assortment of embroidery thread
Tools:
- Baby Lock Embroidery Machine
Steps:
-
Prepare the design page.
-
Open the Preferences and select Hoops found in the Environment folder. Select Normal from the Hoop Style.
-
From the hoop selection list select the 130mm x 50mm (hat) from the list. Click Apply then OK. This hoop is used on multi-needle machines.
-
If you don’t have a multi-needle machine select the 130mm x 180mm hoop or the 100mm x 100mm hoop.
-
-
Merge art from the design library.
-
Click the Merge Design icon select the Shapes 2 category then Fire from the selection window.
-
Click OK.
-
-
Size and separate the object.
-
Adjust the size of the artwork to 1 ¼” x 1 ½”.
-
Click to select the bottom left inside node then select Close/Open Outline to move the opening point on the art.
-
Click to select the bottom right inside node. Right mouse click and select Break at Point from the menu.
-
Select just the bottom part of the object and click Close/Open Outline to close the shape.
-
From the Object tree select the top section of the flame and click Close/Open Outline to close the shape.
-
Separate the very tip of the flame from the following the same steps used previously separating the bottom section.
-
Close both the middle and the top sections of the object. There will now be three separate objects.
-
-
Apply the stitches to the flame:
-
Select the top section of the flame object 1:1 in the Object Tree. Use the Fill tool to apply stitches to this section.
-
Using the Inclination line adjust the stitches so they fill the area vertically. Select Feather the fill from the Properties box.
-
In the Feather properties set the Left at 25% and the Ext. to 20%. Set the Right at 35% and the Ext. to 70%.
-
Select the Underlay properties and remove all underlay.
-
Change the color to yellow.
-
Select the middle section of the flame object 1:2 in the Object Tree. Use the Fill tool to apply stitches to this section.
-
Using the Inclination line adjust the stitches so they fill the area vertically. Select Feather the fill from the Properties box.
-
In the Feather properties set the Left at 25% and the Ext. to 20%. Set the Right at 35% and the Ext. to 50%.
-
Select the Underlay properties and remove all underlay.
-
Change the color to orange.
-
Select the bottom section of the flame object 1:3 in the Object Tree. Use the Fill tool to apply stitches to this section.
-
Using the Inclination line adjust the stitches so they fill the area vertically. Select Feather the fill from the Properties box.
-
In the Feather properties set the Left at 15% and the Ext. to 0%. Set the Right at 50% and the Ext. to 90%.
-
Select the Underlay properties and remove all underlay.
-
Change the color to red.
-
Select all three sections of the flame and adjust the size to 1” x 1 ¼”.
-
-
Create the logs for the fire.
-
Open a new page. Select Image and open the Acorns image on to the design page.
-
Using the Magic Wand create an outline from the branch in the Acorn image. Increase the Sensitivity of the wand to 75%.
-
Use the Satin Column tool to fill the branch with stitches. Copy the branch and paste it on the bonfire page.
-
Size the branch to 2” x ¾”.
-
Copy and paste the branch creating two branches. Using Flip horizontally from the platform flip the second branch. Arrange as desired at the bottom of the bonfire.
-
-
Create the text.
-
Click the Create Lettering tool from the tool bar.
-
Using the 130mm x 180mm hoop select Text on a circle and type Bonfire Hair – Don’t Care in the text box. Press enter on the keyboard.
-
Using the 100mm x 100mm hoop select Text on a circle and type Bonfire Hair in the text box. Press enter on the keyboard.
-
Place a check in the bottom checkbox and type Don’t Care in the text box.
-
-
Adjust the size of the text object to 1 3/8” height for the 130mm x 180mm hoop and the cap hoop.
-
Adjust the size of the top text to ¾” height and the bottom to 5/8” height for the 100mm x 100mm hoop. Center the text over the bonfire.
-
-
Go to File in the menu bar and Save As…(Stitch and Working) and save the file to the proper media and format for your machine.
-
If the 100mm x 100mm or 130mm x 180mm hoop is being used hoop with sticky stabilizer.
-
Fold the band to the outside of the hat.
-
Center the hat in the hoop and firmly press onto the sticky stabilizer
-
Load the design into the machine and stitch it onto the hat
-
-
If you are using the cap hoop for the multi-needle machine or the cap hoop for the single needle machine please follow the instructions for that product.
-
Enjoy wearing at your next bonfire because you won’t have to worry about your hair.
-


