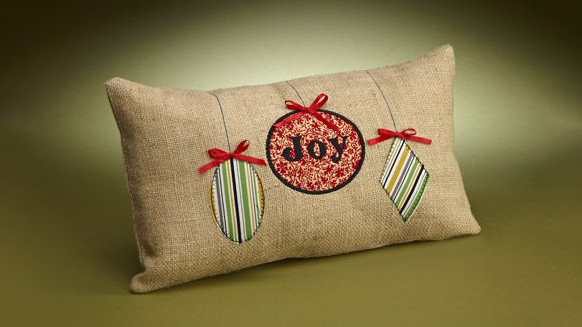
Add some holiday cheer to your décor with this burlap pillow using the framing patterns and fonts on your Baby Lock embroidery machine. This great beginning embroidery and serging project makes a great gift for family and friends.
Materials:
- 4 Spools Madeira Aerolock serger thread
- Assorted spools decorative embroidery thread
- Madeira Aerofil all-purpose thread to match fabrics
- 1/2 yard of burlap fabric
- Baby Lock Cut-Away Stabilizer
- 2 Fat quarters for the appliques
- 1/3 yard fusible fleece
- 1 yard ¼” red ribbon
- Fiberfill
- Hand sewing needle
Tools:
- Baby Lock Sewing and Embroidery Machine
- Baby Lock Serger
Steps:
-
To soften the burlap and reduce the release of itchy fibers common with cutting burlap start by serging across the cut edges of the fabric
-
Wash and dry the burlap using fabric softener (I used a short cycle on my washer).
-
The burlap will shrink with washing as the weave gets closer together. This is why ½ yard is suggested in the supply list to allow for shrinkage.
-
Cut two rectangles 12” x 18” for the pillow front and back.
-
Cut two rectangles of fusible fleece 12” x 18”. Fuse the fleece to the wrong side of the burlap fabric.
-
This will help hold the burlap together as well as makes a soft foundation for the pillow.
-
-
Set up your machine for embroidery with the unit attached.
-
To set-up the embroidery design for each ornament set up two frame patterns.
-
The first will be a running stitch; this will be used to hold the applique fabric in place.
-
The second frame pattern will be the decorative stitch around the ornament.
-
Also note the design will be set up sideways in order to use the full length of the hoop.
-
-
Select embroidery edit mode.
-
Select the framing patterns select an oval and a running stitch outline. Resize it larger. This will be for the first ornament.
-
For the last ornament on the pillow select the diamond frame pattern and a running stitch. Resize it so it is similar in size as the oval.
-
Add another design select the same size and shape oval. This time select the applique outline. Move this oval on top of the first oval.
-
Add again and select the diamond frame pattern. Then add another design and add the diamond again this time with an applique outline. Move this diamond on top of the first diamond
-
Next select a circle for the center ornament. Then resize it so it is the largest ornament.
-
Then add another design and add the circle again this time with a satin stitch outline.
-
Now add again. This time select the fonts. Choose your desired font and add the word “Joy” in the center ornament. Remember you need to rotate the word 90 degrees.
-
Note: Another option would be to replace the word “Joy” with a monogram.
-
-
Hoop one of the burlap pillow pieces and the cut-away stabilizer centering it in the largest Ellisimo hoop.
-
Place the fat quarter you want to use for the far ornaments on top of the hooped fabric.
-
Stitch the first two color stops stitching the running stitch oval and the running stitch Diamond.
-
Without taking the fabric out of the hoop trim the excess cotton fabric away.
-
Once the fabric is trimmed neatly to the stitching line. Stitch the next two color stops to finish the oval and diamond.
-
Place the fabric for the center applique on top of the hooped fabric
-
Stitch the next color stop to get the straight stitched circle. Trim the fabric to the stitching line. Stitch the next color stop to finish the satin stitch edge of the center circle.
-
Stitch the next color stop for the letters.
-
Once the embroidery is complete remove the fabric from the hoop.
-
Set-up the machine for sewing and thread it with a dark color of thread to form the “hanging lines.” Using a triple straight stitch sew lines down to the center of the ornaments.
-
Tie the red ribbon into small bows then using a button sewing stitch tack the bows to the top of each ornament.
-
To assemble the pillow place the front and back right sides together. Using a straight stitch or a 4-thread stitch on the serger stitch the pillow edges together.
-
Leave a small hole for turning on the lower edge.
-
-
Turn the pillow through the opening and stuff the pillow.
-
Using a hand needle whip stitch or blind stitch the pillow opening closed.


