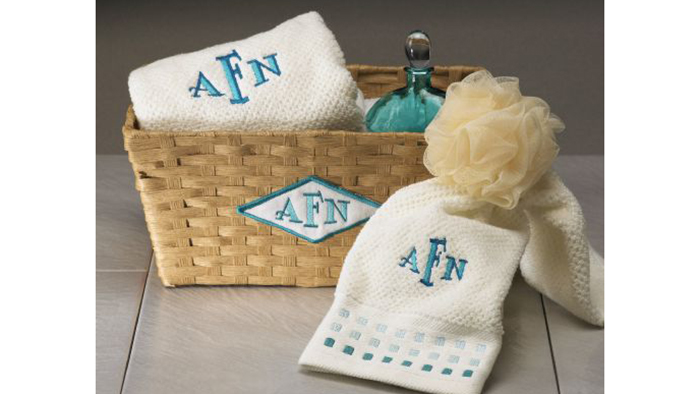
Looking to add an update to your bathroom? Monogram your towels and baskets! Choose a colorful Madeira thread color to add a pop of color and coordinate with your decor. This simple project is made easy with MonogramWorks from Designer’s Gallery and makes a great housewarming hostess or anytime gift! Download printable instructions.
Materials:
- Cream colored scrap material for appliqué on basket
- Bath towels and hand towels
- Hydro Hold Water-Activated stabilizer from Baby Lock
- Hydro Melt Topping from Baby Lock
- Embroidery thread
- Purchased bath towel
- Fabric glue
Tools:
- Baby Lock Embroidery and Sewing Machine
- MonogramWorks from Designer’s Gallery®
Steps:
-
At the Computer:
-
Open MonogramWorks. Note: You can also open MonogramWorks within CustomWorks II Studio III or StudioPlus.
-
With these platform programs you can use all options that will be described.
-
Click on the menu View and select Hoop Size from the drop-down menu. When the dialog box opens select the 130mm x 180mm hoop.
-
Place a check mark next to rotate 90 and click on OK.
-
-
To create the large letter monogram follow the next set of steps:
-
Click on Create Monogram icon on the top toolbar.
-
Click on the Caps Lock key on the keyboard to set the letters to uppercase.
-
Type your monogram in the Text field. Traditionally the first name initial is first the last name initial is the large middle and the middle name initial is last.
-
Click on the down arrow next to the fonts. Scroll down and select the Studio font.
-
With the letters selected type in the 58mm in the height field under the Size and Position Control.
-
Next we will resize the first and last letters. Click on the green box on the last letter. This will select only that letter and will allow us to resize it individually.
-
In the Size and Position Control field type in 26mm for the height of the letter and hit Enter.
-
Select the first letter and type in 26mm in the height field and hit Enter.
-
Left click on the green box on first letter and drag the letter to the center left of the middle letter.
-
Left click on the green box on the last letter and drag it to the center right of the middle letter.
-
To center the design in the hoop select the monogram and click on Center to Hoop icon.
-
-
Click on File Save As and send to the media source in the format that your machine will read.
-
Click on the Print icon on the top toolbar and print out a template of the monogram design.
-
Basket Design:
-
Click on New page.
-
Click on the Load Frame icon on the top toolbar.
-
Select Appliqué Shapes and select the appliqué Diamond.
-
Click on OK to place the shape on the workspace.
-
Since we will be using the same lettering click on the workspace with the lettering.
-
Click on Edit and select Copy.
-
Click on the workspace with the frame.
-
Click on Edit and select Paste. The appliqué design will be the first area that will be embroidered.
-
-
Click on File Save As and send to the media source in the format that your machine will read.
-
At the Machine: Determine the positioning of the monogram on the towel and pin the printed template on the towel.
-
Hoop the stabilizer and following the manufacturer’s directions to water activate the stabilizer.
-
Place the towel over the hoop being careful that the template is centered in the hoop and finger press.
-
Place the hoop on the embroidery unit.
-
Select the Camera function and scan the area in the hoop.
-
The scan will show up on the screen. Center the design so that it fits directly over the template that was scanned.
-
You may need to rotate the lettering if you did not hoop the towel square. Remove the template from the towel.
-
-
Cut a small piece of Hydro Melt Topping larger than the monogram design and place on top the towel where the monogram will be embroidered.
-
Embroider the design following the color stops for each of the letters while using thread colors that coordinate with your bathroom colors.
-
Option: To create the hand towels resize the font smaller.
-
-
To embroider the design for the basket hoop the Hydro Melt topping.
-
Retrieve the design for the basket.
-
.Since this is an appliqué border design embroider the first color on the design. This is the placement stitch.
-
Place the cream colored fabric over the stitch line.
-
Embroider the second color. This is the tack down stitch.
-
Remove the hoop from the machine.
-
Using sharp embroidery scissors trim close to the outline stitch.
-
Place the hoop back on the machine.
-
Embroider the third color to create the appliqué outline.
-
The last two colors will be for the lettering. Embroider them at this time.
-
Remove any stabilizer from the back of the appliqué embroidered piece.
-
Using fabric glue glue the piece to the center front of the basket.


