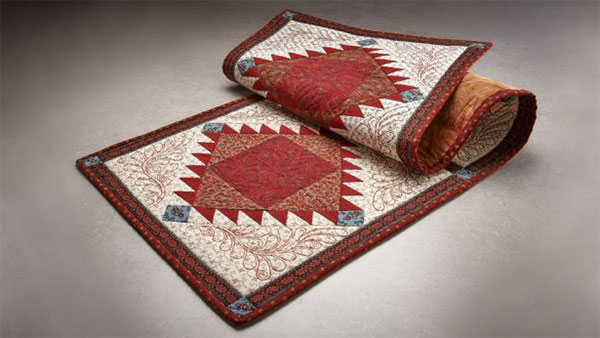
Scrap basket getting full? This table runner is a great way to use a variety of left-over fabrics while creating a beautiful table runner using the camera feature on the Destiny embroidery machine. Download printable instructions.
Materials:
- Optional: Amazing Designs Quilting Feathers and Frills Collection – (ADL3)
- Large scraps of coordinating prints or yardage as follows:
- ¼ yard of red centers (A)
- ¼ yards of three different brown prints (B)
- 1/8 yards of three different red prints (HST) half square triangles (C)
- 1/8 yard of blue small squares (D) and (F)
- 3/8 yards of three different ivory prints (HST) half square triangles (C) and background of block (E)
- ½ yard of striped fabric for sashing border (F)
- 1 3/8 yard for backing
- Quilt batting
- Water soluble marker
- 1 spool of all-purpose thread
- Rotary cutting system
Tools:
- Baby Lock Destiny embroidery and sewing machine
Steps:
-
Start by cutting the following:
-
One – 5 ¾” x 5 ¾” square from 3 different red prints (A)
-
One – 6 ½” x 6 ½” square from 3 different brown fabrics (B) cut each square on the diagonal corner-to-corner in both directions
-
One – 2 1/8” x 44” strip from 3 different red and 3 different ivory prints (C) cut each of these strips into twelve 2 1/8” x 2 1/8” squares
-
One – 1 ¾” x 44” strip of blue cut into twelve 1 ¾” x 1 ¾” squares (D)
-
Two – 8” x 8” squares of 3 different ivory prints (E) cut each one on the diagonal once
-
One – 1 ½” x 44” strip of blue cut into eight 1 ½” x 1 ½” squares (F)
-
-
The following instructions will be for one block. When finished with one block complete the remaining two blocks.
-
Fold a red (A) square in half in both directions and finger press.
-
Place the long side of one brown (B) triangle on one side of the (A) square. The center point of the (B) triangle will align with the center crease on the (A) square.
-
Stitch the triangle to the square ¼” seam.
-
The tips of (B) triangle will extend beyond the (A) square on both sides. Stitch the triangle to the square ¼” seam.
-
-
Press seam toward the (B) triangle. Repeat step 4 on the opposite side of (A) square. Press.
-
Stitch the remaining two brown triangles to the other sides of the red square. Press the block it should measure 8” x 8”.
-
Mark the 2 1/8” ivory (C) squares on the diagonal with a water soluble marker. Next layer the red squares and ivory squares right sides facing. Stitch ¼” from each side of the diagonal line
-
Cut each square on the marked diagonal line. Each square will yield two half-square triangles (HSTs) for a total of twenty four HSTs that measure 1¾” x 1¾”.
-
Press the 24 half-square triangles seams toward the red fabric.
-
-
Stitch the HSTs into four strips six HSTs per strip. Note: 2 strips will face left and 2 strips will face right. Press.
-
Stitch the right facing HSTs to the center block on opposite sides. Press the seams toward the center of the block.
-
Next stitch a 1¾” blue (D) square to each end of the left facing red and ivory HST rows. Press the seams toward the blue squares.
-
Stitch the background (E) triangles to the block placing the long side of the triangle on one side of the block.
-
Center the point of the triangle on the block. Stitch.
-
Place the next triangle on the opposite side of the block center and stitch to the block.
-
Stitch the remaining two triangles to the other sides of the block.
-
Press and square-up the block. The block should measure 14 ½” x 14 ½”.
-
-
Prepare to add the sashing and the borders if your block did not measure 14 ½” x 14 ½” adjust the length of the sashing accordingly.
-
Cut the following:
-
Ten - 1 ½” x 14 ½” strips from the striped fabric for the sashing (4) and borders (6).
-
Stitch the blocks together adding a sashing strip between each block and at each end.
-
Press the seams towards the sashing.
-
-
Next stitch the border strips together stitching a blue 1 ½” (F) square between each strip. Three strips and four squares per side. Stitch the border to each side and press.
-
Prepare the table topper for quilting by first pressing well. Next layer the top batting and backing. Baste the layers together.
-
Quilt as desired. We quilted using two quilt designs from Amazing Designs while using design RS111 for the corners and design RS113 for the center squares.
-
No need for stabilizer; hoop the area and embroider the designs.
-
Use the camera to scan the area in the hoop then place the design on the scan.
-
Repeat for the remaining areas on the table runner.
-
-
Trim the excess backing and batting.
-
Bind the table runner.


