
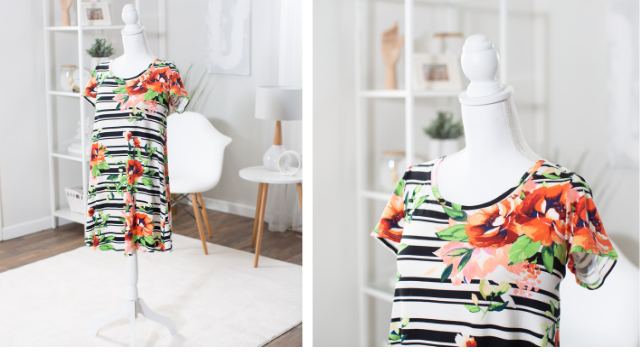
Need a new outfit to wear this Spring? Pick out your favorite floral fabric and use your serger to easily create this cute tee style dress. Then use a sewing machine or an 8-thread serger or cover stitch machine to give it a ready to wear finish.
CLICK HERE TO DOWNLOAD PRINTABLE INSTRUCTIONS WITH ADDITIONAL PHOTOS.
Supplies:
- Laundry Day Tee pattern (dress version) from Lovenotions.com
- Knit fabric of your choice (this dress fabric came from SoSewEnglish.com)
- Fabric to be cut and sewn as directed in the pattern
- 2-3 spools of Madeira serger thread matched to fabric
- 2 spools of Madeira Aeroflock thread
- Baby Lock serger or serger/cover stitch combo
- Baby Lock Open Toe Foot (optional)
- Baby Lock Chain Cover Foot (optional)
- Clover Clips
- Organ Needles ELx705 75/11 SUK for knits
- Pattern marking pen chalk
- Cutting mat and rotary cutter or fabric scissors
- Pins or Fabric weights
- Printing paper and printer to print patterns or if you have tried projector sewing files
Instructions:
- Purchase and download the Laundry Day Tee pattern print and assemble pattern.
- Cut the fabric according to the pattern instructions.
- Set-up the serger for a 4-thread overlock stitch with white Madeira Aerolock thread in upper and lower loopers. Set the stitch width to 6.5 and the stitch length to 2-3. Test sew scrap fabric together adjusting the stitch width as needed to get a 3/8” seam allowance. Using the Open Toe Foot makes it easy for you to see where you are trying to stitch.
- Assemble dress according to the pattern directions. I like to use Clover Clips instead of pins when serging. Starting with the shoulder seams sew from the neck edge to the sleeve edge on each gently press to one side.
- Attach the sleeve according to the pattern directions. If using a stripe fabric try to match your stripes. Serge and ease the fabric by stretching gently. Press seams to one side.
- With right sides together match pattern markings and serge the side seams in the same direction from the sleeve to the hem. This will make a difference in the way the garment hangs. Make sure you are consistent especially with knits. Press seams to one side.
- Place neckband seams together and then press seam to one side. Fold in half and press. Insert neckband according to the pattern instructions. Serge in place. You can finish with a sewing machine and a twin needle or a cover stitch machine such as the Baby Lock Euphoria or a combo machine such as the Triumph or Accolade.
- Set up your machine for a Cover Stitch-Right Narrow according to your machine’s directions. I love the Quick Reference Guide that many Baby Lock sergers come with. I keep mine right next to my machine for easy reference.
- I like to use a double-sided fusible tape in the sleeves and the hem. It helps to give it a very crisp professional finish. For this dress I used a ½” tape. Fuse this tape to the sleeve edge and the hem edge. Then remove the release paper. Fold over once and fuse in place. Then finish by using a Cover Stitch or Twin needle on a tradition sewing machine. With the Cover Stitch I like to use the Chain Cover Foot as it gives you some more visibility. This is a super quick sewing project and I think you will want to make it multiples especially since the pattern can be a Tee Tunic or a dress. What are you waiting for? Before you know it it will be short sleeve weather.


