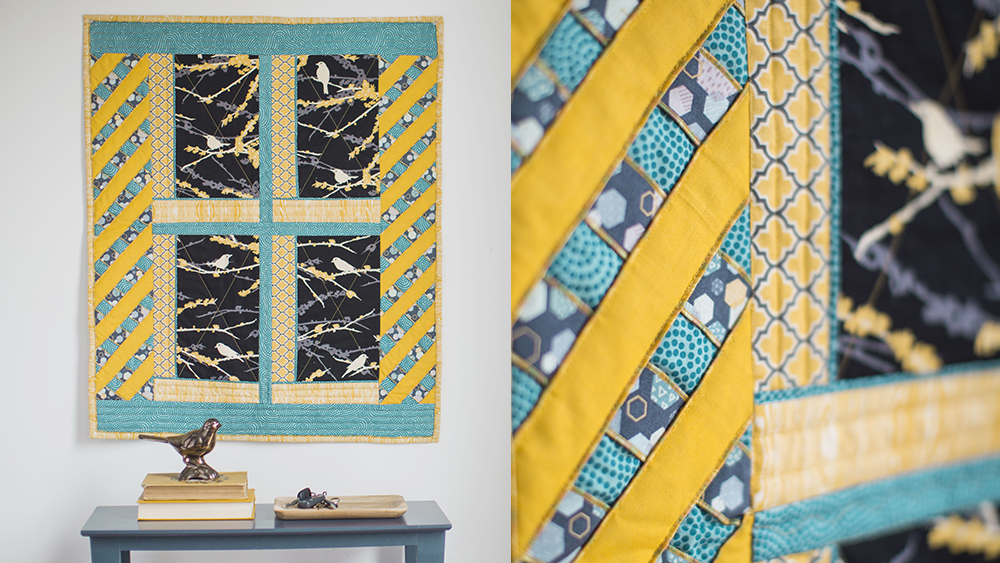
Quilt with your Baby Lock serger to create a beautiful springtime serger trellis wall hanging.
Materials:
- 1 Yard each of 5 assorted cotton prints fabrics that coordinate (one of the prints should have a large print for the four window panels)
- 1 Yard of backing fabric
- Batting
- Madeira® Cotona thread for piecing
- Madeira variegated quilting threads that coordinate with the fabrics
- Chalko marking pencil
- Glue stick
Tools:
Steps:
-
Follow the next set of cutting directions to cut the sections for the quilt:
-
Cut four sections 2” wide across the width of each of the two trellis fabrics (WOF).
-
These two fabric sections will be serger along both long edges using the rolled edge stitch. In the sample a blue print and the solid gold fabric was used.
-
Cut two teal colored print sections that measure 5 ½” x WOF for the background for the trellis sections.
-
Cut four 7 ½” x 12” sections for the window sections for the window panes from the large print fabric. Any large floral or bird print fabric will work.
-
Cut four gold print sections 2 ½” x 12 ½” sections for the window sides.
-
Cut two teal print strips 1 ½” x WOF sections for the trim.
-
Cut three teal print strips 1 ¾” x WOF for the sashing around the window.
-
Cut two teal print strips 3” x WOF for the top and bottom sashing.
-
Cut one gold print strip 2 ½” x WOF for the sashing below the window. These will be cut into 4 strips.
-
Cut three strips from the gold print 1 ½” x WOF for the binding. These will be pieced together to create one long strip.
-
-
Set up the serger for a 3-Thread Overlock Rolled Edge Stitch. With this stitch you will only use the right needle. Remove the left needle.
The upper looper is the thread that will be seen along the fabric edge.
-
Thread the machine so that the variegated thread (gold green and lite orange) is placed in the upper looper.
The other threads could be solid threads that coordinate with the fabric. In the sample gold threads were used in the lower looper and in the needle.
-
Use the following settings for rolled edge serging:
-
Set the length to .75.
-
Set the Stitch Selector to D.
-
Set the Wave Selector to Overlock.
-
Blade should be in the up position.
-
-
To a test on a piece of the scrap fabric to be sure that the rolled edge looks good.
-
Serge along the first side on the first 2” wide trellis strip; cutting off at least a ¼” on the edge.
-
Flip the strip and repeat for the other long edge on the same strip; serge the second edge again removing ¼”.
-
Repeat for the other seven strips for both of the trellis sections. Each of the strips should be close to the same width.
-
Cut the first blue serged strip end at a 45 degree angle. Cut them as you use them.
-
Lay the 5 ½” wide teal colored background sections on a flat surface.
-
Place the blue print serger strip on the background fabric with the 45˚ cut end along the left edge while the opposite edge is placed at an angle in the corner.
-
Cut the second side of the strip even with the edge of the background section. (This cut will be at a 45˚ angle.)
-
Place a dab of glue at each of the ends on the serger strip. This will hold them in place so that they do not shift.
-
Take the cut end of the strip and place it 1” above the last strip.
-
Measure along the strip for accuracy.
-
Cut the end at a 45˚angle and repeat these steps until the piece is approximately 33” long. It will be trimmed to size later.
-
Repeat for the other background section. Fill in the ends with the remaining strips.
-
Eleven strips were used to fill the background section.
-
Using the gold colored serged 2” wide section and cut the end at a 45 degree angle.
-
Important: Cut these sections with the wrong side of the strip facing upward at a 45˚ angle. This will ensure that it is cut at the correct angle.
-
Place the first strip on the background section starting on the lower corner as in the first background section.
-
Cut the opposite end and repeat until the entire section is covered with the second angled gold sections
-
Repeat until the first section is complete.
-
Don’t forget to place a dab of glue at each of the ends to hold in place while placing the sections 1” apart from each other.
-
Repeat for the second background section until the entire section is filled in with the trellis.
-
Baste the edges. Set aside.
-
To piece the window pane blocks together follow the next set of directions:
-
At the ironing board fold the wrong sides together on the two 1 ½” x WOF teal print trim sections.
-
This will create two lengths that are ¾” wide.
-
Place one length along the left side on each of the large bird print window pane sections. Cut to length as needed.
-
Set the other trim section aside for now.
-
Set up the sewing machine with a basting stitch.
-
Using a ¼” seam allowance baste the trim to the large print section.
-
Repeat for the other three window panes.
-
Place the 2 ½” x 12 ½” gold print sections for the window sides over the basted teal trim sides and pin in place.
-
Set up the Baby Lock serger for a 4-Thread Overlock Stitch.
- Place needle 01 and 02 into position. • Set the stitch length to 2.5. • Set the stitch width to 7.5. • Set the Stitch Selector to A. • Set to Overlock. • Place the Knife in the up position.
- Thread the machine using Madeira serger thread that coordinates with the fabrics.
-
Serger along the edge to create a ¼” seam allowance.
-
Repeat for the other four window sections. Press away from the center.
-
Place the teal trim along the bottom edge of the window and baste in place using the sewing machine.
-
Place the 2 ½” striped section even with the raw edges beneath the window and serge as you did for the sides. Repeat for all of the window sections.
-
-
Serge the 1 ¾” teal print strips to the left side on each of the window blocks.
-
Serge the windows together
-
Place the trellis section to each side on the center quilt top
-
Serge the trellis section to each side. Be very careful that the trellis sections stay in place.
-
Serge the 3” teal print strips to the top and bottom edges of the quilt top. Press the seams outward.
-
Create a sandwich with the backing batting and quilt top. Lay on a flat surface in that order.
-
With the sewing machine set up and attach the walking foot.
-
Replace the needle with the quilting needle and re-thread using quilting thread that coordinate with the table runner.
-
Wind a bobbin with the same thread that is used on the top.
-
Quilt the sandwich together by quilting-in-the ditch.
-
The walking foot will allow the quilt sandwich to move as one.
-
When you are quilting always start in the center of the quilt and work your way outward.
-
Using the Chalko marker draw two diagonal lines through the center of the window pane
-
Stitch over the lines to create a quilt line secure the window panes.
-
Replace the walking foot with the “J” foot and stitch close to the rolled edge on each of the trellis gold sections.
-
Stitch from the center of the quilt outward.
-
This will allow the trellis sections to move outward to remove any excess fabric as you stitch.
-
Quilt any other areas as desired. Use the Chalko pencil to mark any quilting lines that you wish to use.
-
Square up the quilt top.
-
To bind the quilt follow the next set of steps:
-
Piece together the gold print 1 ½” wide strip on the short ends to create one long strip.
-
Set up the serger for a rolled hem stitch as in Step 2.
-
Serge one side only on the 1 ½” wide pieced strip. Remove approximately ¼” from the edge as you serge.
-
Starting on one of the long edges on the back side of the quilt top pin the binding strip 8” down from the corner.
-
-
Attach the “J” foot to the machine.
-
Starting approximately 4” down from the pinned end of the binding strip sew the binding to the quilt top using a 3/8” seam allowance.
-
When you are close to the first corner stop 3/8” from the corner and cut the thread.
-
Take the end of the binding and fold it upward away from the quilt top creating a 45˚ angle at the corner.
-
Finger press to crease.
-
Bring the binding strip down over the corner so that the raw edge of the binding is even with the edge of the quilt top.
-
Starting at the corner sew the second side of the binding to the runner. Stop at the corner and repeat these directions for the other three corners.
-
After you round the last corner cut away the excess binding.
-
Be sure to allow a long enough section so that can be tucked behind binding at the starting point.
-
Continue to stitch the binding to the runner.
-
Fold and press the binding to the front side of the quilt top so that the rolled edge shows on the front side of the quilt top.
-
Machine stitch along the rolled edge to hide the stitch and secure the binding.


