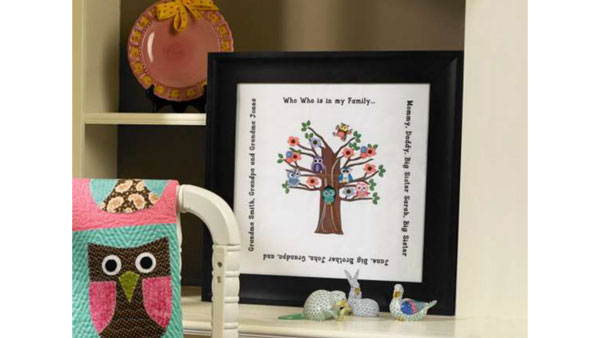
This embroidered take on a family tree makes great décor in a child’s room to teach them about their family. Add lettering to your embroidery designs using Palette software. The Baby Lock Destiny makes it easy to work with software and import your designs. Download printable instructions.
Materials:
- Flash Drive
- White canvas 24" x 24"
- Madeira embroidery thread
- Baby Lock Tear-Away stabilizer
- Temporary spray adhesive
- Basic sewing supplies
Tools:
- Baby Lock Destiny Sewing & Embroidery Machine
- Palette 10 Software
- Built-in Tree Owl design
Steps:
-
Tree Owl Design
-
With the embroidery machine on retrieve the Tree Owl design located under the Kids Corner category.
-
Click on Memory to save the design to the computer or to a flash drive.
-
-
Open the Palette Software program.
-
Set the workspace up with the 240mm x 360mm hoop.
-
Import the Tree Owl design from the machine or flash drive.
-
Add lettering to top and bottom of the design.
-
Click on the Text icon on the top toolbar.
-
With the properties open click on the down arrow and select the Vista Sans Alt Regular font.
-
Click on the down arrow and select the 15mm font size.
-
Select the color for the font.
-
Select the Not Sewn Line to deselect an outline around the font.
-
Select the Satin Stitch font. (Refer to the following illustration for the settings.)
-
In the Text Attribute field type in the phrase "Who Who is in my Family ..."
-
Place the phrase approximately 1 1/2" above the tree so that it fits in the frame.
-
To create the phrase below the design click on the Text icon while using the same font size color and stitch options. Type the names 1 1/2" below the tree.
-
Rotate this phrase so that it is upside down.
-
While holding down the CTRL key select both phrases.
-
Click on the down arrow under the Arrange icon and select Layout Horizontal Center to adjust the positioning.
-
Save the modified design to the flash drive.
-
-
Create the lettering designs for the sides.
-
Click on the New page icon on the top ribbon.
-
Click on the Text icon and select the same font size color and stitch options.
-
In the Text Attribute field type in the names for the right side of the tree. The size of the phrase should be approximately 12 1/2" long. Adjust according to the number of names.
-
Rotate the design.
-
Print out a template of the design.
-
Save the design to a flash drive or send directly to the machine.
-
Embroider this phrase on the right side of the tree.
-
To create the left lettering phrase open a new page.
-
Click Text icon. Type in other names.
-
Rotate the design.
-
Adjust the size of the lettering as needed.
-
For perfect placement print out a template of the design.
-
Save this design to the flash drive or send directly to the machine.
-
This phrase will be embroidered on the left side of the tree.
-
-
Center the white canvas fabric along with the tear-away stabilizer in the hoop.
-
Retrieve the design from the flash drive.
-
Embroider the design using Madeira embroidery threads. In the sample black thread was used for the lettering.
-
Remove the embroidered design from the hoop.
-
Pin the printed templates for the side lettering to each side of the embroidered design. Position them as desired.
-
Hoop the stabilizer and spray with the temporary spray adhesive.
-
Place the first template centered in the hoop with the cross-marks on the template centered in the hoop. Finger press smooth to secure.
-
Use the camera to line up the design.
-
Embroider the design.
-
Repeat Steps 12-15 for the other lettering phrase.


