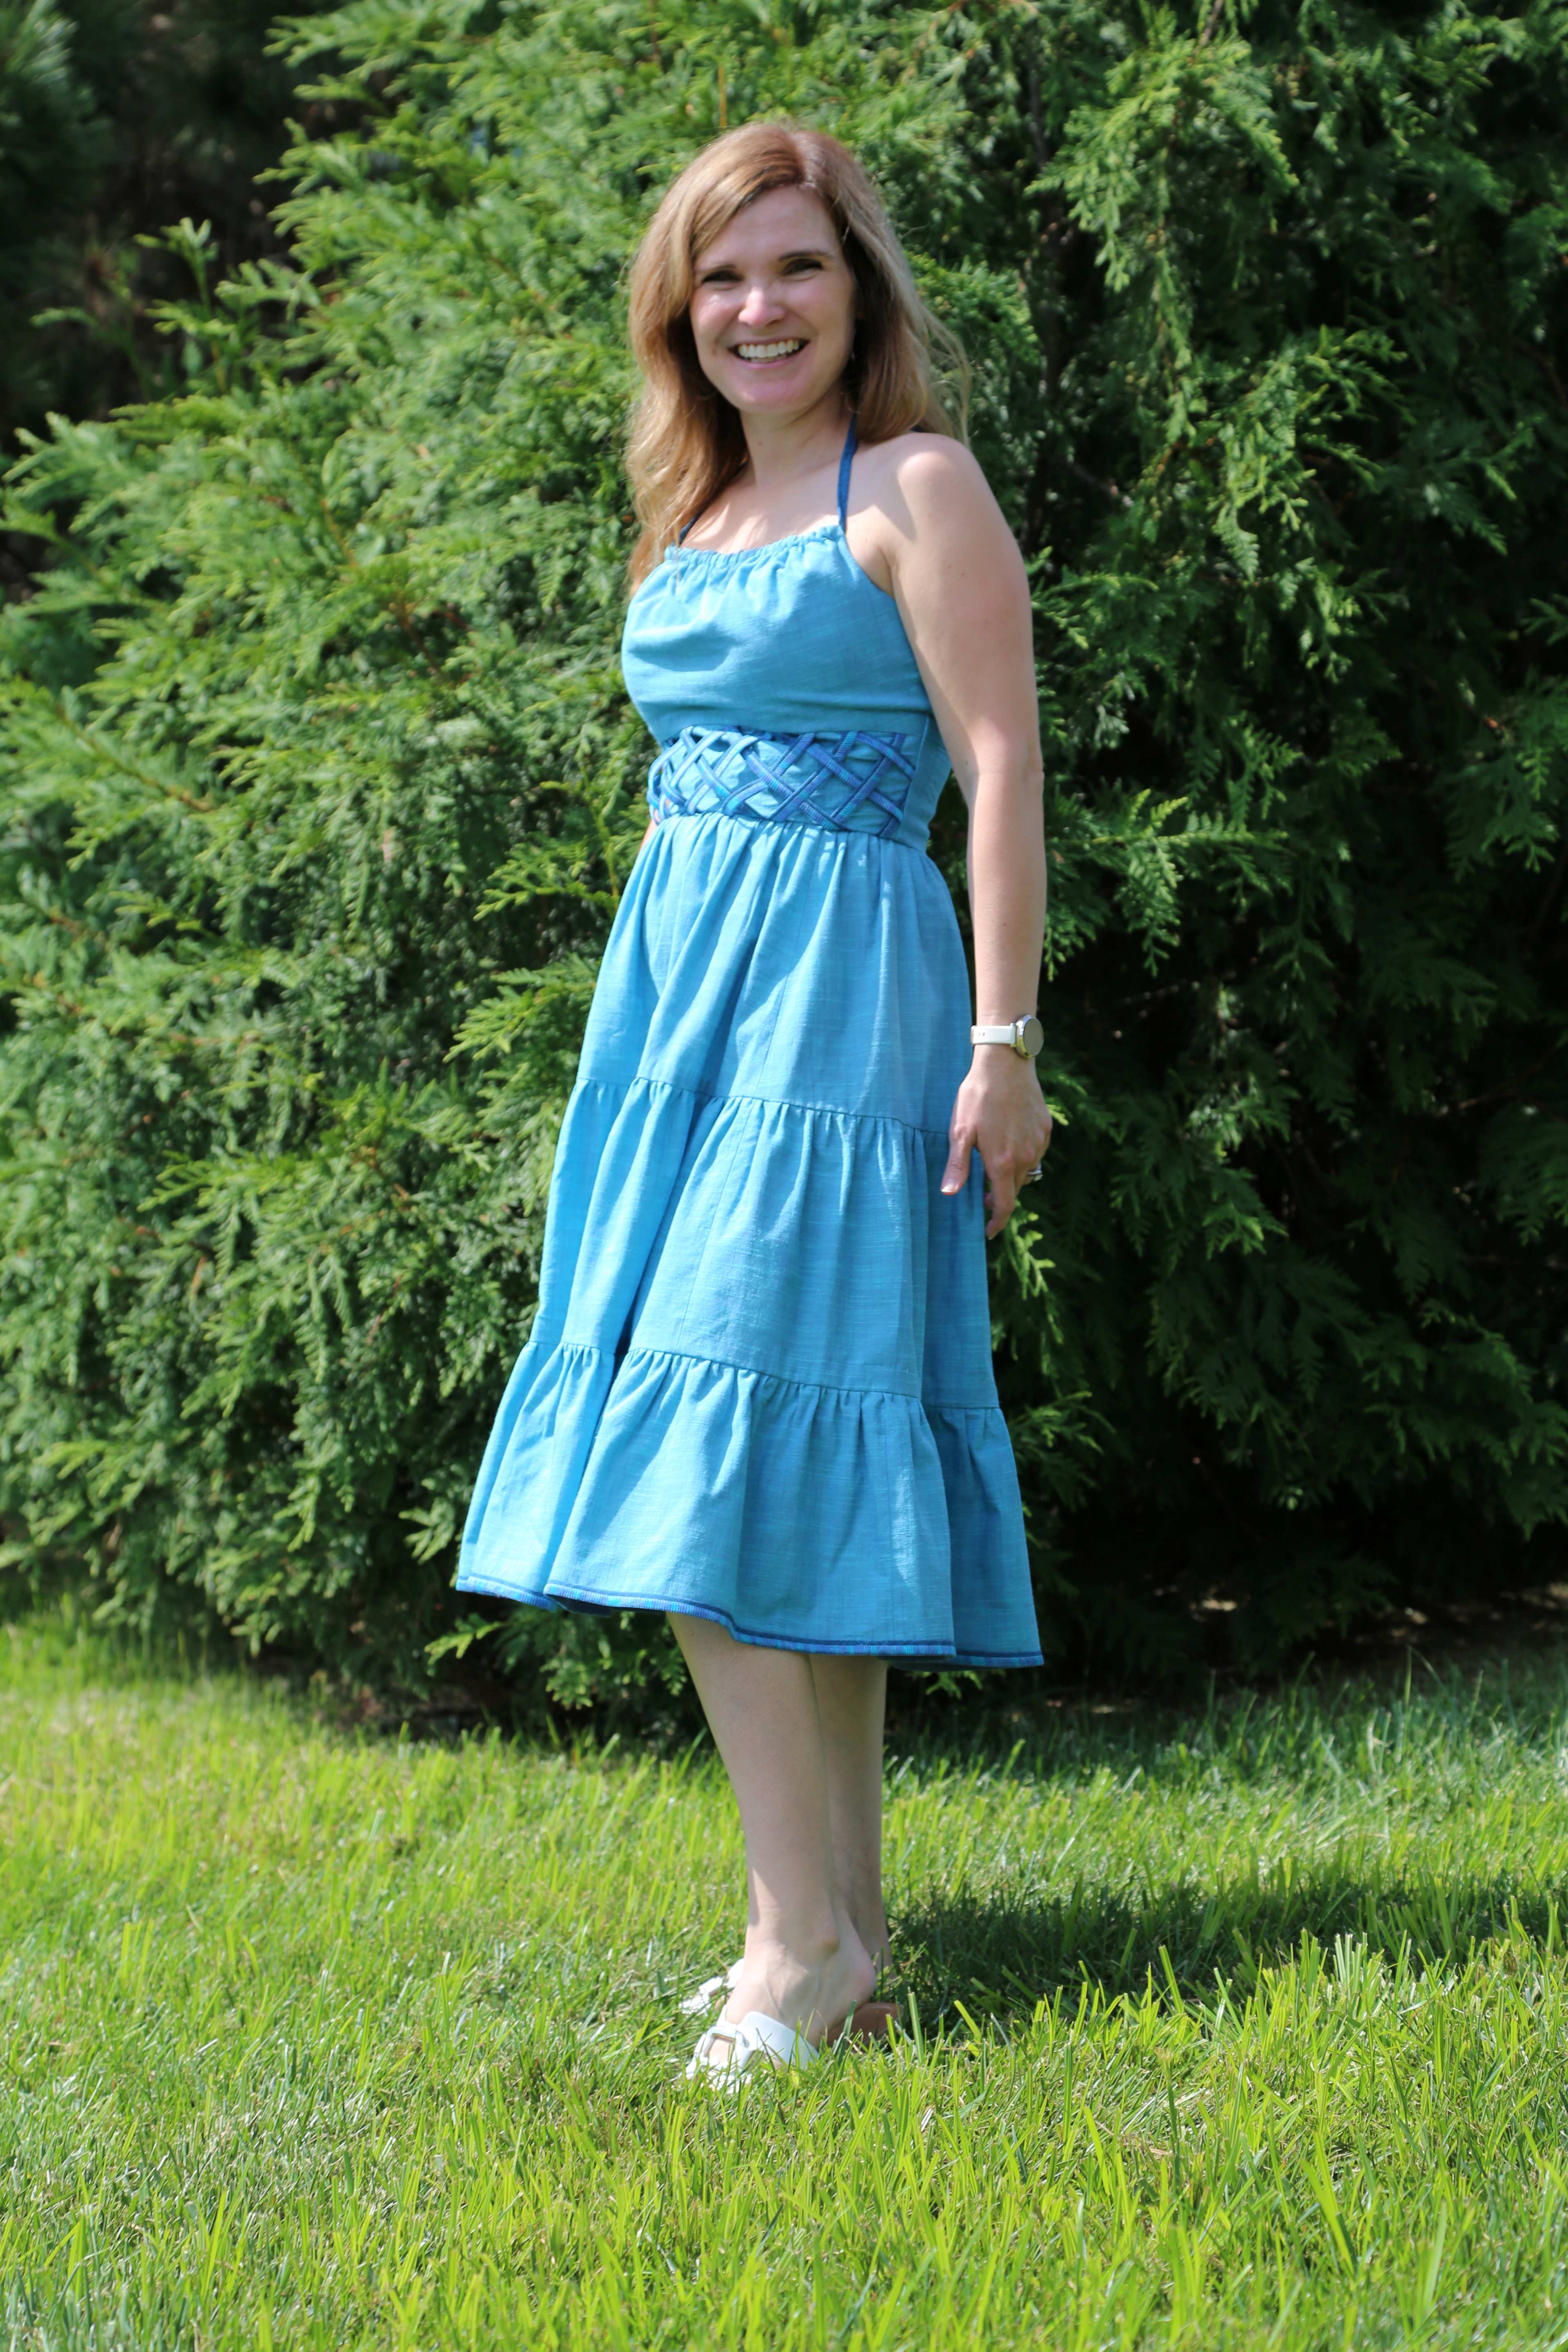
Make a Strappy Ruched Dress on a Serger
Your serger isn't just for garment seams, and the belt loop binder attachment does sew much more than just belt loops! Stephanie Struckman walks us through creating a beautiful ruched and tiered dress with woven details using the Serenity serger and accessories. Our overlock tables and compatible attachments allow your serger to perform even more techniques and to expand your creative skills.
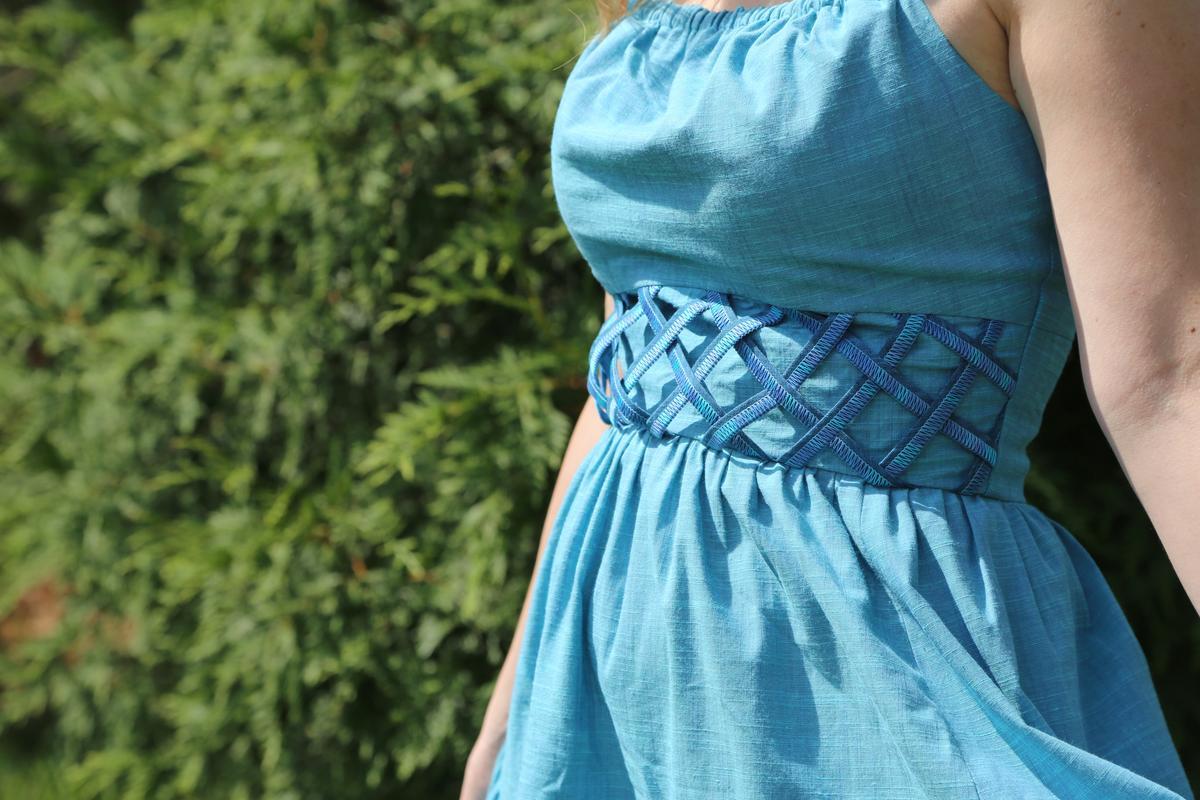
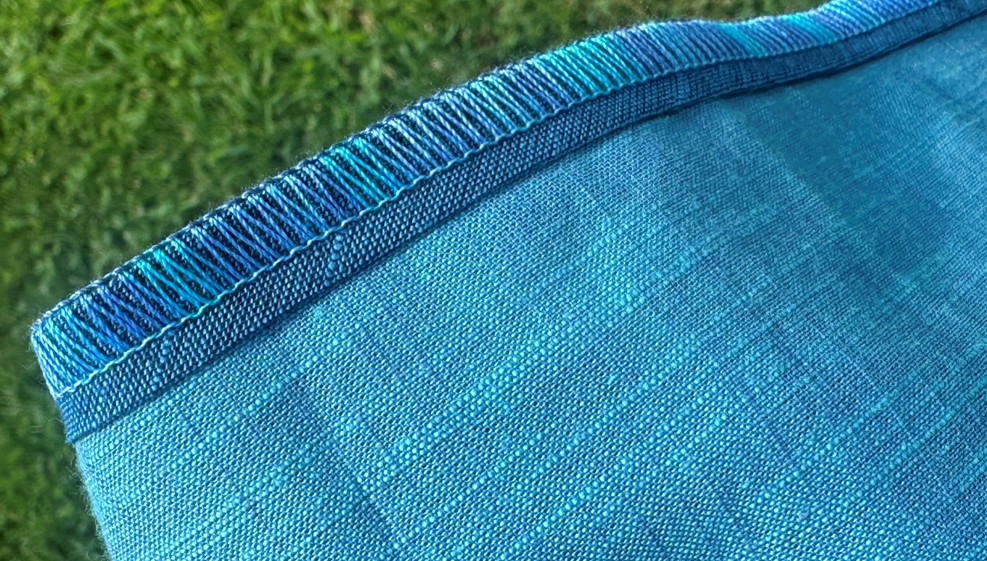
Get creative with your Serenity serger by adding decorative overlock stitches to fabric strips using the Belt Loop Binder and Single Fold Bias Binder on the Compact Overlock Table to add some pizzazz to your next garment project. In this tutorial, the Belt Loop Binder was used to create finished strips on a contrasting fabric that were then woven and added to the front midriff of this dress, using McCall Pattern 8211. The Single Fold Bias Binder was used to place a contrasting fabric and decorative stitch along the hem of the skirt. Use the same pattern or find a way to incorporate the same technique into a pattern of your own! Start with a pattern that uses woven fabric (as opposed to knit fabric).
Supplies
- Baby Lock Serenity
- Baby Lock Sewing Machine
- McCall's Pattern 8211
- Fabric and Notions according to pattern
- 1 yd. of complimentary/contrasting fabric for the woven strips and hem*
- Baby Lock Compact Overlock table
- Baby Lock ¾” Belt Loop Binder BLE8-S12
- Baby Lock Single Fold Bias Binder 40mm (or desired hem size) BLE8-S5
- Optional feet for gathering: Baby Lock Ruffling Foot (for serger or sewing machine; the Ruffling Foot for the sewing machine is shown in the tutorial)
- Standard Sewing Thread
- 3-4 spools serger thread to match fabric
- Decorative Thread for the Upper and Lower Loopers*
- Baby Lock Tear Away Firm Stabilizer BLT103
- Stiletto Tool (optional, but helpful)
- Printable instructions with additional photos (optional, but helpful)
*For the decorative serging in the project sample, 12 wt. Sulky Blendables Cotton Thread was used in the project sample. It is a variegated thread. I like to use the same weight threads in the upper and lower looper to get a nice balance on top and bottom. See the decorative serger strips that have been woven and applied to the front midriff (left), as well as the decorative bias hem (right) below.
Cutting and Interfacing Instructions
- Cut all pattern pieces according to your pattern and the garment you plan on sewing. Using McCall Pattern M8211, I cut all pattern pieces to make Dress C except for the rouching pieces (which is pattern pieces 6 and 7, Midriff Front C and Back C, respectively) so that I could just place the woven serger strips on top of the flat front midriff piece.
- Interface the outer Midriff Front and Back (pieces 3 and 4).
- For the woven serger strips: Cut strips for the ¾” Belt Loop Binder serger attachment, you’ll cut 7/8” bias strips from the coordinating fabric (see tip below). Bias is better for this project so that the weave that the strips are used for can move with the body. Cut 4-6 very long strips of bias to allow for practice/testing and for the woven area on the front midriff.
- For the decorative serger hem: Cut 1 ⅝” wide strips (see tip below) for the 40mm Single Fold Bias Binder, you’ll cut 5-6 very long bias strips. For the hem strips, miter them together to create one giant strip. Once mitered, press the seam allowances open as flat as you can get them. Trim off any dog ears. I also stitched each seam allowance down very near the raw edge with NO back stitch (minimizes bulk; see image below). This will help these bulky edges go through the Single Fold Bias Binder. Note: Only the Single Fold Bias Binder strips need to be mitered together; the Belt Loop Binder strips do not need to be mitered/sewn together.
Tip: How do you know what size strip to cut for the serger attachments? For starters, the attachment instructions tell you what size to cut strips for those attachments. However, if you’re anything like me, you can’t find the instructions quickly when you need them. I have found that if you measure the opening of where the fabric strip is initially inserted into, you get the measurement you need! This method has yet to fail me! See pictures below. Test out your specific fabric because you may just need to adjust slightly for different fabric thicknesses.
Construction Instructions
Creating the Woven Front Midriff
- For the Belt Loop Binder strips (that create the weave on the front midriff section), set the serger up for a 3-Thread Wide Overlock Stitch. Place decorative thread in the upper and lower loopers. Place matching standard serger thread in the O1 (left) needle. If the decorative thread slips off the spool too easily, consider using one of the sponge disks (included with your machine) below your thread spool OR placing a gray foam disk (shown in the image; can be purchased from your Baby Lock retailer SKU: M0-70010) under the thread spool and/or thread nets around the decorative thread spools.
- Start with the Stitch Width at the widest width and the Stitch Length at 2mm (and adjust to your preference when testing). Attach the Belt Loop Binder to the Compact Overlock Table. Ensure that the nose of the attachment is centered with the O1 and O2 needle notches on the front of the foot (there is no needle in the O2 needle position). The attachment may need to be adjusted as you test.
- Place one strip in the attachment. Use a stiletto or the allen wrench tool with your machine to feed the fabric strip into the attachment. Make sure the foot is raised. Then, use that same tool to push fabric out from the nose of the attachment to the needles under the foot. Lower the foot and start stitching slowly. As you serge, assess how the strip is coming out. Are both raw edges folding under and encased under the serger stitch? If not, move the attachment left or right and test some more to get the desired stitch. Adjust stitch width/length to your liking, as well. The stitch will not cover the entire width of the strip, but both sides of the strip should roll under and raw edges caught within the overlock stitch.
- Once you have several stitched strips, lay a piece of large tear-away firm stabilizer on a hard surface. It should be larger than the Midriff Front. Lay the interfaced Midriff Front on the center of the stabilizer. Place strips diagonally or straight up and down (depending on how you want the weave to look) over the Midriff Front. Cut them slightly longer than the Midriff Front so that you have many more strips to work with. Space them out as desired.
- Next, weave strips perpendicularly to the first strips that were laid down. Space them out according to your preference.
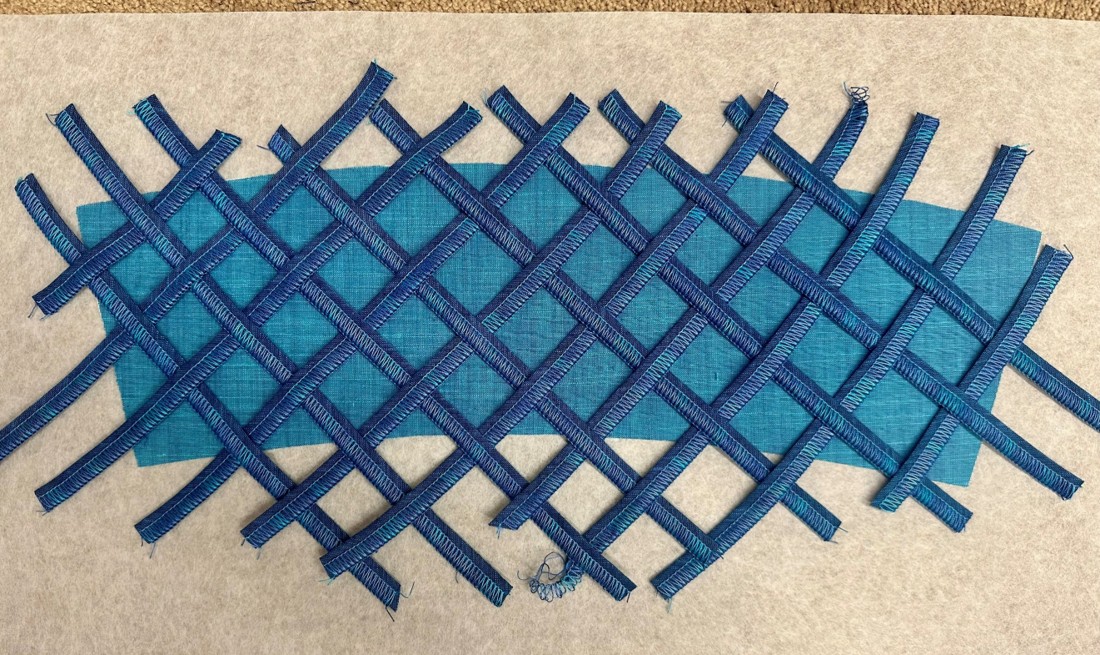
- Once you have the weave that you like, gently place another piece of the same tear away firm stabilizer on top and pin in several places to hold strips in place.
- Carefully move the entire piece to a sewing machine and baste straight lines approximately 2” apart vertically. Try to only baste within the perimeter of what will be the seam allowances of Midriff Front. Then, baste around the entire perimeter. All basting stitches will be removed. Their purpose is to hold all of the strips in place.
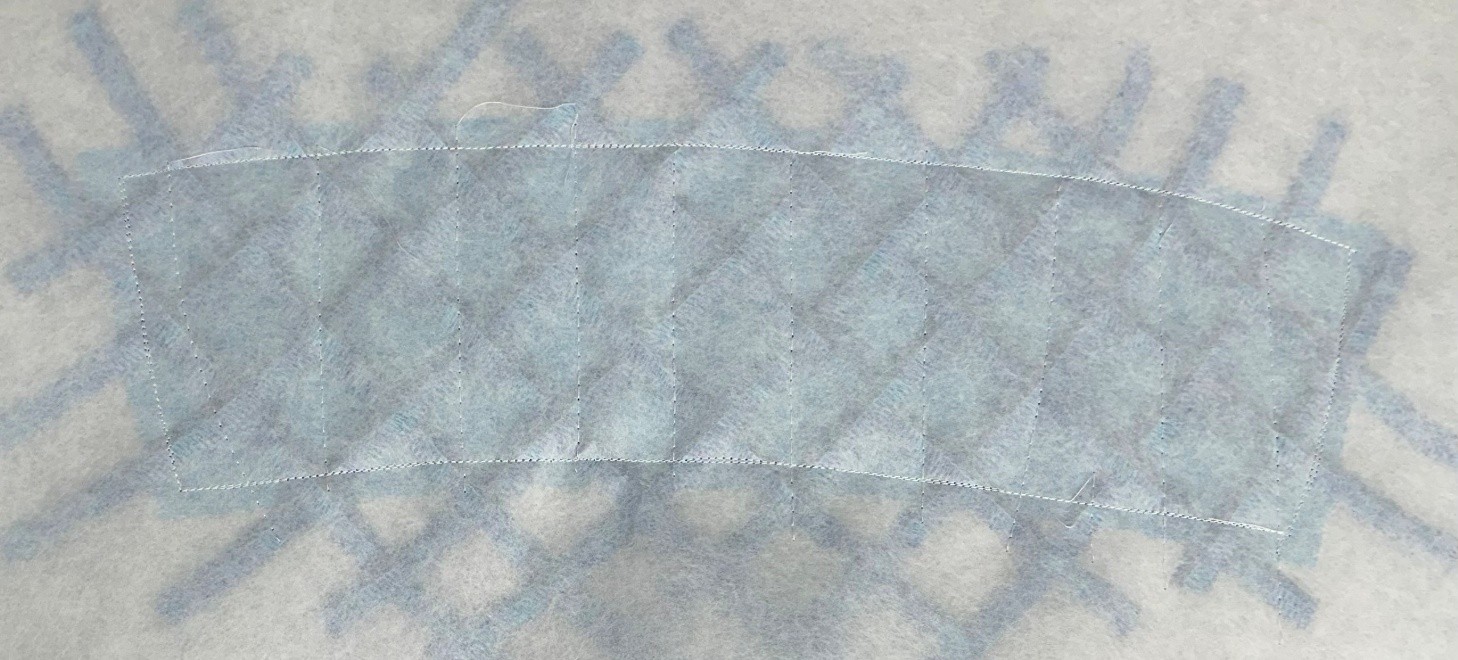
- Cautiously, tear away the stabilizer outside the perimeter stitching (you may need to remove some vertical line stitching outside of the perimeter stitching if any stitching is past the perimeter stitching).
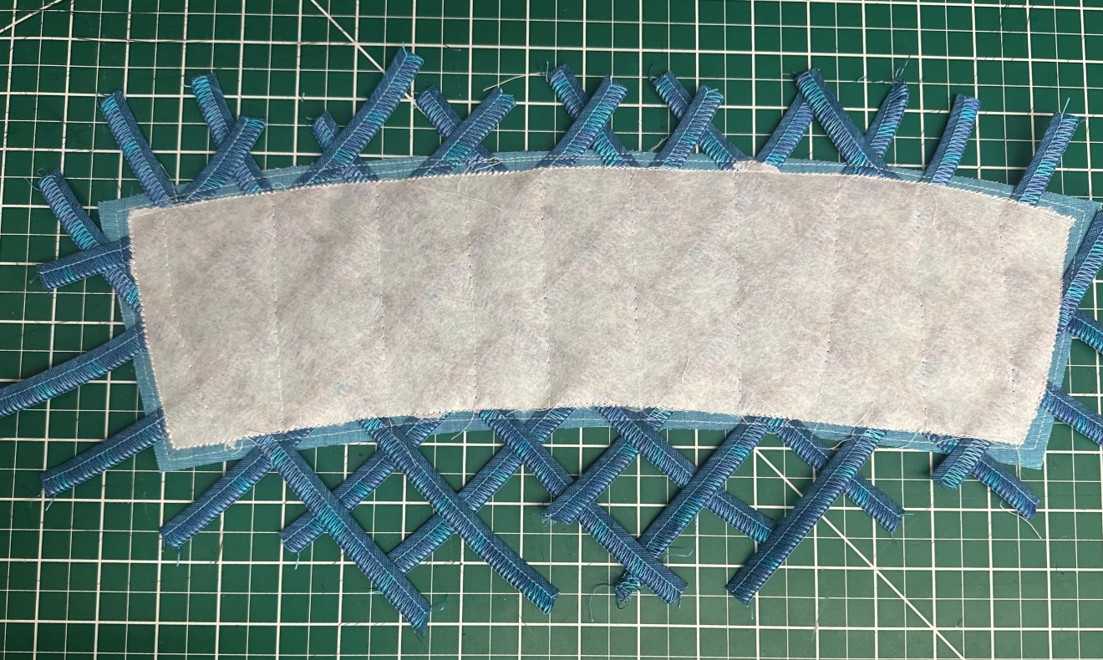
- Then, remove the vertical basting stitches and the remainder of the stabilizer. The midriff is complete! Set aside.
How to Hem the Dress with a Single Fold Bias Binder
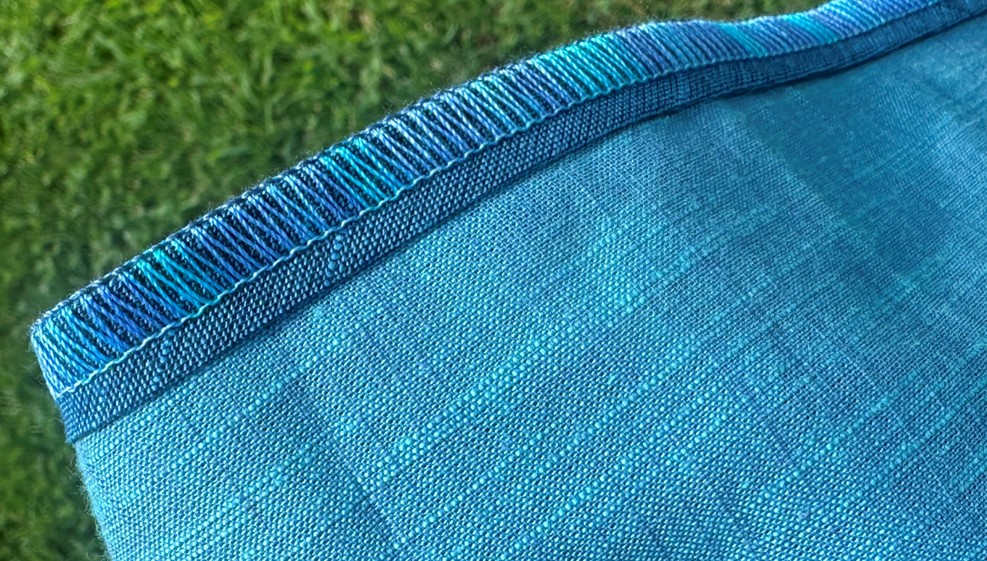
- If you would like to add a fancy serger hem with bias strips and the Single Fold Bias Binder, here are the steps I used. Using a basic 3-thread Overlock Stitch with standard serger thread, I serged all of the single-layered short edges of all skirt panels before sewing any seams together. Then, I serged the long edges (also single layers). You could serge all of the seams together, but I wanted really flat seams so that when fed through the Single Fold Bias Binder, it would be nice and flat. This is also helpful for the Ruffling Foot (used on the sewing machine; instructions below), which is how I gathered these long ruffles. Just to reiterate, before stitching any seams, I serged all raw edges of each skirt panel before sewing seams.
- Next, with the sewing machine, stitch all vertical skirt panel seams (except for the center back seams, leave those open on each tier) to create the long panel strips. Press all seams open and very flat.
- Take the longest, lowest skirt tier and the long bias strip specified in the Cutting Instructions for the Single Fold Bias Binder near the beginning of this tutorial. Ensure that the bias strip is about 1-2 feet longer than the lowest skirt tier. If it cuts it close, add more bias strip. You’ll want extra for the start and finish.
- Place the Single Fold Bias Binder on the Compact Overlock Table. Try to aim the area where the bias feeds out of the attachment toward the needles. You can adjust the attachment as you test. For a 3-thread Overlock Stitch, place standard serger thread in the left O1 needle (no needle in the right unless desired). Place decorative thread in the Upper and Lower Loopers. Start with a Stitch Length of 2.5mm and the widest width. Make sure the Stitch Selector is on the A setting.
- Run a test strip partially through the attachment by itself and adjust the attachment as necessary to get the placement of the stitch and strip correctly. Adjust any stitch settings, as needed. The folded/rolled edge should not be warped and the stitching should lie flat. The bottom side will just be a raw single layer under the rolled edge (this will sit on the underside of the hem when applied to fabric). Once the strip and stitch are turning and stitching nicely, try placing fabric into the slit where it is supposed to be inserted to run along with and finish the raw edge.
- When the practice stitch-outs look good, take the really long bias strip that you created earlier and place it into the attachment. Very important: make sure that the seam allowances will roll to the inside when passing through the attachment! Stitch to start the strip alone and ensure it looks good again. Once it’s ready, add the skirt tier into it (it is very important to check that the right side of the skirt tier is facing up)! Serge the strip onto the entire lower skirt tier. Take your time. Continually check to make sure all is well. Be careful and steady when passing mitered seams through the attachment. If needed, use a stiletto tool or the allen wrench that came with your machine to help position or move the strip through, watching to make sure nothing catches wrong anywhere. Try to watch for seams on the skirt tier and feed them through flat as they pass through the bias binder.
- Once the hem is complete and removed from the machine, you can trim the excess bias strip down or leave it as is (because it is bias, it will not fray). Now, each tier is ready for gathering!
How to Gather the Skirt Tiers
There are many ways to gather!
-
- Two Rows of Basting: If you prefer the timeless method of stitching two rows of basting stitches and gathering, by all means use that method!
- Serger Gathering: You can also use the serger to gather by setting up the machine for a 4-thread Overlock stitch, changing the Stitch Length to 4, and moving the Differential Feed all the way up to 2. There’s also a Ruffling Foot for the serger that encourages it to ruffle up more. If you use this method and need to pull the gathers in more, just use the needle threads to cinch the gathers in further.
- Using the Sewing Machine Ruffling Foot: The Ruffling Foot has also been around for a long while and takes a little know-how and practice, but it is great for perfectly even/regular gathers. The only drawback is once it’s stitched the gathers are stationary. If you want to give this method a whirl, the tutorial is below.
How to Gather with the Sewing Machine Ruffling Foot
- Place the Ruffling Foot on your sewing machine. For starters, you’ll want to watch this video to familiarize yourself with the Ruffling Foot. Make sure to use the CENTER justified Straight Stitch on your sewing machine with this foot!
- Next, we need to figure out what settings to put on the foot. To do that, we’ll want to run some test fabric through the foot to get the correct ratio of gathers so that each gathered tier matches with the flat fabric it will be seaming too.
- First, lay out your skirt tiers and measure them (you can fold them in half and measure them that way; it’s a little more manageable and you get the same ratio). Find the ratio difference between them. To do that, divide the length of the longer tier by the length of the tier directly above it (do this for all 3 tiers that will be gathered – the ratio will likely be consistent). I found that my number came out to 1.75” to every 1” for the pattern I used. If you are using the same pattern, I’d imagine yours will come out to be the same. But, it’s good to know how to do this to get the correct ratio. So, as you can tell, it does not come out to a 2:1 ratio; each tier is not quite double the tier above it. Note: In the image below, the Front Midriff Panel is not folded in half, but when measuring, either everything is folded in half and measured that way or everything is laid our flat.
- This number/ratio that we found allows us to do a smaller scale test with practice fabric. Cut a 2-3” wide strip at 10” long of the same or similar fabric you’ll be using. Multiply 10” by 1.75 and you get 17.5”. Cut another 2-3” wide strip at 17.5”. Now, the task is to get the 17.5” strip to gather up as close as possible to the 10” strip.
- At the machine, start with a 3mm Stitch Length for your Center Straight Stitch and set the foot to gather every 6 stitches at a depth of 2. Try running the 17.5” strip through and see how close the gathered strip is to the 10” strip. If the gathered strip is less than the flat strip, try changing the Stitch Length to 3.5mm or adjust the depth on the foot toward 1. If the gathered strip is a tiny bit smaller, sometimes you can gently “stretch” it to fit, but only slightly – so you don’t want it to be terribly smaller than the ungathered strip. Test until you can get the strip as close to 10” as possible. If the gathered strip is a tiny bit larger, that is ok. You can pin it to fit. If it’s quite larger, it will be a lot to pin in. So, if it is a lot larger, try adjusting the Stitch Length to 2.5mm or adjust the depth toward 3 on the foot.
- Once you’ve got the settings down, you can gather the top edge of each tier. Place the start of the fabric into the foot. If you have a serger tail, it can assist with getting the fabric in (as shown in the left image below). I also like to place the fabric within the guide on the foot (lower pink arrow in the left image). You don’t have to place it in the guide if you feel that you can keep the fabric straight, but it does help keep the gathered allowance even. However, seam allowances (right image below) tend to be bulky so I remove the fabric from the guide before and while the seam allowance passes through the foot. Once the seam has passed through the foot, I put the fabric edge back in the guide. Sometimes you need to help seam allowances through the gathering part of the foot with a stiletto tool.
- After all edges are gathered, place the Standard Sewing Foot back on the machine and use the preferred justified Straight Stitch to get a 5/8” seam allowance. Start from top to bottom or bottom to top. Pin the gathered edges to fit the straight edge of the tier above it, matching ends and centers accordingly. Stitch seams.
- After the tiers are stitched together, sew the Center Back Seam (leaving the zipper area open as noted by the pattern). Make sure the hem edges are perfectly even so that they look nice on the outside.
- After stitching, press the Center Back seam open. Along the hem, I used a coordinating thread and stitched the seam allowance down (stitching from the top side). I made sure the seam allowance laid flat on the backside and stitched right next to (and parallel to) the decorative serger stitch on the hem (just within the ½” or so away from the seam where the seam allowance on the underside is) so that it would hold the hem area of the Center Back seam allowance flat and open on the backside. Trim threads.
- Finish the rest of the garment as you would normally, stitching the Front Midriff piece in as it would be in the pattern (without the rouching). Happy Stitching!
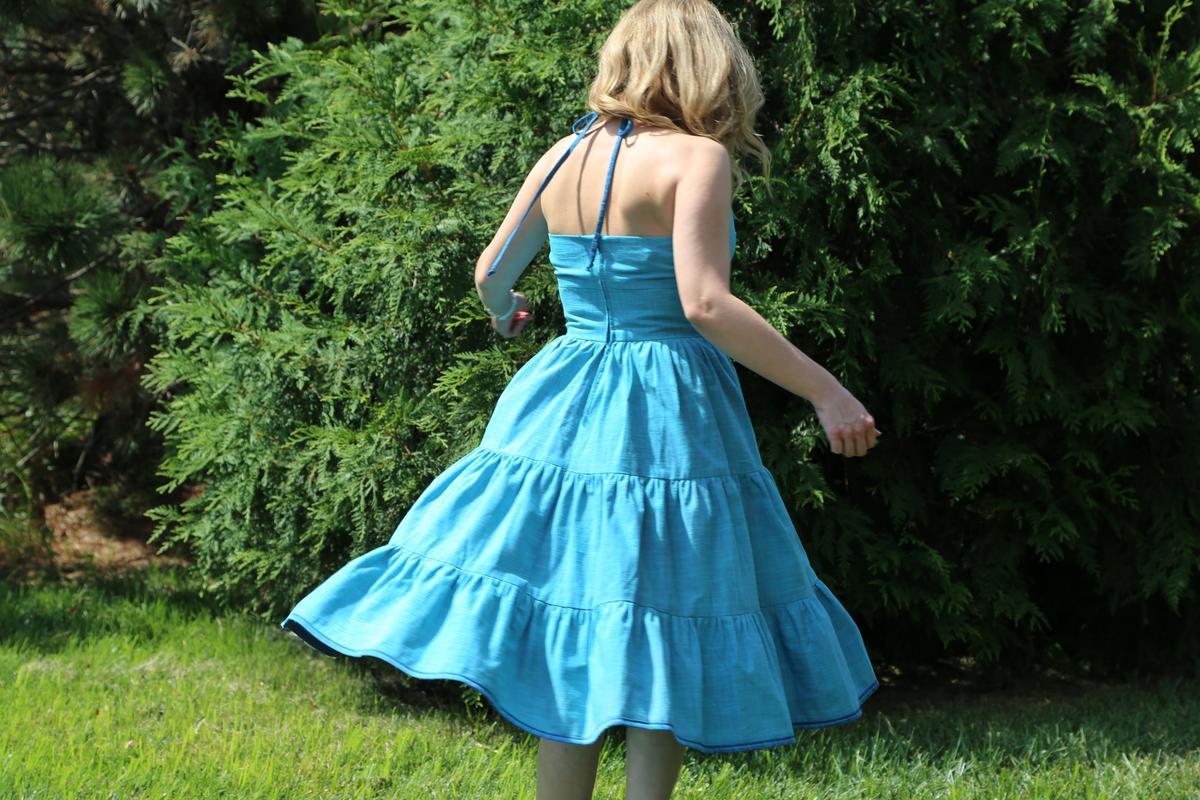
For other exciting projects like this one, visit our website at www.babylock.com.
©2026 Baby Lock USA. This project may be freely used by individuals for non-commercial purposes. Project instructions may not be sold or distributed without approval from Baby Lock. Baby Lock must be acknowledged as the source of the project instructions through copyright or online link.