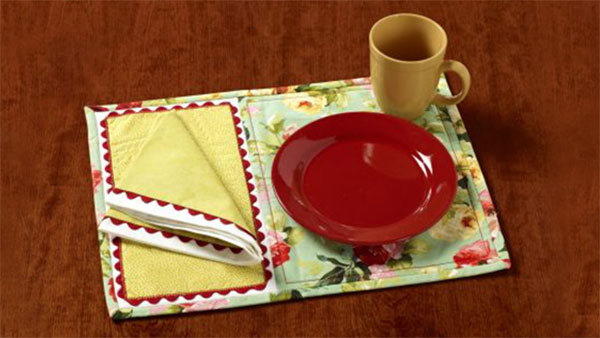
These placemats are the perfect touch for any springtime brunch setting. Use them on Mother’s Day or any other gathering and guests are sure to be impressed. No one will believe how easy it all was to make. Download printable instructions.
Materials:
- 1/3 yard of 45” wide floral cotton fabric
- ¾ yard¾ yard of 45” white on white cotton fabric of 45” white on white cotton fabric
- ½ yard of 45” white cotton for backing of placemats
- 3 packages of red jumbo rickrack
- Quilt batting
- Assortment of embroidery threads that coordinate with floral fabric
- Water soluble marker
- Rotary cutting system
- Madeira Aerofill All-purpose Thread
- Basic sewing supplies
Tools:
Steps:
-
Using the Kiwi fabric cut two sections that measure 6” x 11½”. The directions and supplies will make two placemats and napkins
-
Pin the kiwi colored 6” x 11½” sections to the white on white fabric and sandwich the red rickrack between the two layers. Baste all three layers together.
-
Thread the sewing machine with cherry red embroidery thread and set the machine for a small zigzag. Stitch around the kiwi section twice encasing the raw edges of the kiwi fabric.
-
Thread the sewing machine with kiwi green embroidery thread and set the machine for a small blanket stitch.
-
Stitch around the designs again covering the cherry red zigzag stitches making sure the kiwi green thread just meets the edges of the cherry red zigzags.
-
Trim each section to measure 7¼” x 13”.
-
-
From the floral fabric cut two pieces measuring 10¼” x 13”. Stitch one of these to each of the kiwi sections along the right side. Press.
-
Cut the quilt batting and the backing to fit the placemats. Baste the layers together.
-
Quilt the floral fabric as desired. The sample shows simple straight stitching along the edges.
-
Bind each placemat with floral fabric binding.
-
For the napkins cut two 18” squares from the dotted kiwi green fabric and two 16½” squares from the white on white fabric.
-
Mark each corner with a water soluble marker for the perfect 1” miter. Stitch the miters trim and press flat folding all of the edges in 1”.
-
Layer the kiwi green squares on top of the white on white squares matching the mitered corners. Between the layers sandwich the red rickrack pin securely.
-
Top-stitch the layers together using kiwi green thread. Press.


