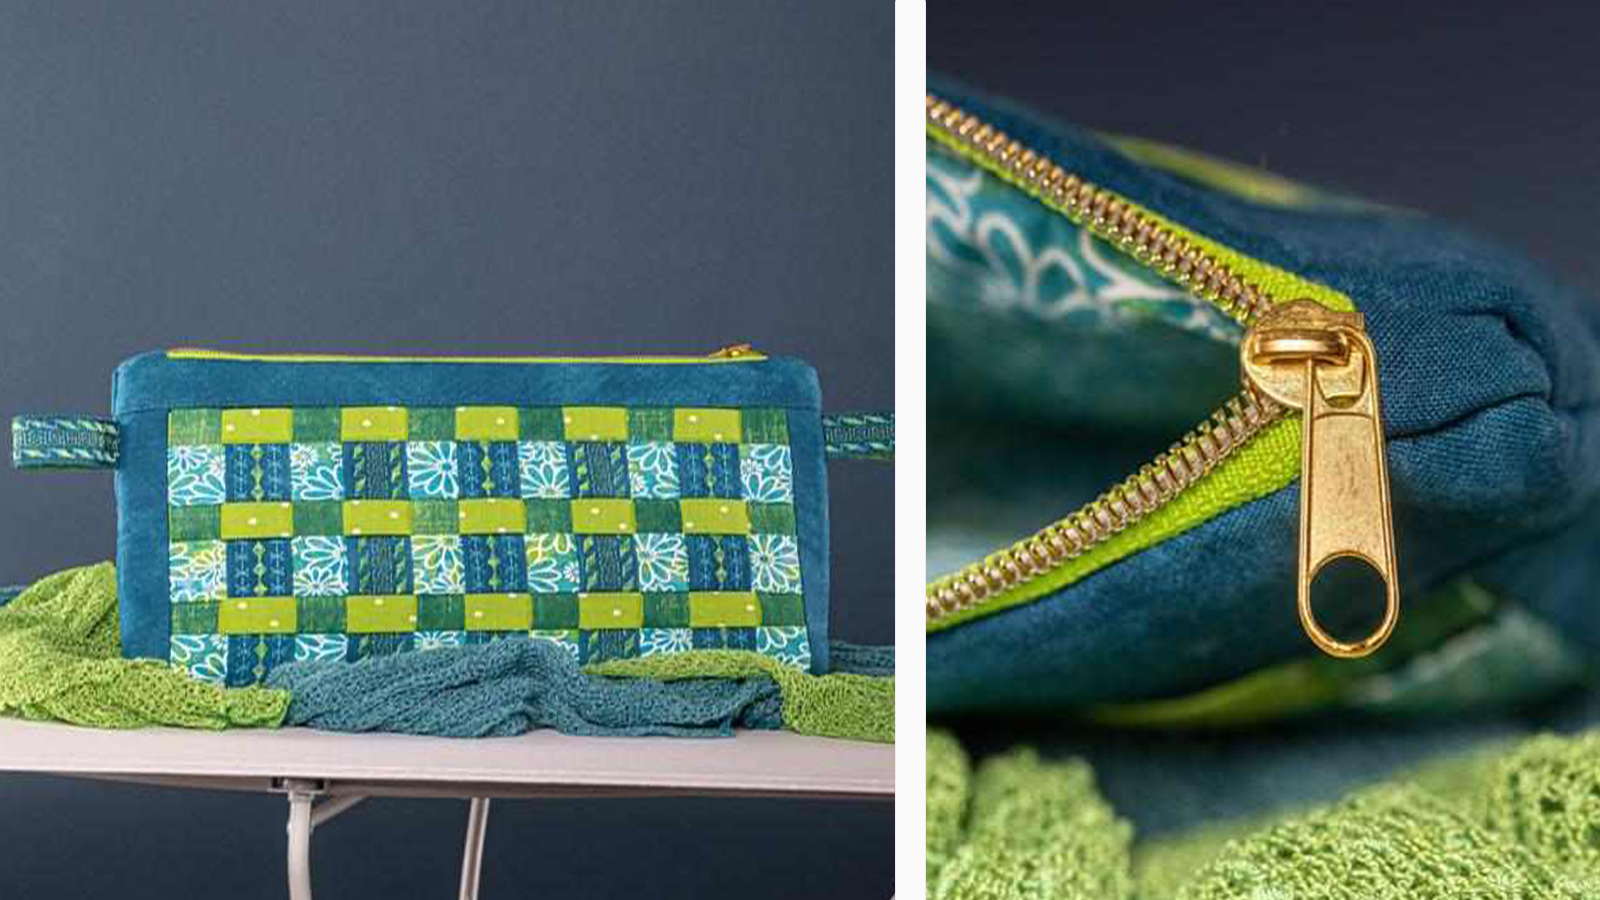
Create this beautiful clutch using your sewing machine and weaving strips of your favorite fabric prints together. You can can even use fun decorative stitches on your sewing machine to embellish some of the strips. The end result is a beautiful woven clutch you can take with you for any occasion.
CLICK HERE TO DOWNLOAD PRINTABLE INSTRUCTIONS WITH ADDITIONAL PHOTOS.
Supplies
- Baby Lock Allegro Sewing Machine zipper foot standard foot stitch-in-the-ditch foot
- Madeira embroidery thread three coordinating colors
- Bobbin weight thread
- Madeira sewing thread to match
- 80/12 machine needle Universal or Embroidery
- Washable glue Elmer's Washable School Glue or Roxanne's Glue Baste-it are examples
- 2 sheets Print & Stick Target Paper (by DIME) and printer
- PDF files named “DIAGRAM FOR CUTTING FELT RIGHT SIDE” and “DIAGRAM FOR CUTTING FELT LEFT SIDE
- DOWNLOAD FILES HERE
- Rotary cutter ruler iron pressing surface starch fabric marker or chalk
- Wash Away Wonder Tape®
- X-Acto knife®
- Baby Lock Stick-Tear Tear Away Embroidery Stabilizer to cover 15'' x 15'' area
- Baby Lock Ultra Soft Fusible Interfacing to cover 11'' x 15'' area plus another 11'' x 16'' piece to be sub cut later
- Purse weight (#4.5 coil) Zipper-by-the-yard—12'' and one zipper pull
- 4 cotton quilt weight fabrics details follow. Use project photo as a reference for colors and fabric placement
- Acrylic or wool blend felt 12'' x 16''
- 7/8'' grosgrain ribbon 15''
Fabric: Strips for Weaving
- Flower print—cut one 15'' x 13''. Starch then sub cut into six 2.5'' x 13'' strips
- Bright green—cut one 10.5'' x 13''. Starch then sub cut into seven 1.5'' x 13'' strips
- Dark green—cut one 9'' x 15''. Starch then sub cut into six 1.5'' x 15'' strips
- Blue fabric—cut one 15'' x 15''. Starch. Cut one 15'' x 15'' Sticky-back tear away stabilizer. Remove paper backing from the stabilizer and apply to the wrong side of the blue fabric. Set aside.
- Blue fabric—cut one 3'' x 16''. Cut one 3'' x 16'' Ultra Soft Fusible Interfacing. Fuse interfacing to the wrong side of the blue fabric. Sub cut into two 1.5'' x 16'' strips.
- Blue fabric—cut one 4'' x 12''. Cut one 4'' x 12'' Ultra Soft Fusible Interfacing.. Fuse the interfacing to the wrong side of the blue fabric. Sub cut into two 2'' x 12'' strips.
- Zipper tabs—cut one 4'' x 3.5''. Cut one 4'' x 3.5'' Ultra Soft Fusible Interfacing.. Fuse the interfacing to the wrong side of the blue fabric. Sub cut into two 4'' x 1.75'' strips.
- For lining cut two Flower print—7.75'' x 12''
Getting Creative
Thread: You can use standard 40-weight Madeira Rayon or Polyester Embroidery Thread. If you want more of a matte finish consider a Madeira Polyester 40-weight Sewing or Frosted Matt Thread. With any of the above options use a Klassé 80/12 Embroidery or Universal Needle.
Stabilizer: I highly recommend the Baby Lock Stick-Tear Tear Away Embroidery Stabilizer to support the decorative stitching this project. It gives great stability for the design and gently tears away. The Baby Lock Ultra Soft Fusible Interfacing adds extra support and body to the structure of the clutch.
Print & Stick Target Paper: This product is for inkjet and laser printers. It helps you create adhesive templates that stay put! Another use is for auditioning embroidery or quilting patterns. Print should show on the matte side. The shiny side is the paper backing. Removing the paper backing reveals the sticky side that will be temporarily adhered to the 12'' x 16'' felt.
Instructions
Note: Please refer to the download instruction link above to view all photos referenced in the below steps.
- Mark the horizontal and vertical centers of the 12'' x 16'' felt as shown below.
- Print the two PDF files onto the Print & Stick. Make sure to print at 100%. Remove the paper backing from the Print & Stick and align the vertical and horizontal lines with the marks on the felt.
- Use the X-Act knife to cut slits into the felt using the template as your guide. Cut on the red lines only.
- Prepare the strips that are not embellished with the decorative stitches. There are 19 of them. Six are the print fabric. Seven are dark green and six are bright green. Fold in half lengthwise and lightly press with iron to create center line. Open the fold and bring long raw edge to center line and press. Repeat for remaining long raw edge. Open the fold and apply a small bit of glue. Re-fold and press to dry the glue
- Mark the blue fabric 15'' x 15'' piece as shown below. The red dotted lines represent the centers of each strip that will be embellished with decorative stitches. The black lines represent the cutting lines. After the strips are embellished and cut apart they will be trimmed to 2'' wide.
- Now to the sewing machine! The project photo shows using a combination of stitch numbers 145 146 087 and 039. Stitch as desired using the patterns you prefer. In the photo stitch numbers 146 and 087 are stitched following the dotted lines. Stitch numbers 145 and 039 are applied on each side of the dotted lines. Use embroidery bobbin thread.
- When the stitching is complete cut the strips apart on the black lines. The strips will be a bit too wide initially. Trim the strips to 2'' wide making sure to keep the decorative stitches centered within the 2'' strip.
- At the ironing surface repeat the pressing-folding and gluing process as described in step 4 for each of the six strips. The strips need to finish at 1'' wide. Remember to keeps the decorative stitches centered within the 1'' folded strip. Set aside.
- Gather together all of the prepared fabric strips and the felt. Time to weave! Follow the steps below:
- Decorative stitch strips are first. Keep the strips flat smooth and right side up.
- Print strips are second. Weave each of them underneath the previously woven strips.
- Stitch down the free ends of the print strips as shown. This creates a “channel” to accommodate the next set of strips.
- Next the dark green strips are woven underneath the print strips.
- Stitch down the free ends of the dark green strips as shown. This creates a “channel” to accommodate the next set of strips.
- Finally the bright green strips are woven underneath the dark green strips.
- Stitch down all the free ends. After stitching trim each end approximately ¼'' from the stitching.
- Flip the woven unit to the wrong side. Center the 11'' x 15'' Ultra Soft Fusible Interfacing and fuse. Use a press cloth.
- To prepare the zipper: Install the pull on the zipper . Mark the zipper as shown below.
- Note: The zipper will be applied to the 12'' ends
- Zipper tabs: Mark a line in the center of the tab on the interfacing side. This will be the sewing line
- On one end align the sewing line drawn on the tab with the line drawn on the zipper. Stitch on the line and then two more times approximately 1/8'' apart. Trim zipper near the stitching. Repeat for other end of zipper.
- Fold the tabs so the interfacing sides are together. Lightly press. Trim to match the width of the zipper. Trim the unit so it measures 12'' long. Set aside.
- The outer edges of the bright green strips will serve as the sewing line to attach each of the two 2'' x 12'' strips.
- Draw a line on the interfacing side of the 2'' x 12'' strip ¼'' on one long edge. Repeat for other 2'' x 12'' strip. Align this line with the sewing line on the woven unit right sides together. Stitch. Repeat for other end of woven unit. Press the sewn strips away from the center of the woven unit. Repeat this step for the 1.5'' x 16'' strips. After all the strips are sewn it should look like the image below.
- For the “handles” Place the ribbon wrong sides together with the remaining blue decorative stitch strip carefully aligning long edges. Use Wonder Tape® to hold securely. Top stitch along the long edges to connect the ribbon to the strip. Cut into two equal 5'' pieces. Fold in half to meet the short edges. Decorative stitches are on the outside. Baste the ends together. Position on the woven unit as shown below. Baste in place ¼'' from raw edges.
- Place the zipper unit right sides together with a 12'' edge of the woven unit. Using a zipper foot stitch ¼ '' away from the raw edges. Use Wonder Tape® to help hold the zipper unit in place for accurate sewing. (Handles are not shown in the following images.)
- Place a 7.75'' x 12'' lining piece right sides together with the woven unit. Sew though all layers again using a ¼ '' seam allowance. Press lining away from zipper.
- Repeat steps 26 and 27 to attach the remaining zipper edge to the other 12'' end of the woven unit and lining.
- VERY IMPORTANT! Unzip the zipper. Place the woven unit right sides with itself and the lining pieces right sides together. Stitch the remaining 3 sides of the woven unit with a ¼ '' seam allowance. (pink lines) Stitch the remaining three sides of the lining keeping an opening in the bottom edge as shown. (Black line) Be sure to back stitch at the opening.
- Box the corners of the woven unit as well as the corners of the lining. Trim to ¼ ''.
- Turn the bag right sides out through the opening in the bottom of the lining. Close the opening in the lining by hand or machine. Push the lining inside the bag. Carefully push out the zipper edge corners as well and the boxed corners. Press carefully.


