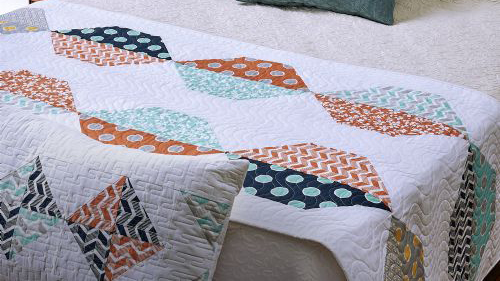
Give your room a touch of high end luxury with a bed scarf customized by you to fit and match with your bedroom decor. The Baby Lock Jazz and the Coronet will make it easy to piece and quilt your bed scarf. Click here to download Instructions.
Materials:
- 1 Fat quarter bundle with assorted prints
- 2 Yards of white fabric for sashing
- Backing fabric
- Madeira® Cotona thread for piecing
- Madeira Quilting Thread
- Batting
- Rotary cutter and mat
- 3” x 18” Straight edge ruler
- Basic sewing supplies
Tools:
- Baby Lock Coronet quilting machine
- Baby Lock Jazz sewing machine
Steps:
-
From the fabrics cut the following:
-
From the 10 fat quarters cut 20 sections 5.5 inches x 15.5 inches
-
Cut 40.5-inch squares from the white fabric.
-
-
On each of the 5.5-inch white sections draw a diagonal line from corner to corner
-
Pin the two squares on each end of the 5.5-inch x 15.5-inch section
-
Thread the Baby Lock Jazz machine. Select straight stitch #1.
-
Sew on the drawn line on both sides of the pinned section. Sew the other 19 sections.
-
Trim each of the sections ¼ inches from the stitched line. Tip: Use the scrapes to make a pillow or any other quilting project.
-
Press the seam outward.
-
Determine the placement of the sections by laying the sections on a flat surface with the long side of the colorful sections next to each another.
-
Create four rows with the 5.5-inch white sashing section centered between two of the rows.
-
Make any placement adjustments before you sew the rows together.
-
-
Sew the sections together on the short end to make rows. Press the seams outward. Make two rows.
-
Sew the sashing to the long side on one of the rows then sew the other row to the opposite edge of the sashing strip.
-
If you wish the quilt to be wider sew a 4-inch wide sashing strip to each side of the pieced top. Press seams.
-
-
Layer the backing batting and the quilt top on a flat surface. Use adhesive spray to hold the layers together during quilting or pin the layers together.
-
Clamp the quilt to the top take up roller on the Baby Lock Coronet quilting machine.
-
Place the quilt sandwich on the frame with the left side of the quilt 6 inches to 8 inches from the edge and top edge of the quilt sandwich under then up and over the back of the roller.
-
Clamp in place with the smaller clamps. Repeat for the remaining portion of the quilt top.
-
Clamp the front of the quilt to the front roller using the larger clamps.
-
Clamp the right edge of the quilt.
-
-
Thread the machine. Adjust the tension on the bobbin and place the bobbin in the machine.
-
Set the machine to regulated mode with the stitches set to 12 stitches per length.
-
Test for proper tension using a scrap of fabric attached to the side of the quilt. Adjust the top tension as needed.
-
-
Baste 1/8 inches from the edge starting on the left side across the top edge.
-
Quilt the layers together using your favorite stipple or quilt pattern.
-
After your first pass has been completed remove the clamps from the back and front rollers.
-
Pull the quilt upward and re-clamp the top roller with the clamps. Re-clamp the side and the front edges.
-
Use the C clamps to stop the top edge from flopping over onto the portion of the quilt that you will be working on.
-
-
Continue with quilting until you have quilted the entire surface.
-
Remove the quilt from the frame.
-
Trim the edges around the quilt so that the quilt is square.
-
To bind cut several 2.5-inch strips across the width of the white fabric for the binding. Piece the sections together to form one long continuous strip.
-
Fold the wrong sides together along the long edge and press.
-
On one of the short ends fold in at a 45-degree angle on one of the short ends and press.
-
Place the raw edge of the binding along the outer edge of the quilt starting 6” from the top corner and pin in place.
-
Using a 1/4-inch seam allowance start to sew 4 inches from the top edge of the binding and continue down the first side of the quilt.
-
Stop when you are ¼ inches from the corner and backstitch. Cut the thread.
-
-
Remove the quilt from the machine. Fold the binding up and then down over the second side of the quilt so that the raw edges are even. This will create a 45 degree corner.
-
Pin in place and sew the second side of the quilt. Stop 1/4 inch from the second corner; backstitch and cut the thread.
-
Pin in place and sew the second side of the quilt. Stop 1/4 inch from the second corner; backstitch and cut the thread.
-
-
Follow the above steps to finish sewing the binding to the remaining sides on the quilt.
-
When you turn the last corner trim the end on the binding so that it overlaps past the starting point on the binding.
-
Tuck the binding inside the beginning point of the binding and sew in place.
-
-
Press the binding to the back of the quilt.
-
To finish your quilt hand-sew the binding to the back of the quilt.


