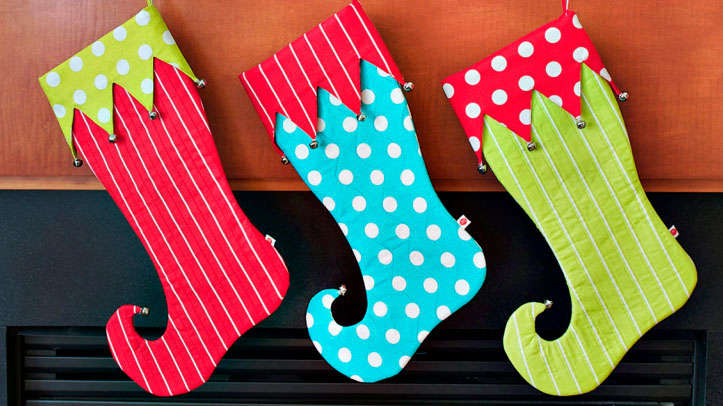
Brighten up your fireplace this holiday season with this colorful elf-inspired stocking. This simple Christmas project comes together quickly with an easy-to-follow pattern and in no time you'll have a fun place for Santa to put tiny gifts! Download pattern and printable instructions.
Materials:
- Fabric
- Fabric
- Fusible fleece
- Thread
- Ornamentation for stocking
- Sewing pins
- Fabric scissors
- Paper scissors
- Tape
- Tracing paper
- Tracing wheel or water-soluble fabric marker
Tools:
- Baby Lock Sewing Machine
Steps:
-
Prepare pattern pieces
-
Print all patttern pieces at 100% (no scaling).
-
Cut pattern pieces on the outer solid line (including the shaded areas).
-
Overlap the shaded areas as indicated on the pattern pieces and tape together to form your lower “sock” pattern piece. This will be referred to as Pattern Piece A.
-
Cut Pattern Piece B along the outer solid lines only (do NOT cut along the diagonal dashed lines).
-
-
Cut the Fabric Pieces
-
Pattern Piece A (Sock): cut two pieces of the first fabric and two of the fusible fleece
-
Pattern Piece B (Cuff): cut four pieces of the second fabric and trace dashed lines onto the wrong side of two of these pieces only.
-
Hanging Loop (no pattern piece):Cut one 1.5" wide x 8" long piece
-
-
Assemble
-
Fuse fleece to the wrong side of each sock (Pattern Piece A). Quilt your sock as desired. Place each sock piece right sides together and pin aligning all raw edges.
-
Stitch with a 1/2" seam allowance (along the dashed line) all around the Sock leaving the top open. Pivot at the toe point.
-
Trim the seam allowance down to a 1/4" and clip into all curves. Turn the sock right side out and use a blunt tool to get the curly toe nice and pointy. Press around all edges
-
Place the two rectangular cuff (Pattern Piece B) pieces with the traced lines right sides together and stitch along the short sides with a 1/2" seam allowance.
-
Do the same with the remaining cuff pieces. Press seams open. Turn the untraced cuff piece right side out.
-
Place inside the traced cuff piece with right sides together and pin along the raw edges aligning the sides. Baste 1/4" along the bottom raw edge to keep these pieces from shifting
-
You will now be sewing along the lines you traced from the pattern piece. Trim off the excess fabric below the stitched lines leaving about a 1/8" seam allowance.
-
Clip into each top peak as close as you can without snipping through your stitches and clip each bottom point.
-
Turn cuff right side out and push out each point with a blunt tool. Press entire cuff well. Topstitch 1/8" along points.
-
Fold the hanging loop in the same manner as bias tape. To do this fold the loop in half lengthwise wrong sides together.
-
Open back up and press each raw edge in toward the center using the first fold as a guide.
-
Fold entire piece in half encasing the raw edges. Topstitch along the open edge 1/8" fig. 10.
-
Fold hanging loop in half pin and baste to the inside of the sock aligning raw edges at the back seam.
-
Insert cuff inside the sock with the right side of the cuff facing the wrong side of the sock and the hanging loop sandwiched in between.
-
Aligning side seams and raw edges at the top pin and stitch with a 1/2" seam allowance all around the opening. Trim seam allowance down to 1/4".
-
Turn cuff over to the right side of the sock and slightly press around the opening.
-
If desired hand sew decorative ornamentation to each point of the cuff and the toe. We used miniature jingle bells for our stockings.
-


