
The beauty of creating your own custom laptop travel case is that you get to make it totally your own. Not only do you get a functional, protective case, but it's also a fun way to show off your creativity and style. Serging adds such a professional touch and clean finish to your project! Happy serging!
Click HERE to download printable instructions with additional photos.
Finished Size – 13 ½” x 11”
Supplies:
- Baby Lock Applaud Creative Cover Stitch Machine
- Baby Lock Triumph Serger
- Bag Front:
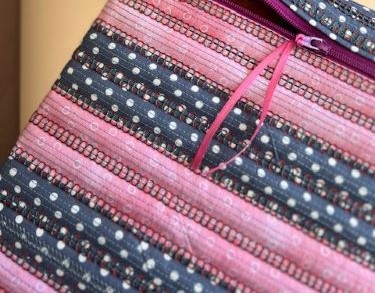
- 4 1 ⅝” x 42 main fabric strips
- 3 1 ⅝” x 42 accent fabric strips
- 1 9 ½” x 15” fabric for front background (this will not show)
- 1 9 ½” x 15” foam interfacing for front
- 1 9 ½” x 15” fabric for front lining
- 1 1 ⅝” x 10 fabric for tabs
- Above the zipper:
- 1 1 ½” x 15” fabric for above the zipper
- 1 1 ½” x 15” foam interfacing for above the zipper
- 1 12” x 15” fabric for above the zipper lining
- Bag back:
- 1 12” x 15” fabric for back
- 1 12” x 15” fabric for back lining
- 1 12” x 15” foam interfacing for back
- 8” ⅛” ribbon for zipper pull
- 1 20” nylon zipper
- Fun 12 wt. threads for your Wipers on the Applaud to accent your fabrics
- 1 ½” Belt Loop Binder
- Bamboo Stiletto
- Spray fabric adhesive
- Erasable fabric marker
Instructions:
- Sew the 1 ⅝” x 42 main fabric strips end to end on the bias.
- Cut a point on the end of the strip. Press the seams so they go away from the pointed end.
- Sew the 1 ⅝” x 42 accent fabric strips end to end on the bias. Cut a point on the end of the strip. Press the seams so they go away from the pointed end.
- Set your machine up with a Triple Cover Stitch. Attach the 1 ½” Belt Loop Binder. Test your stitch.
- Feed the main fabric strip into the Belt Loop Binder with right side up, pointed end first. Cut into eight 16” pieces. Set aside.
-
Feed the accent fabric strip into the Belt Loop Binder with right side up, pointed end first. Cut into six 16” pieces. Set aside.
-
Cut a point in the fabric. Feed it in the Belt Loop Binder with the right side up, pointed end first. Cut two 2 1/2" pieces. Set aside.
- Use the fabric adhesive spray to fuse the following:
With wrong sides together, sandwich the foam between the front background and the front lining.
With wrong sides together, sandwich the foam between the fabric for above the zipper and the above the zipper lining.
With wrong sides together, sandwich the foam between the back and the back lining. - Mark the right side of the front background fabric with a line 1 ⅝” from the bottom. Mark another line 1 ⅝” from the first one. Mark three more lines 1 ⅝” from the last one. You will have 5 lines on the front.
- Set your Applaud up with a Triple Cover Stitch, with 2 threads in the Wipers. Install the Middle Stitch in the Ditch Insert.
- Place 2 main fabric strips side by side at the bottom of the front. They will line up with the bottom of the bag and the first line.
-
Stitch the fabric strips to the background by sewing between the strips, keeping the edges butted together.
-
Stitch an accent fabric strip to the main fabric strip. Continue adding strips alternating the colors grouped by twos. The last strip at the top will be an accent strip.
-
In the same manner, sew two main fabric strips to the fabric labeled “above the zipper”.
-
Trim the front and above the zipper to 14” wide.
-
You are now ready to install the zipper! Center the top front on the right side of the zipper tape about 1/16” down from the zipper teeth with right side facing up. Sew a top stitch with the Applaud set up with a Triple Cover Stitch and 2 Wipers.
-
Repeat with the “above the zipper” fabric. Make sure to line up the sides of the front and the above the zipper fabric.
-
Mark lines on the diagonal on the right side of the back fabric 2” apart. Mark them in both directions. Sew on these lines with the Applaud. Trim to 14” x 11 ½”.
- Fold the tabs in half with wrong sides together. Place a tab on each side of the zipper on the front with the folds to the center. Line up the raw edges. Clip in place.
- Place the front on the back with right sides together. Clip in place.
- Set your Triumph up with a 4-Thread Overlock. Sew along the bottom.
- Sew the side with closed end of the zipper. Use your Bamboo Stiletto to help you keep the tab in place.
- Sew the top.
- Open the zipper ¾ of the way. Clip in place, making sure the tab is in place. Sew along the side.
- Turn right side out through the zipper opening. Carefully poke out the corners. Lightly press.
- Slip the ribbon through the zipper head for a zipper pull.


