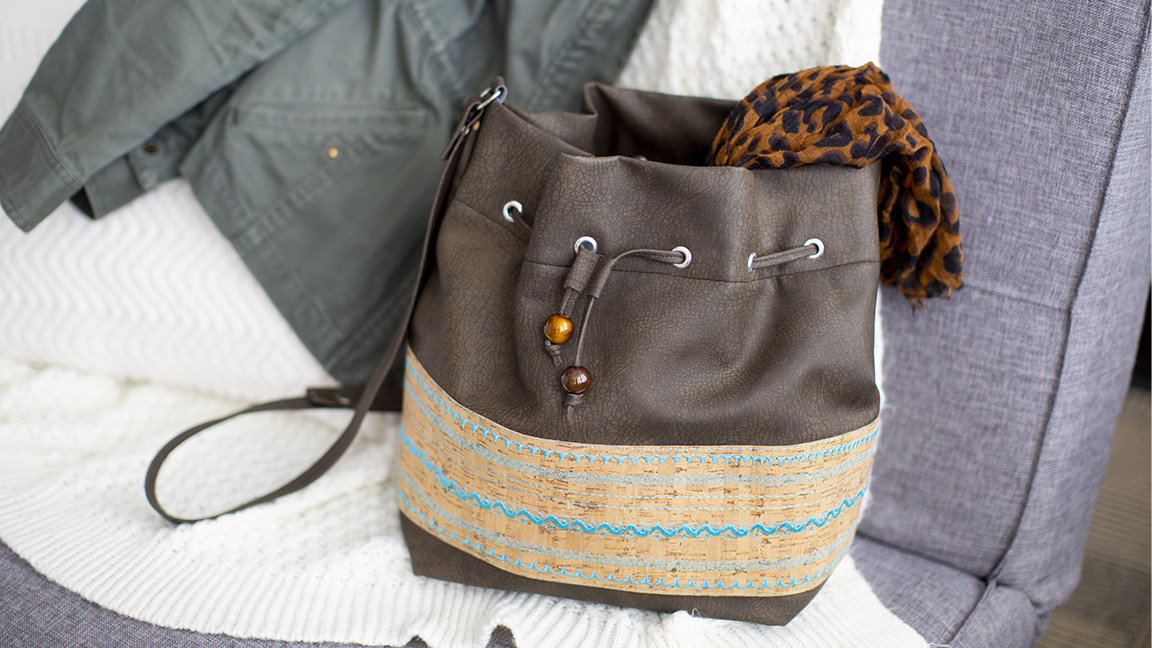
Turn heads with this custom bucket bag perfect for anywhere your day takes you. This bag uses a variety of sewing and embroidery techniques including using trendy cork as one of your fabrics! Download printable instructions.
Materials:
- ¾ Yard of medium-weight flexible brown vinyl 54" wide
- ½ Yard of cotton fabric for lining
- 2 Pieces of 4" x 20" cork
- 4 - 1" D-rings
- 5 Heavy duty smooth snaps fasteners
- 12 Large metal eyelets
- 4 Purse feet
- Baby Lock Ultra Soft Fusible Fleece Stabilizer
- ¼ Yard of heavyweight interfacing
- Tube of vinyl adhesive
- Madeira® embroidery and Cotona thread for sewing
- Sewing clips
- Pressing cloth
- Basic sewing supplies
Tools:
- Baby Lock® Aerial or Altair sewing machine
- Baby Lock® Teflon Foot
Steps:
-
From the blue vinyl cut the following:
-
Two rectangles 17" x 19-½"
-
One rectangle 2-½" x 1" for the drawstring slider
-
One strip 1" x 36" for the drawstrings
-
One strip 3" x 54" for the strap
-
One strip 1" x 14" for the side tabs
-
-
From the lining fabric cut two rectangles 17" x 13".
-
From the fusible fleece cut two rectangles 16-¼" x 12-3/8".
-
From the heavyweight interfacing cut one piece 6" x 10" for the bag bottom insert.
-
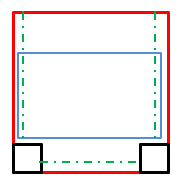
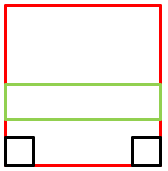
On the bottom of each of the bag’s corner vinyl sections (17" x 19-½") cut out a 3” square (as shown below with the black boxes).
-
Follow the manufacturer’s directions to fuse the 16-¼" x 12-3/8" fusible fleece sections to each of the 17" x 19-½" vinyl sections.
-
The fleece sections are placed just over the seam lines and 3-3/8" up from the bottom edge (as shown below with the blue box area).
-
The green lines are the stitching lines.
-
Tip: When fusing the fleece sections be sure to use a pressing sheet to protect the vinyl from scorching.
-
-
Set up the machine for sewing.
-
Wind several bobbins using the same thread color that will be used for applying decorative stitches to the cork.
-
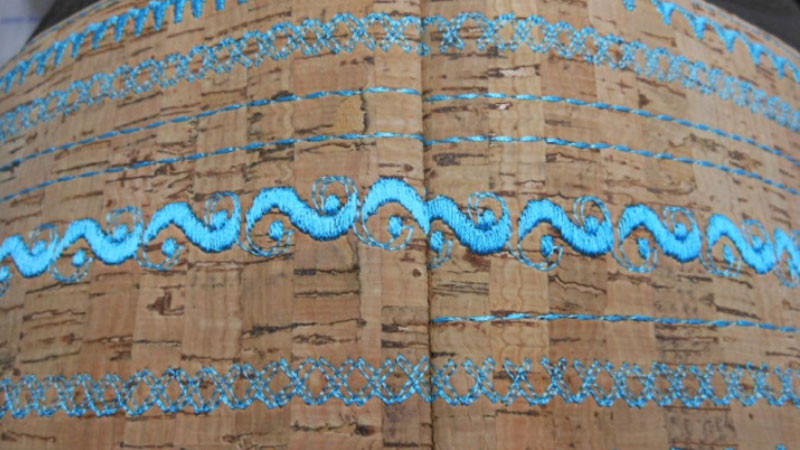
In the sample Madeira teal blue embroidery thread was used.
-
Thread the machine and attach the Baby Lock Teflon Foot.
-
-
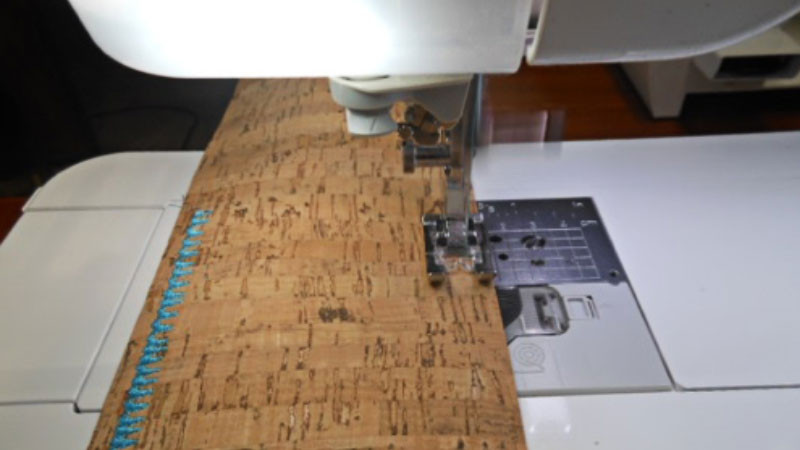
Decorative stitch application on cork:
-
To get the cork sections ready for stitching cut the sections 4" x 20" long.
These sections will be trimmed down to 17" long after the stitches have been placed.
-
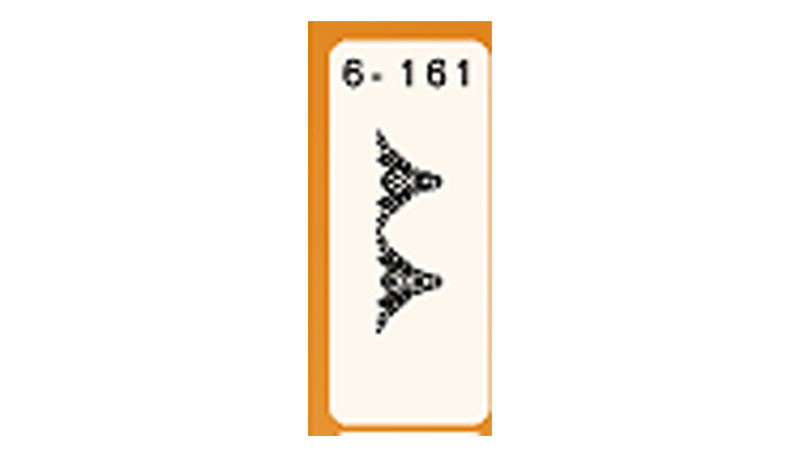
Select a decorative stitch such as 6-161 on the Altair or stitch 6-278 on the Aerial for the edges.
-
Set the tension at 3.2.
Note: You will need to do a test sew to confirm this setting. Your settings may vary based on the needle thread cork fiber and the bobbin thread that is used. Repeat this test for any other decorative stitches that will be sewn.
-
Place the presser foot along the edge and apply this stitch.
-
Repeat for the opposite side of the cork and the second cork section.
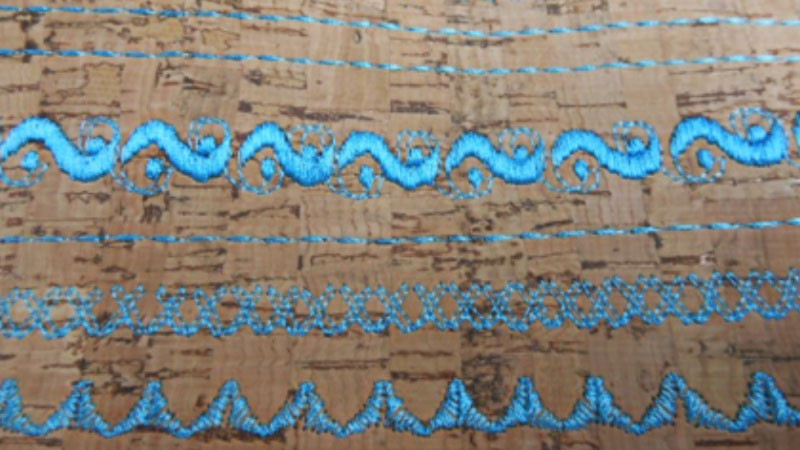
Try to keep the rows even with the rows on the second section. The rows should line up so when piecing the sections together there is an even flow on the seam line with the decorative stitched lines (as shown in the above illustration).
-
Select another decorative stitch for the second row of stitches. Remember to do a test sew for accuracy and likeability.
-
Place the Teflon Foot along the last row of decorative stitches applied. Stitch in place.
-
Repeat for the opposite side of the section. Then apply to the second section.
-
Repeat these steps until you have applied stitches to the entire cork section. In the sample there are eight rows of decorative stitches.
-
-
Assembly:
-
Cut the length of the stitched cork sections to 17" wide.
-
Place the cork panels two inches up from the cut corners (as shown in the illustration that follows with the green box).
-
Repeat for the back section on the bag.
-
Place right sides together and clip in place using the sewing clips.
-
Set up the machine for straight stitch sewing.
-
Using a ½" seam allowance sew the sides and the bottom edges together.
-
Open the seams and press using the pressing cloth.
-
To create the boxed corners on the bag align the open seams sections. Using a ½" seam allowance stitch across the area.
Use the sewing clips to hold in place. For extra reinforcement stitch twice. Trim close to the seam.
-
Turn the bag right side out.
-
Fold down the top raw edge ½" and clip the edges to hold in place.
-
Top stitch ¼" from the edge.
-
To create the facing on the bag fold down the top stitched edge to toward the inside of the bag while using the fleece as your guideline for folding.
-
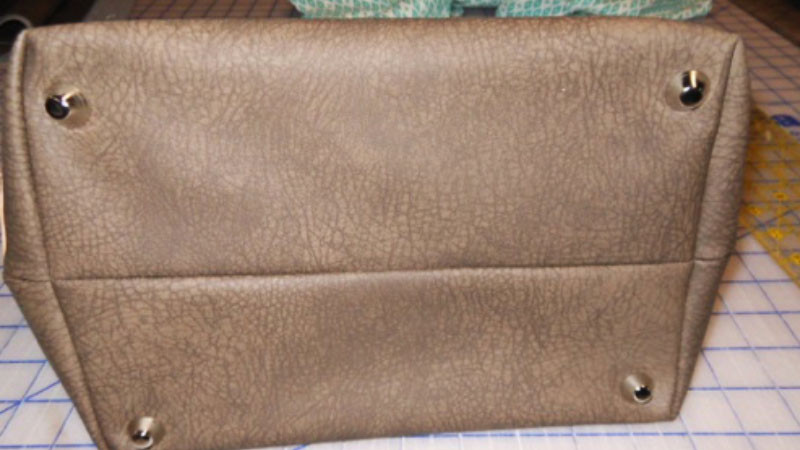
Place the 6" x 10" interfacing section into the base of the bag.
-
To hold the interfacing in place insert the purse feet onto the bag.
-
Measure ¾" from each of the corners and mark.
-
Follow the manufacturer’s directions for applying the feet.
-
For the two lining sections cut out a 3" corner on the bottom edges as in step VI.
-
Repeat steps IV-VIII to create the lining for the bag.
-
With the wrong sides together slip the lining section inside the vinyl bag.
-
Push the lining into the bag aligning the bottom edges into the corners and the side seams together.
The top raw edge on the lining should sit about 2-½" down from the top edge of the fleece.
-
Pin the lining to the fleece. Fold the top hemmed portion of the bag to the inside and pin or clip in place.
-
Top stitch 1/8" from the edge of the facing. There should be two rows of stitching showing.
Be sure that your bobbin thread is the same color as the top thread since it will show on the outside of the bag.
-
-
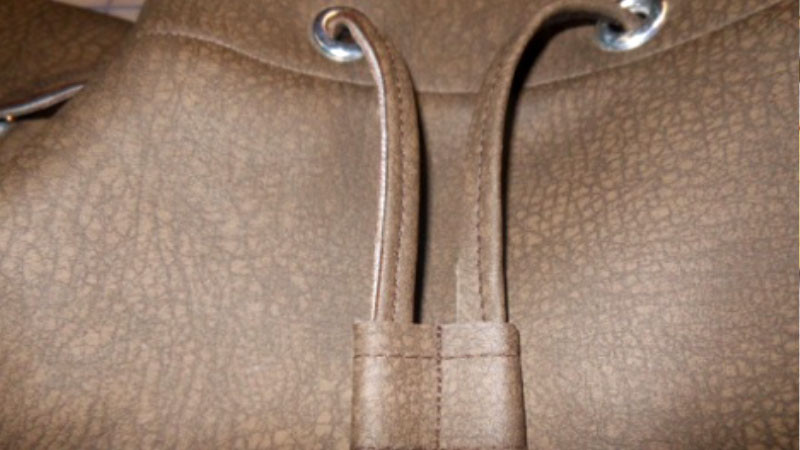
To add the grommets (eyelets) to the bag determine the exact center of the bag by measuring from seam to seam on front and back.
-
Measure 2-¼" down from the top edge of the bag.
-
Measure 1-1/8" from the center point in both directions.These marks will determine the placement for the first two grommets.
-
Measure 2-¼" from those points to add the next set of grommets.
-
Continue until you have added all 12 grommets to the bag.
There should be six grommets on the front and six on the back. Follow the manufacturer’s directions for applying the grommets.
-
-
To create the straps follow the next set of directions:
-
Locate the 3" x 54" strip of vinyl.
-
Sub cut the strip into one 31-½" section and one 22-½" section.
-
Fold in each side ½" and clip in place. Cut each of the corners at a 45° angle. Fold in the ends and clip them at a 45° angle.
This should form a mitered corner.
-
Fold the strips in half lengthwise with the sides even and clip.
-
Edge stitch around all four sides. Set aside.
-
Repeat for the other strap.
-
-
Locate the 1" x 14" strip and follow the next set of steps:
-
Top stitch 1/8" from the edge on both the 14" long sides.
-
Cut the length into two 6" long sections.
-
Find the D-rings.
-
Slip the D-rings through each of the ends.
-
Fold the end of the strip 1" back on itself to the backside of the strip.
-
Place a dab of the vinyl adhesive under the folded area to secure. Clip the ends until it dries.
-
Repeat for the other tab.
-
-
Place the tabs centered over the side seams. One of the D-ring ends should extend outside the bag. The other can be used for attaching keys.
-
Use the vinyl adhesive to secure the tabs to the bag. Allow the adhesive 24 hours to dry.
-
After the glue has dried sew the tabs to the bag. Stitch in the seam to hide the stitches.
-
Starting at the seam line top stitch around the bag.
-
Be sure to place the snap socket and ball section on the correct side according to the manufacturer’s directions.
-
-
Attach the snaps to the handles by following the next set of directions:
-
Follow the manufacturer’s directions for attaching the snaps.
-
The snaps should be centered from left to right on the handles.
-
Measure 1" inward from each of the ends that will be attached to the D-ring tabs and mark.
-
Place a snap front and back on each of the straps sections. Snap the straps to the bag through the D-rings.
-
To add the three adjustable snaps to the opposite ends on each of the straps measure 1-¼" in from the end of the straps.
-
Measure 2-¼" from the first measurement and mark for the second snap.
-
Measure 2-¼" in from the second snap for the third snap.
-
Be sure to place the snap socket and ball section on the correct side according to the manufacturer’s directions.
-
Once the snaps have been applied snap the front strap to the back strap.
-
-
To create the drawstring locate the 1" x 36" section and follow the next set of directions:
-
Fold in ¼" along the long edge. Fold ¼" again. There will be ½" extending from the rolled edge.
This makes it easier to hold the piece while you edge stitch the section.
-
Edge stitch along the folded edge.
-
Using sharp scissors trim away the vinyl edge that extends outward from the stitched edge.
-
-
Locate the 1" x 2-½" strip to create the slider and follow the next set of steps:
-
Edge stitch along both of the 2-½" long sides. Do not fold.
-
Fold in the ends overlapping them about ¼" at the center. Clip to hold them in place.
-
Stitch down the center to secure the overlap and also to create two openings on the slider.
-
Find the drawstring and thread the drawstring through the center left grommet on the bag. Weaving in and out through the grommets.
The end of the drawstring will exit through the center right front grommet.
-
Cinch the bag to create the desired look.
-
Feed the one end of the drawstring through one of the slider channels and repeat for the other end of the drawstring.
-
Trim away any excess drawstring length as desired.
-
Place an end cap or bead (optional) or you can tie a knot to finish the ends of the drawstrings.
-


