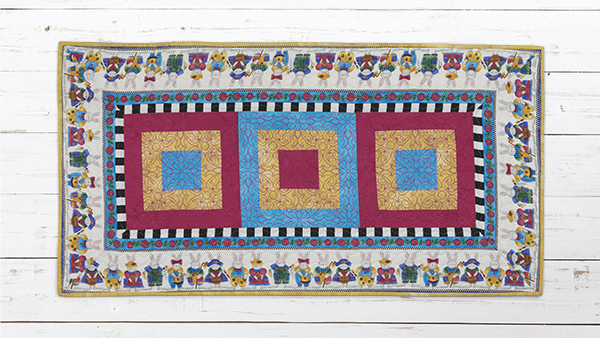
This simply sweet Easter table runner is created with just three quilt blocks bordered by bunnies on parade. This quilted piece is sure to bring a bit of spring to your dining room table! Download printable instructions.
Finished size: 19 ¼” x 37” the measurement is approximate depending upon the width of the border print selected
Materials:
- ½ yard of 45-inch wide pink cotton fabric; blocks and binding
- 7/8 yard of 45-inch wide blue fabric; blocks and backing
- ¼ yard of 45-inch wide yellow fabric; blocks
- 1 1/2 yards of multi-row fabric to cut into border strips (design printed lengthwise)
- Quilt batting
- Madeira sewing and quilting thread
- Rotary cutting system and a Companion Angle Ruler
- Basic sewing supplies
Tools:
Steps:
-
Stitch three strip-sets using the 2-inch width of pink yellow and blue fabric strips
-
Press the seams toward the yellow strips. The strip-sets should measure 5 inches across when completed.
-
Using the Companion Angle Ruler cut the strip-sets into triangles. Align the tip of the ruler with the top of a strip-set.
-
Cut eight triangles with the tip of the ruler placed in the blue strip
-
Cut four triangles with the tip of the ruler placed in the pink strip
-
-
Create the center blocks for the table runner by sewing the triangles together as follows:
-
Match the edges of two triangles with blue tips; pin the seam to keep the strips from shifting.
-
Begin stitching at the center of the seam and stitch to the outside edge.
-
Stitch the remainder of the seam from the center outward as well.
-
Remove the pins and press. Stitch all of the triangles together and press.
-
Using the same method of matching the edges and pinning prepare the triangles to be stitched into three blocks: two with blue centers and one with a pink center.
-
Stitch from the center outward for each block. Press well.
-
Take a moment and square-up the edges of the blocks.
-
-
Stitch the three blocks together alternating the color combinations. Press the seams.
-
Prepare to add the border strips by locating and marking the centers of each border strip.
-
Stitch the 52” border strips to either side of the table runner blocks matching the center of the strips to the center of the blocks.
-
Start and stop stitching ¼-inch from each end. Press the seams toward the border strips. There will be approximately 6 to 7 inches extra of the border strip on both ends.
-
Start and stop stitching ¼-inch from each end. Press the seams toward the border strips. There will be approximately 6 to 7 inches extra of the border strip on both ends.
-
-
Stitch the 34-inch border strips to each of the remaining sides of the table runner.
-
Start and stop stitching ¼-inch from each end. Press the seams toward the border strips.
-
-
Working with one corner at a time fold both the border strips and the table runner in half diagonally with right sides facing creating a triangle.
-
Line up the border strips carefully. When the borders are aligned place a ruler along the border strips and onto the table runner.
-
Mark this angle with a water-soluble marker.
-
Pin the borders together and move to the sewing machine.
-
Stitch along the marked line from the seam to the outer edge of the borders.
-
Unfold the table runner and make sure there are no gaps at the inner corner and that the border lies flat.
-
Press the border and trim the excess to a ¼-inch seam.
-
-
Repeat this process for the remaining three corners.
-
The backing fabric requirement is for the table runner being laid selvage to selvage not lengthwise along the selvage.
-
Layer the table runner top batting and backing. Baste the layers together.
-
Quilt as desired either by machine or hand. Here the three center blocks were quilted using the large pattern fills in IQ Designer from the Destiny II.
-
Measure the block.
-
In the IQ Designer draw a square the same size as the measurement of the block.
-
Select the pattern fill of your choice and fill the inside of the square.
-
Save the design and send to the embroidery field.
-
Hoop the quilt sandwich so that the first square in centered in the largest hoop.
-
Use the Camera to scan the hoop.
-
. Center the design over the quilt sandwich square.
-
Embroider the design.
-
Repeat for the two remaining squares.
-
-
Bind the table runner.
-
Make a label and stitch it to the back of the table runner.


