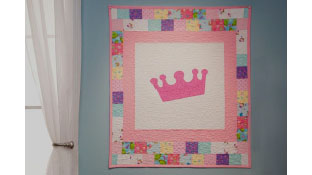
Combine whimsical print fabrics and free-motion quilting from the Baby Lock Tiara long-arm machine to create this Fairytale quilt. Perfect for a child’s room or as a baby shower gift this quilted wall hanging is quick and can be easily made in a few hours. Download printable instructions and template.
Materials:
- Aerofil all-purpose thread to match fabrics for patchwork
- Quilting thread – white and variegated pastels
- Pink quilting thread for the bobbin
- ¾ yard white cotton fabric for center
- 1 1/2 yards pink cotton fabric for backing and border
- Fat quarter of bright pink fabric for crown
- 10 assorted print fabrics in fat quarters for patchwork
- Batting
- Steam-a-Seam 2
- Chalk marker
- Quilt spray adhesive (Or quilt pins/quilt safety pins for basting)
- Wonder clips
- Rotary cutter mat and ruler
Tools:
- Baby Lock Tiara Quilting Machine
- Baby Lock Sewing Machine
Steps:
-
Thread the sewing machine with all-purpose thread and set the machine for a straight stitch and a ¼” seam allowance.
-
Cut the center block 21 ½” square from the white fabric
-
Trace the crown design onto the paper of the Steam-a-Seam2.
-
Following the manufacturer’s directions fuse one side of the steam a seam to the wrong side of the bright pink fat quarter then cut out the crown shape.
-
-
Fuse the crown shape in the center of the white center block angling it as desired.
-
Applique the center shape down using matching thread and a zigzag stitch if desired. The crown can also be secured by free-motion stitching along the edges of the shape if desired.
-
From the pink fabric cut four strips 3 1/2” x width of fabric for the inner pink borders.
-
Sew the pink border to the left and right side of the center block and square off the edges with the rotary cutter mat and ruler.
-
Then add the top and bottom borders and square off the edges.
-
Cut the assorted fat quarter prints into 3 1/2” squares. You will need 64 total blocks.
-
Arrange the colors as desired and sew border strips together.
-
You need two strips of 9 blocks for the side borders. Sew these to the sides attaching it to the pink border.
-
Then two strips of 11 blocks for the top and bottom border.
-
An additional row is added to the top and bottom row but not the sides.
-
Create two strips of 12 blocks for the additional row of top and bottom borders.
-
When attaching these rows off-set the blocks from the previous seam. Square off the corners.
-
Layer the pieced top backing and pink backing fabric. Make sure the backing fabric is larger than the front. Spray or pin base the layers together.
-
Thread the Tiara with your desired quilting thread.
-
Mark the template lines across the lower edge of the crown. Using the Tiara to quilt follow the marked lines to quilt the details on the crown.
-
Then stitch-in-the-ditch or add echo quilting lines along the edges of the crown shape. Using the Tiara’s hopping foot as a guide.
-
Stipple the center block of quilt using the white thread
-
Then do a larger stipple or meandering pattern over the pieced border using a pastel variegated thread.
-
Tip: The TruStitch for the Tiara can be very helpful for this step as the stitch regulator will make sure your stitch length is consistent.
-
-
Once the quilting is finished do not cut off the excess fabric. Carefully with scissors trim off the excess batting only.
-
Measure and mark the backing fabric 1” from the edge of the finished quilt top all the way around. Trim to 1”. This excess fabric will become your binding.
-
To form the binding fold the 1” of backing fabric over 1/2” towards the quilt top and press.
-
Fold it in again this time overlapping the quilt edge and temporarily secure in place using wonder clips.
-
Once all edges are folded over tuck the corners in to form a mitered look.
-
Using a zigzag or appliqué stitch stitch along the folded binding edge to secure.
-
Optional: for a great baby shower gift idea use a Baby Lock embroidery machine to add a name and birthdate to the white center section before quilting
-


