
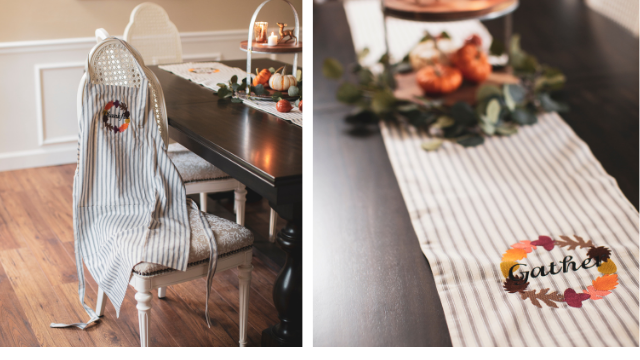
Get ready for Thanksgiving by embroidering these cute Fall designs on a table runner and apron. This project was featured in our one of our Totally Stitchin' Magazine Fall/Winter Issues HERE. Click HERE to download printable instructions with additional photos. Click HERE to download the free embroidery designs.
Supplies
- Embroidery machine
- Blank table runner and apron
- Spools of rayon or polyester embroidery thread in various colors
- Baby Lock Tear-Away Firm Stabilizer or Stick-Tear Tear-Away Stabilizer
- 5" x 7" Embroidery hoop
- Wreath embroidery design (included)
- “Gather” and “Thankful” design (included) or font of choice from your own design collection
- Adhesive spray if using tear-away
- Marking pen
- Pins to secure to the stabilizer (optional)
Instructions
- This design was created in two sizes. There is a wreath that will fit into the 5" x 7" hoop and another that is a larger half design that can be combined to create a larger embroidery design (see instructions for combining designs).
- Measure and mark the placement for your design.
- If using the smaller design hoop your apron or table runner into the 5" x 7" hoop using the Baby Lock Tear-Away Firm Stabilizer. Use spray adhesive if desired.
- Place the hoop onto the machine.
- Transfer the designs onto a USB stick.
- In the machine retrieve the design from the USB stick.
- If machine has an option to add a basting stitch add this around the design.
- Position the design to align with the placement marked on the apron.
- When ready to stitch touch Embroidery and Start/Stop.
- Once finished sewing remove hoop from your machine.
- Gently remove the basting stitches and topping.
- Remove the apron from the stabilizer.
Instructions for combining design:
- For a larger design you can easily combine the two halves of the wreath together. It will require three separate hooping and stitch-outs but the end result will yield you with a larger embroidery design element.
- Measure and mark the placement for your design on the table runner. For this table runner a line was drawn approximately 8" from the end and then the center of the table runner width was marked.
- Hoop your table runner into the 5" x 7" hoop using the Baby Lock Tear-Away Firm Stabilizer. Use spray adhesive if desired.
- You can stitch either portion of the half wreath so just hoop while being mindful of direction and any design rotation that might be needed.
- Transfer the designs onto a USB stick.
- In the machine retrieve the design from the USB stick.
- Rotate the design as needed for your fabric placement.
- Place the hoop on the machine.
- Select your Point of Placement key.
- This key will allow you to pick a different point of reference for placing your design than the default of center.
- In the project example the left center point of reference was selected.
- The Move keys were then used to position the design so that it lined up with the center left marking on the fabric.
- Other points of placement could also be selected to confirm the design was in the desired position.
- When ready to stitch touch Embroidery and Start/Stop.
- Once finished sewing remove hoop from your machine.
- This is the first half of your wreath.
- Remove the fabric and re-hoop in preparation for the second half of the stitch out.
- Re-hoop the fabric in the hoop making sure to keep the marked line visual for placement of the second half of the wreath.
- Place the hoop on to the machine. Repeat the steps above to align the design using your points of placement. You want to ensure the design is lined up with the center of the marked line. If you want your leaves to overlap at the ends you should move it just a little above the marked line.
- When ready to stitch touch Embroidery and Start/Stop.
- Once finished sewing remove hoop from your machine.
- A word was added to the center of the wreath. If you would like to add a saying you will want to re-hoop a third time using the marked line as a center for your hooping.
- Place the hoop back onto the machine and position the lettering of choice in the center of the wreath.
- When ready to stitch touch Embroidery and Start/Stop.
- Once finished sewing remove hoop from your machine.
- Repeat the same embroidery process for the other end of the table runner.
- Remove any markings from the fabric and gently remove the excess stabilizer from the back of the table runner.
- Now you are ready to set the table for all your guests!


