This little pillow is quick project and will make any room feel merry and bright! Make one for yourself and for any of the hard-to-shop-for people on your holiday shopping list to put a little merry in their Christmas.
Materials:
- ½ yard of a neutral color for the pillow front and interior lining
- 1 fat quarter of a print for holiday appliqué and pillow back
- Scraps of a solid for the word appliqué
- 70” of binding
- Heat n’ Bond Lite or similar paper-backed fusible web product
- 1 spool of neutral thread for piecing and quilting
- 1 spool of thread to match your scrap color for the word appliqué
- 1 spool of invisible thread
- Piece of batting at least 13” x 17”
- Pencil or pen
- Scissors
- Safety pins or basting spray
- 12” x 16” pillow form
- Computer with printer
Tools:
- Baby Lock Sewing Machine
Steps:
-
Cut 2 rectangles from your neutral solid measuring 13” x 17” each.
-
Cut a 12.5” x 21” rectangle from your print. Cut this rectangle into (2) 12.5” x 10.5” pieces. The large scrap you have left from this fat quarter will be used for the holiday appliqué (tree)
-
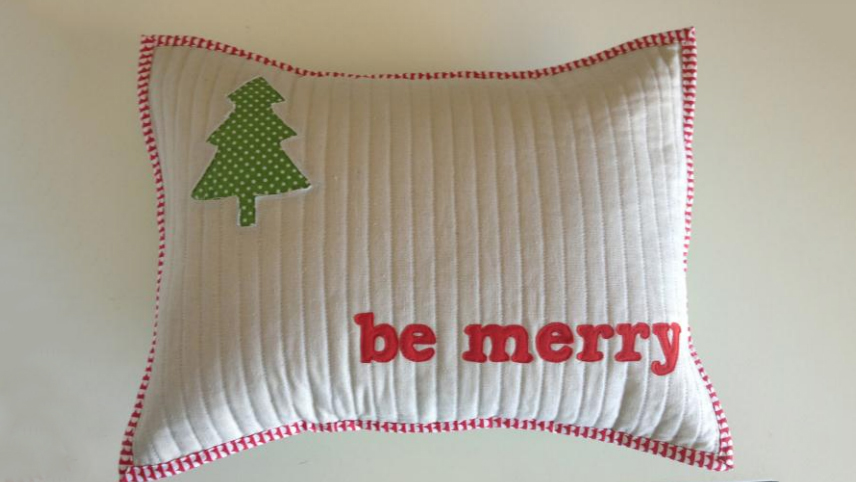
Draw your favorite holiday shape (I chose a tree) onto the back of the print scrap you have left from Step 2. Cut the shape out.
-
Pin the holiday shape right side down to the WRONG side of one of the neutral 13” x 17” pieces. I put my tree in the upper corner but you can place it any way your holiday heart wants!
-
Working from the back side of the neutral solid use a 1/4” to 1/8” seam allowance to sew around the holiday shape.
-
Working from the front side of the neutral solid (with holiday shape now attached) gently begin to cut away the neutral fabric inside the stitches outlining your holiday shape.
-
Be sure not to cut your print fabric! You will want to cut about 1/8” away from your stitches.
-
-
Layer the second rectangle of the neutral solid the batting and the neutral solid with the holiday shape.
-
The wrong sides of both neutral rectangles should be facing the batting—just like how you make a quilt. Baste the layers.
-
Use basting spray or simply pin all three layers with safety pins about every 4”.
-
-
Use your walking foot and the neutral thread to quilt as desired. I quilted mine with straight lines about ½” apart.
-
Trim the quilted pillow front to 12.5” x 16.5”.
-
Using your computer type the words “be merry” in any font you want! My letters are about 1.5” high.
-
I used the Word Art function to make the letters chunky and I chose the American Typewriter font.
-
Then before you print flip the letters (rotate on the vertical axis) so they look like a mirror image. This step is very important!
-
If you cannot figure out how to flip the letters print it out like normal and then hold the paper up to a window and trace the letters on the backside of the paper.
-
This will give you the mirror image of the letters.
-
-
Trace the mirror image letters onto the paper-backed side of the Heat n’ Bond.
-
Fuse the solid scraps to the glue side of the Heat n’ Bond. Let cool then cut out the letters.
-
Peel off the paper back on the letters and fuse to the quilted pillow front.
-
Lower your feed dogs and using a free-motion (open toe) foot and thread to match your letters stitch VERY close to the edge of the letters.
-
If you are not comfortable using your free-motion foot you can use your walking foot and a short stitch length but it will take much longer.
-
-
Fold the 12.5” side of a 12.5” x 10.5” print rectangle over ¼” toward the wrong side. Press. Fold over ¼” one more time and press.
-
Stitch very close to the folded edge.
-
Repeat Steps 15 and 16 for the other 12.5” x 10.5” print rectangle
-
Place the quilted pillow front right side down. Lay both 12.5” x 10.5” print rectangles right sides up on top of the quilted pillow front.
-
Match the 12.5” edges of the quilted pillow front and the UNFINISHED 12.5” sides of the two print rectangles.
-
The two print rectangles should overlap—this will form the envelope back of the pillow. Pin around the outside of the pillow.
-
-
Baste around the edges of the pillow using an 1/8” seam allowance.
-
Bind as you would a quilt. I took 2.25” binding strips folded and pressed them in half and sewed the binding to the BACK of the pillow with a ¼” seam allowance.
-
I then folded the binding to the front and used invisible thread to stitch the binding to the front of the pillow.
-


