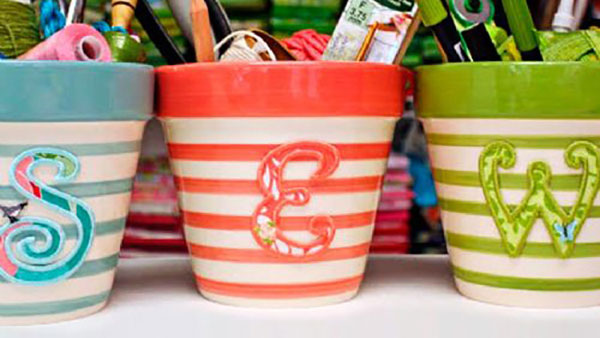
Looking for a fun way to organize your sewing table or update your home decor? Create appliques for terracotta pots! Smaller pots are the perfect size for holding all your scissors and notions on the cutting table while adding a monogram to a potted plant is a great touch for a housewarming present! Download printable instructions.
Check out Evy's blog post about this project here.
Materials:
- Ceramic pots (any kind ceramic glass or terracotta - you can find these pots at Design Imports).
- Machine applique embroidery designs (appropriately sized for your pots I used my Curly Applique Alphabet designs and re-sized them 20% smaller).
- Applique fabric backed with fusible web (I used Riley Blake fabrics).
- Silk organza in a color that will fade into the pot (I used white).
- Embroidery thread
- Very small very sharp cutting scissors with curved blades (I used my Snips).
- Temporary spray adhesive (I like 505).
- Permanent spray adhesive (Super 77 by 3M)
- Wooden skewer
- Sheets of paper
Tools:
- Baby Lock Sewing Machine
Steps:
-
Hoop two layers of silk organza.
Make it nice and flat smooth and wrinkle free. No flopping fabric. I used silk organza because it trims very cleanly doesn't whisker is really sturdy is super flexible and doesn't add bulk. Back your applique fabric with fusible web and fire up your mini-iron.
-
Fuse the applique fabric to the hooped organza before stitching the final satin stitch finishing edge.
(Note if you use polyester organza skip this step! You might melt the organza in the hoop too.) If you need a brush up on applique see my Amazing Applique blog post here.
-
Complete the applique. I also added tiny designs from my Petites collection to the letters just for fun.
-
Clean up the back trimming away all the excess bits of thread.
-
Un-hoop and cut out the letter trimming as close as possible to the satin stitched edge.
-
Spray one side of a sheet of paper lightly with temporary spray adhesive. Press the letters wrong side up onto the sticky paper. This keeps them from lifting and flipping while you spray on
-
Go outside and spray the wrong side of the letters with an even coat of permanent spray adhesive.
I love Super 77 by 3M mostly because it doesn't become permanent for a while so you have time to change your mind if you need to. Don't forget to turn the can upside down and spray away from you until the bottle sprays just air. (That will keep the nozzle clean for the next time and you'll be so glad you did that.)
-
Apply the letter to the pot.
Use the point of a wooden skewer to poke in any whiskers of organza or over-sprayed glue along the edges. Use the flat end to tamp down any places too tiny for which to use your fingers. Press the design firmly to the pot.
-
Let it dry!
The perfect catch-all! Sturdy enough not to tip over and big enough to hold lots of junk. And if you really want to you can actually put a plant in it!


