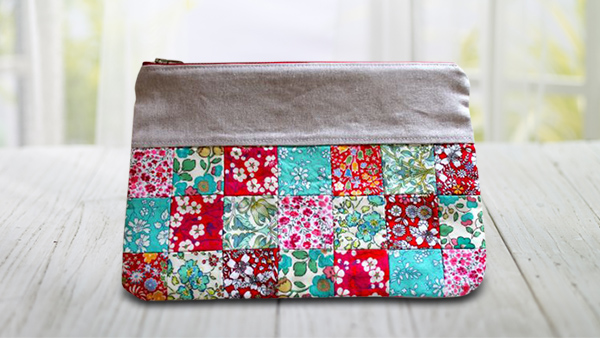
This cute patchwork pouch is a quick project perfect for using up all those pesky scraps! This little bag is great as a small gift or as a beautiful wrapping for gift cards or other small items. Download printable instructions.
Materials:
- Scraps- enough to make (42) 2" squares
- (2) 3"x11" pieces of linen or linen blend fabric
- (1) 9" metal zipper--the zipper tape should measure between 10.5"-11"
- (2) pieces of 7.5"x 11" fabric for lining/interior
- (2) pieces of Pellon Shape Flex (SF101) or similar interfacing measuring 7.5"x11"
- 1 Spool all-purpose thread
- Optional: cup or bowl to make the bottom of the pouch curved
Tools:
- Baby Lock Sewing Machine
Steps:
-
Use a 1/4" seam allowance unless otherwise indicated.
-
Sew 2" squares into two rectangles that have 3 rows of 7 squares. You will use 21 squares for each rectangle. I like to press all my seams open.
-
Sew the linen along the 11" side to the top of each patchwork rectangle.
-
Press the seam allowance toward the linen.
-
Top stitch 1/8" from the patchwork rectangle on the linen. This simply gives the pouch a more polished look.
-
Fuse the interfacing to each linen/patchwork exterior unit.
-
Layer one lining/interior rectangle right side up the zipper right side up and the exterior patchwork unit right side down. Match along the 11" side and pin in place.
-
With your zipper foot attached sew all three layers together.
-
Open and put the interior and exterior wrong sides together and press the interior and exterior away from the zipper teeth.
-
Top stitch 1/8" away from the zipper teeth. This secures the exterior and interior fabrics away from the teeth and also gives the pouch a finished look.
-
Repeat steps 6-9 to attach the other interior and exterior pieces
-
Optional: using a cup or bowl draw a curved line at the bottom corner of each interior and exterior piece and trim to give the pouch rounded bottom corners.
-
-
Open the zipper at least half way
-
Put exteriors right sides together.
-
Put interiors right sides together pin in place.
-
Using a 3/8" OR 1/2" seam allowance sew all the way around the pouch leaving a 3" hole in the lining for turning.
-
Turn the pouch right side out pushing out the corners and zipper ends. Press
-
For the lining press the seam allowance inward pin in place then sew closed using a 1/8" seam allowance making sure to back stitch at each end.
-
You're done! You just created one adorable pouch that measures approximately 6.5"x10"


