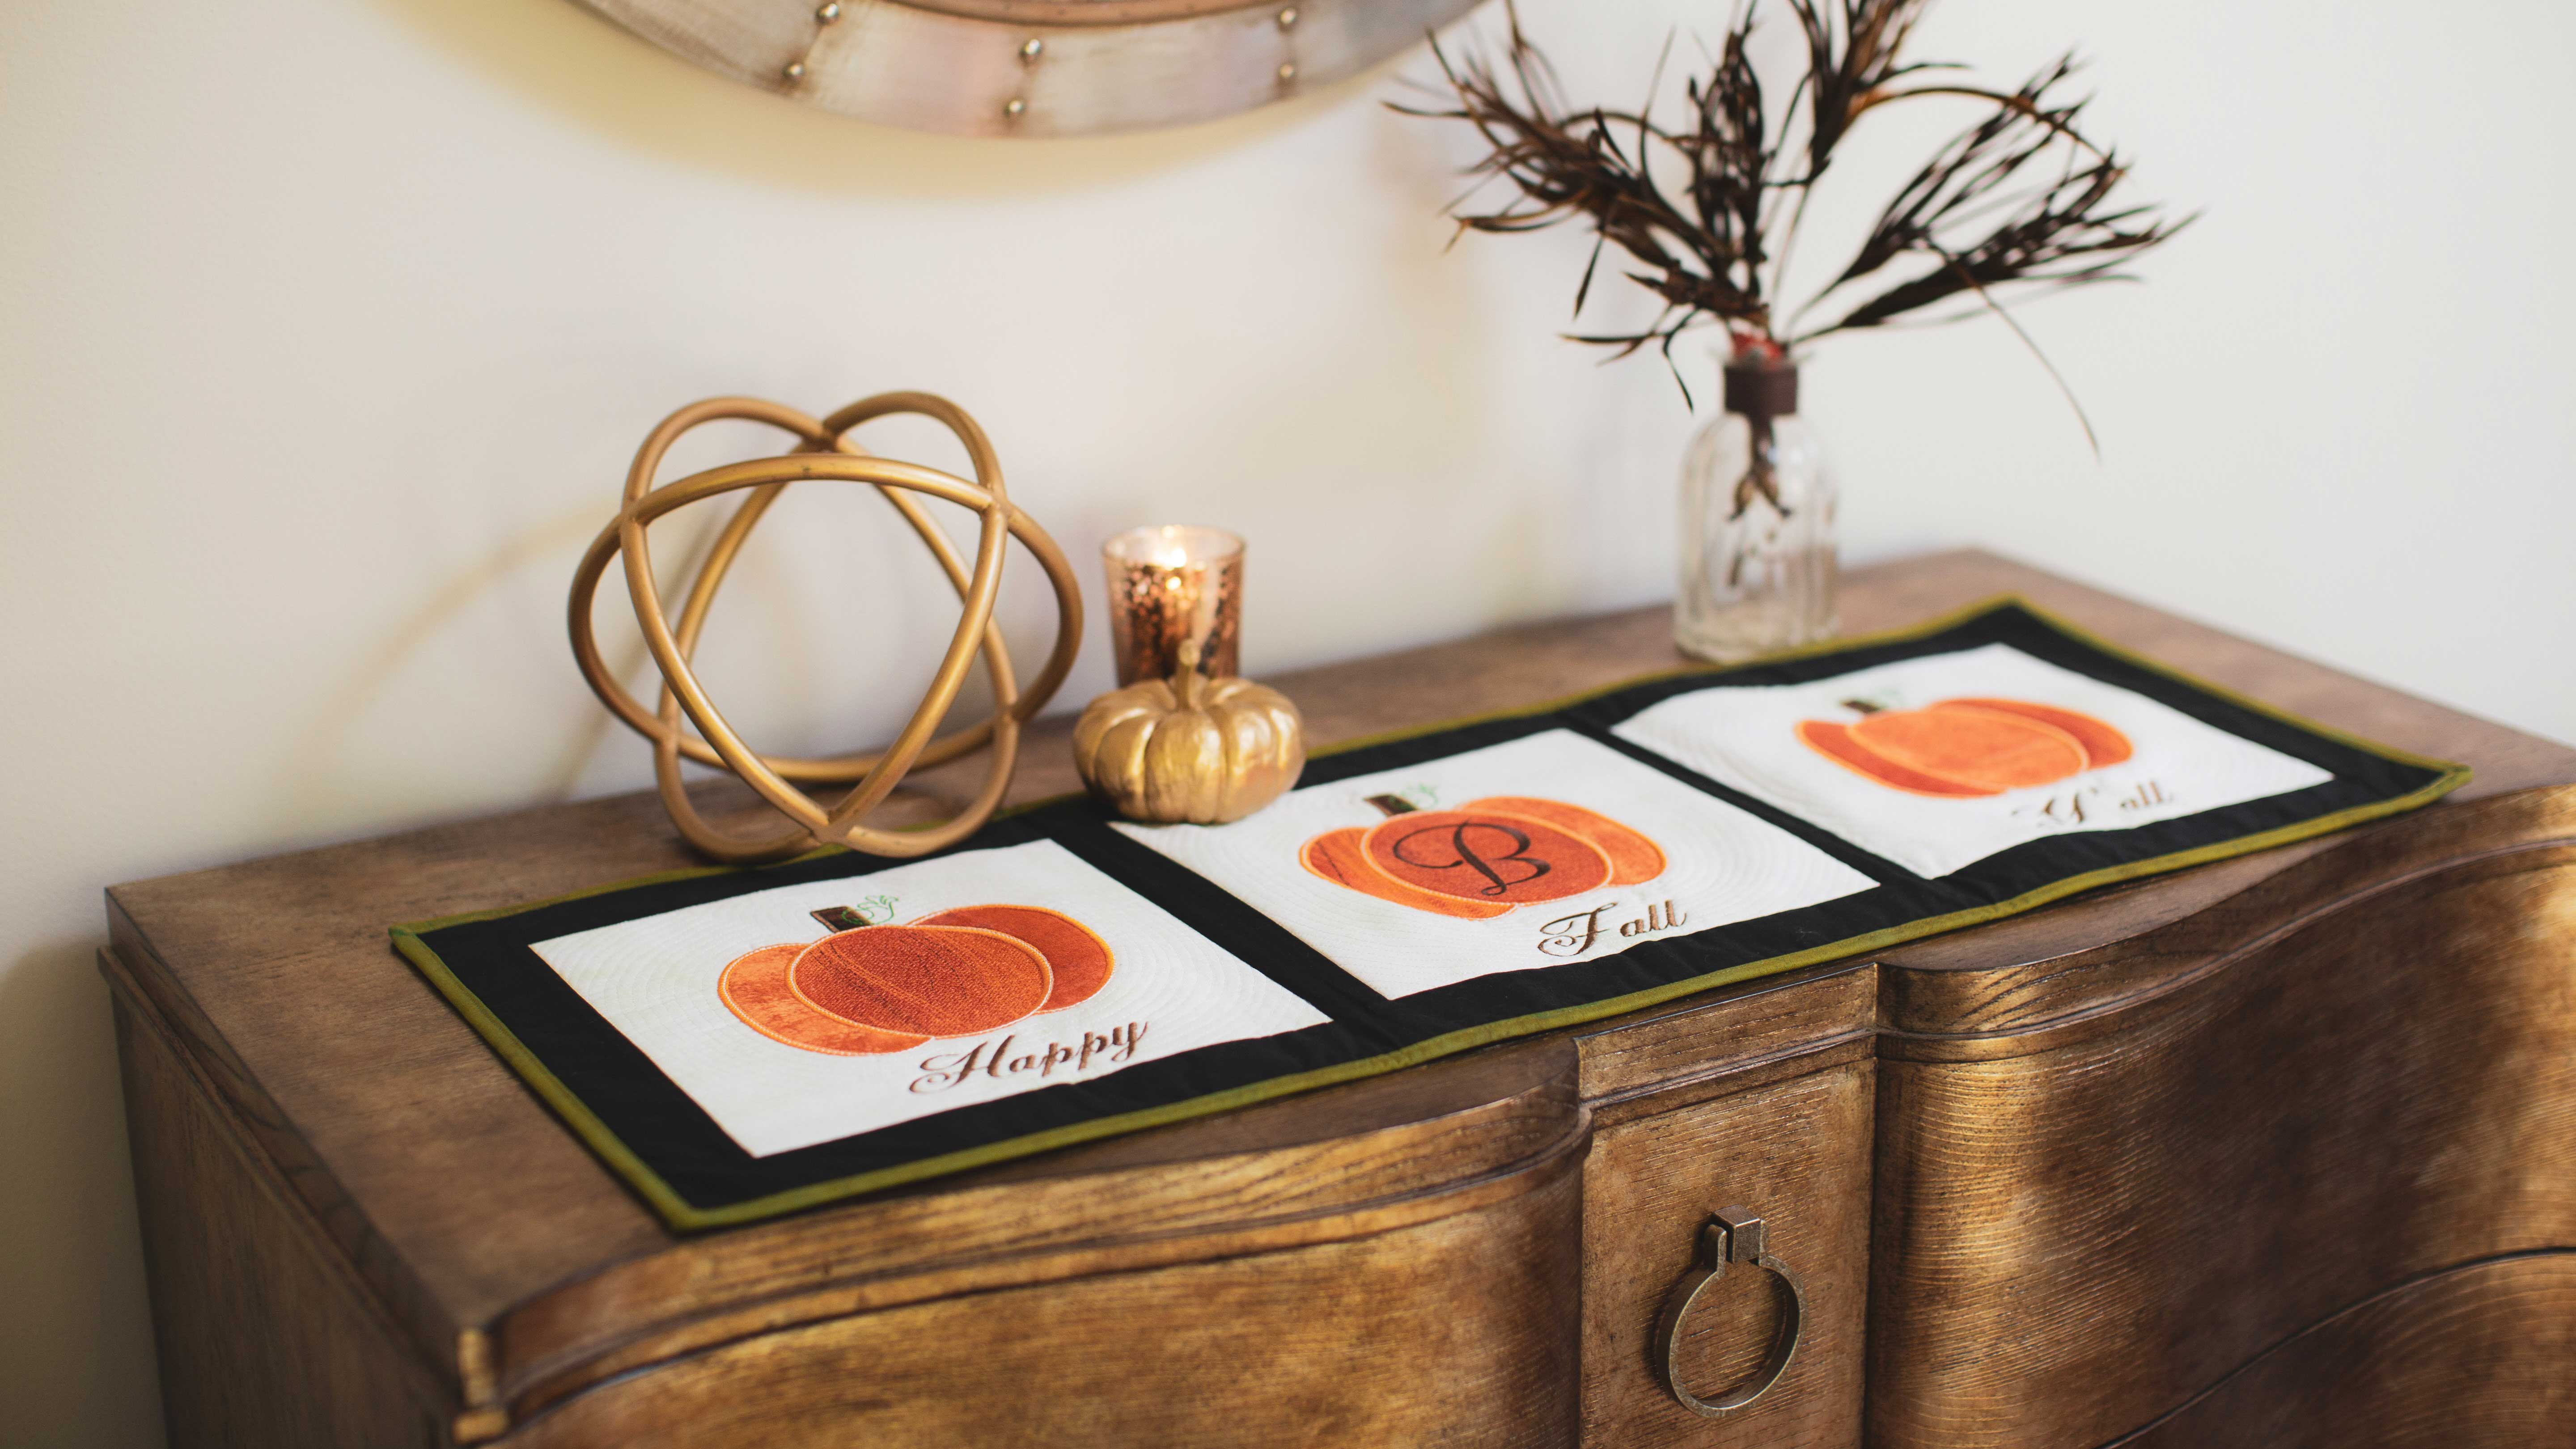
Fall in love with fall by making this embroidered table runner. The pumpkins monogram and phrase can all be created with your Baby Lock Solaris embroidery capabilities and before you know it you’ll be welcoming the autumn season with a “happy fall y’all!” Download printable instructions.
Materials:
- 1-yard white fabric for background
- 3/4-yard black fabric for sashing border & backing
- ¼ yard -green fabric for binding
- 1 Fat quarter of brown for pumpkin stem
- 1 Fat quarter of 3 different values of orange
- 1 ¼ yard Baby Lock Ultrasoft Cutaway BLC-204
- Orange embroidery thread to match orange fabric
- Green embroidery thread for leaves
- Brown embroidery thread to match stem fabric
- White embroidery thread for bean stitch and echo quilting
- Black sewing thread
- 6” x 24” Quilters Ruler
- Digital Dual Feed Foot
- ¼” Piecing Sole for Digital Dual Feed Foot
- Stitch-in-the-Ditch sole for Digital Dual Feed Foot
- 45mm Rotary cutter
- Rotary cutting mat
- USB Stick
- Iron and ironing board
Tools:
- Baby Lock Solaris Sewing and Embroidery Machine
Steps:
-
At the cutting table:
-
Cut (3) - 18” x 18” squares from white background fabric
-
Cut 3 - 2 ½” x WOF from black fabric
-
Cut 1 - 16” x WOF for backing from black fabric
-
Cut 2 - 2 ½” x WOF strips from green fabric
-
Cut 3 - 18” x 18” for embroidery from stabilizer
-
Cut 1- 16” x 40” for batting/Ultrasoft from stabilizer
-
-
Designing the pumpkin:
-
Touch the settings icon choose the 1” grid and the 9 ½” x 9 ½” hoop then OK.
-
Open IQ Designer
-
Select the shape icon choose closed shapes and select the second shape from the left on the top row a rounded corner square and touch OK.
-
Select the Size tool and resize the rounded square to measure about 2” tall x 1.50” wide or a pleasing shape to you for a pumpkin stem and touch OK.
-
Select the Line Property settings and change to the run stitch and touch OK.
-
Select the Line Property fill tool and touch the outline of the stem to apply the double line property.
-
Move the design 2 1/4 squares up from the horizontal center line.
-
Save to memory.
-
Choose Next leave run stitch settings to default touch Set OK and you are in embroidery.
-
Save to memory in embroidery.
-
-
Follow the next set of instructions to create three similar shapes.
-
Touch Home>OK then Select IQ Designer.
-
Select the shape icon choose the circle shape then OK.
-
Select the Size tool and resize the circle to 4.50” tall x 3.50” wide then touch OK.
-
Select the Line Property settings and change to the run stitch touch OK.
-
Select the Line Property fill tool and touch the outline of the oval to apply the double line property. Save to memory.
-
Choose Next leave run stitch settings to default touch Set OK and you are in embroidery.
-
Save to memory in embroidery.
-
Repeat this step three times to create three pumpkin shapes aligning the next two shapes to the right and left and resizing to 4.5" tall and 2.69" wide.
-
Touch Home>OK then IQ Designer.
-
Select the shape icon choose the “open shapes” icon. Select the icon 5 rows down and 5 rows to the right and touch OK
-
Select the Size tool and resize the “leaf” to .85” tall x 1.50” wide then touch OK.
-
Select the Line Property settings and change to the run stitch touch OK.
-
Select the Line Property fill tool and touch the outline of the shape to apply the double line property.
-
Select the design with the selection tool rotate the design 180° to the right then rotate -10° to the left.
-
Move the “leaf” three squares up from the horizontal center line.
-
Save to memory.
-
Choose Next leave run stitch settings to default touch Set OK and you are in embroidery.
-
Save to memory in embroidery.
-
-
Apply new line properties to the pumpkins by using the IQ Designer and following the next steps:
-
Open IQ Designer then select the pocket at the top of the screen to access the designs previously saved to your USB.
-
Select where you saved the designs and open the first oval onto the IQ Designer screen.
-
Select the memory pocket again and open the right oval onto the IQ Designer screen.
-
Select the memory pocket again and open the left oval onto the IQ Designer screen.
-
Select the eraser tool and erase the lines of the left and right oval from inside the center oval.
-
Select the Line Property settings and change to the satin stitch color orange and touch OK.
-
Select the Line Property fill tool and touch the outline of the pumpkin shape to apply the satin stitch line property and color.
-
Choose Next and change the zig zag WIDTH settings to .160”. Touch OK and save to memory.
-
Touch Set OK and you are in embroidery.
-
Save to memory in embroidery.
-
Touch Home>OK then IQ Designer.
-
Select the pocket at the top of the screen to access the designs previously saved to your memory.
-
Select the stem design you saved previously onto the IQ Designer screen.
-
Select the eraser tool and erase the bottom line from the stem.
-
Select the Line Property settings and change to the satin stitch color brown and touch OK.
-
Select the Line Property fill tool and touch the outline of the pumpkin shape to apply the satin stitch property and brown color.
-
Choose Next and change the zig zag WIDTH settings to .140”. Touch OK and save to memory.
-
Touch Set OK and you are in embroidery.
-
Save to memory in embroidery.
-
Touch Home>OK> then IQ Designer.
-
Select the pocket at the top of the screen to access the designs previously saved to your memory.
-
Select the satin stitch pumpkin design onto the IQ Designer screen.
-
Select the Line Property settings and change to the triple run stitch color yellow and touch OK.
-
Select the Line Property fill tool and touch the outline of the pumpkin shape to apply the triple run property and the color yellow.
-
Choose Next leaving properties at default.
-
Touch Set OK and you are in embroidery.
-
Save to memory in embroidery and touch the Home icon.
-
-
Now create your applique using the placement stitch tack-down stitch and bean stitch.
-
Select embroidery and select the pocket at the top of the screen to access the designs previously saved to your memory.
-
Open the Stem running stitch design then ADD from embroidery memory open a second running stitch stem design. (you now have 2 stacked on top of each other)
-
Select embroidery and select the pocket at the top of the screen to access the designs previously saved to your memory.
-
Open the right-side oval then ADD from embroidery memory open a second right-side running stitch oval design. (you now have 2 stacked on top of each other)
-
Select embroidery and select the pocket at the top of the screen to access the designs previously saved to your memory.
-
Open the left-side oval then ADD from embroidery memory open a second left-side running stitch oval design. (you now have 2 stacked on top of each other)
-
Select embroidery and select the pocket at the top of the screen to access the designs previously saved to your memory.
-
Open satin stitch pumpkin design and it should stack on top of the previously added designs.
-
Select embroidery and select the pocket at the top of the screen to access the designs previously saved to your memory.
-
Open the triple stitch design on top of the previously added designs and ensure it is centered with the pumpkin satin border stitch.
-
Select embroidery and select the pocket at the top of the screen to access the designs previously saved to your memory.
-
Open the scroll leaf design.
-
Select the grouping icon at the bottom of the page and group the design together.
-
Select the stippling key and choose Echo quilting. Use the arrows to choose the 9 ½” x 9 ½” hoop. Select OK then ADD.
-
Select font tab #3 and the Exclusive Script font. Spell (Happy) in Medium size. Touch SET>EDIT>MOVE then position below the pumpkin. SAVE THE DESIGN!
-
Select Add. Select font tab #3 and the Exclusive Script font. Spell (Fall) in Medium size. Touch SET>EDIT>MOVE then position below the pumpkin. SAVE THE DESIGN!
-
Select Add. Select font tab #3 and the Exclusive Script font. Spell (Y’all) in Medium size. Touch SET>EDIT>MOVE then position below the pumpkin. SAVE THE DESIGN!
-
73. Fuse Ultrasoft and 18” square of fabric together then Hoop Ultrasoft and 18” square fabric centered in hoop and stitch the blocks.
-
You have three blocks to stitch the same way. One will say Happy one will say Fall and one will say Y’all.
-
Once embroidery of all three blocks is complete trim to 10” square.
-
Sew sashing between blocks and add borders.
-
Apply Ultrasoft to the front and add backing wrong sides to the Ultrasoft. Stitch in the ditch to quilt all three layers together. Trim all edges even.
-
Apply binding or stitch a decorative wave stitch from a Baby Lock serger for added details.
-
Now your Pumpkin table runner is complete. Enjoy!
-


