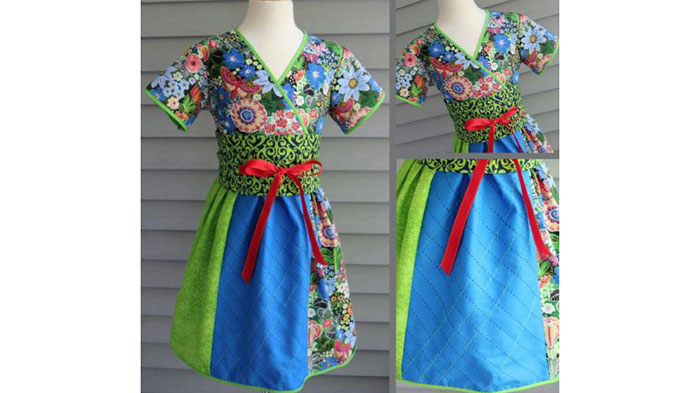
This little dress was made from the Kyoko Modkid pattern by Patty Young and features Sashiko stitched panels and bias trim. The unique pattern and fun stitching will make your daughter or granddaughter stand out! Download printable instructions.
Materials:
- 28 mm Double Fold Bias Binder (BLE8-S3)
- Kyoko Pattern from Modkid
- Fabric –see pattern envelope for sizes and yardage
- ½ yard solid color cotton for skirt section (color variation from pattern)
- ½ yard cotton for bias binding
- Fusible Interfacing for belt and skirt panels
- 4 Spools Aerolock or Maxi-Lock serger thread
- All-purpose threads to match & contrast with fabrics
- Ribbon for belt ties
- Chalk
- Ruler
- Iron and Ironing board
- Spray Starch
Tools:
- Baby Lock Sashiko Machine
- Baby Lock Sewing Machine
- Baby Lock Serger
Steps:
-
Follow the basic cutting directions in the Modkid Kyoko pattern for the bodice sleeves and belt.
-
For the skirt follow cutting directions and cut 2 panels from each of the two prints.
-
For the Sashiko stitched skirt panels cut two panels 1” wider and longer than the other skirt panels from the solid color fabric. Cut two pieces of interfacing to match in size.
-
Following the manufacturer’s directions for the interfacing fuse the interfacing to the wrong side of the fabric.
-
Use the ruler and chalk draw a grid onto the right side of each of the skirt panels.
-
The grid lines in this project were approximately 5/8” apart. Create any type of grid pattern or traditional Sashiko pattern that compliments your fabrics.
-
-
Once you have drawn your guild lines with chalk.
-
Thread the Sashiko machine with a contrasting thread color (refer to owner’s manual for threading assistance) and follow the lines to create your own design.
-
Change colors of thread to create visual interest.
-
-
Once the panel is complete lightly press. Using the ruler and rotary blade trim this panel to match the size of the other skirt fabrics.
-
Sew the skirt panels together at the side seams alternating colors until you have one long strip. Set it aside.
-
Assemble the shoulder seams of the dress top as directed in the pattern directions lining the top if desired.
-
Attach the sleeves at the shoulders but leaving the underarm seam open.
-
From the binding fabric cut bias strips 1 1/8” and connect the bias strips into one long strip of bias.
-
Using the small silver screws that come with the Sashiko machine attach the double fold bias binder to the bed of the machine.
-
Adjust the folder section of the bias binder so it aligns with the needle.
-
Tip: For best results when using a bias binder attachment spray the bias strips heavily with starch.
-
Let the strips dry then iron flat so the bias strip has some body or firmness to it when it goes through the folder section of the binder.
-
-
Following the directions from the bias binder feed the bias strips into the binder and test a few stitches.
-
Feed the lower edge of the skirt sections along the edge of the bias binder to encase the fabric edge within the bias strip. Stitch at a steady and consistent speed.
-
Bind the sleeve edges and neckline in the same manner.
-
Once you have bound the edges sew the back skirt seam together matching it from the bottom edge aligning the binding and catching the bias ends into the seam
-
Sew the underarms and side seam of the bias in the same manner aligning the bias as you go.
-
Continue assembling the dress as directed by the pattern instructions.
-
After assembling the belt add decorative topstitching with the Sashiko machine along the belt edges and along the edges of the ribbon.


