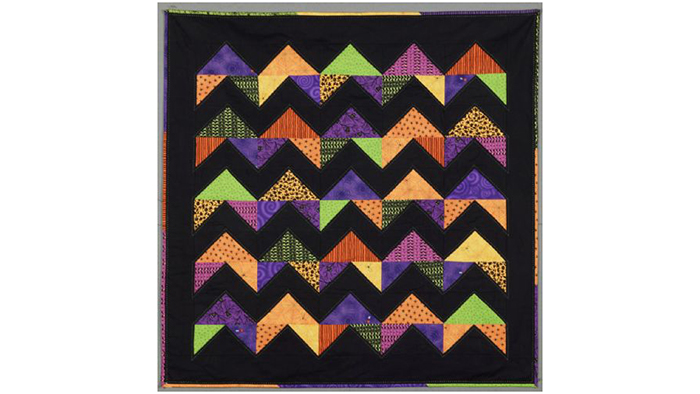
Achieve the look of hand quilting on this spooky scary Halloween quilt with the Baby Lock Sashiko Machine. Make the stitches really “pop” by selecting a brightly colored thread such as lime green to contrast the black background fabric! Download printable instructions.
Materials:
- 1/3 yard of 7 assorted 45” wide Halloween printed cotton fabrics or scraps of Halloween fabrics at least 10” square
- 2¼ yards of 45” wide black cotton fabric for blocks and borders
- 3 yards of 45” wide cotton fabric for quilt back
- All-purpose thread for the piecing
- Lime green all-purpose thread for the quilting
- Chalk marking pencil
- Batting
- Rotary cutting system
Tools:
- Baby Lock Sashiko Machine
- Baby Lock Sewing Machine
Steps:
-
Cutting: width of fabric=WOF
-
Quarter square triangles (QST): cut four strips from black fabric 9¼” x WOF.
-
From the strips cut thirteen 9¼” x 9¼” squares.
-
Cut each square in half along the diagonal making 26 black QST (25 actually needed for project).
-
From the Halloween fabrics cut thirteen 9¼” x 9¼” squares (two from six of the fabrics and one from the seventh fabric).
-
Cut each square in half along the diagonal making 26 Halloween printed QST (again only using 25 for project).
-
-
Half square triangles (HST); cut three strips from black fabric 4 7/8” x WOF:
-
From the strips cut twenty five 4 7/8” x 4 7/8” squares.
-
Cut each square in half along the diagonal making 50 black HST.
-
From the Halloween fabrics cut 25 4 7/8” x 4 7/8” squares.
-
Cut each square in half along the diagonal making 50 Halloween printed HST.
-
-
Start at the sewing machine with 25 black QST and 50 Halloween printed HST. Select 2 different prints from the HST for each black QST mixing the prints around as much as possible.
-
Sew one printed HST to each black QST. Sew long sides of the printed HSTs to short sides of each black QST right sides facing. Press the seams toward printed HSTs
-
With remaining QSTs (Halloween-printed) and HSTs (black) follow steps 3 and 4. Sew black HSTs to the two sides of each Halloween-printed QST. Press seams towards black HSTs.
-
Lay the blocks out into rows each row consisting of five blocks. Start with the blocks containing the black QSTs. Next lay out a row of blocks with the Halloween printed QSTs.
-
Continue this method alternating the rows and mixing the Halloween prints as much as possible. The zigzag pattern will start to appear within the rows.
-
-
Sew the blocks into 10 rows of five blocks each. Press the rows.
-
Sew the rows together and press.
-
Prepare the border from the black fabric as follows:
-
Two strips: 4” x 40½”
-
Two strips: 4” x 47½” (piece strips together if necessary to achieve length)
-
-
Sew the first two strips to the sides of the quilt blocks. Press the seam towards the border.
-
Sew the next two strips to the top and bottom of the quilt blocks; again press to the border.
-
Cut and piece the backing for the quilt.
-
Layer the quilt top batting and backing baste the quilt.
-
Prepare the quilt for quilting by marking lines around the Halloween printed zigzag rows. The lines are to be marked ¼” from the seams highlighting the zigzag pattern
-
Quilting for this quilt was done on the Sashiko machine with brightly colored thread.
-
Cut the binding from the remaining Halloween fabrics: 2 3/8” x 15”-20” strips
-
Sew the strips together using 45 degree angled seams. Trim the seams and press. Sew the binding to the quilt.
-
Stitch one more line of quilting near the binding around the entire quilt.


