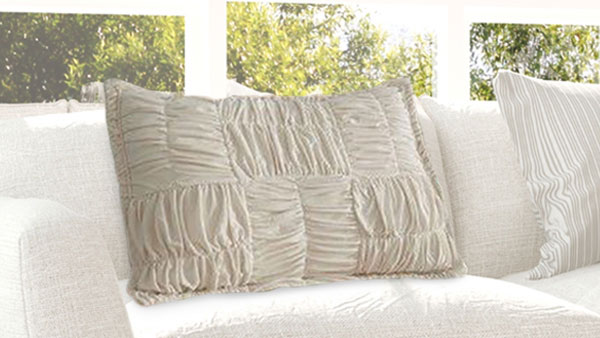
Use your Baby Lock serger to create a beautiful and unique pillowcase! You will see that she uses the differential feed for gathering making this project a snap! Download printable instructions.
Materials:
- 1 1/3 yd soft jersey knit for front gathers
- >1 yd knit (or soft cotton) for pillow body and back
- Wonder Tape
- measuring too
- rotary cutter and mat
- serger with matching thread
- quilter’s tape
Tools:
- Baby Lock Diana Serger
Steps:
-
Cut your fabric for gathered front:
-
cut 3 rectangles measuring 10.25″ X 20″ for horizontal gathered squares
-
cut 3 rectangles measuring 8.875″ (8 7/8") X 20″ for vertical gathered squares
-
cut 3 rectangles measuring 10.25″ X 20″ for horizontal gathered squares
-
cut 3 rectangles measuring 8.875″ (8 and 7/8′s) X 20″ for vertical gathered squares
-
-
Cut your fabric for body and back:
-
1 rectangle measuring 26.5″ X 19″
-
2 rectangles measuring 17.5″ X 19″
-
1 rectangle measuring 26.5″ X 19″
-
2 rectangles measuring 17.5″ X 19″
-
-
To gather with your serger: set your differential feed dial to its highest setting adjust your needle thread tensions to the highest number
-
Increase your stitch length to the longest possible.
-
-
Gather the long edges of all your rectangles for gathered front.
-
On each gathered edge knot one end of serger tail and then pull out center serger stitching line on opposite side so you can adjust the gathers to the correct measurements
-
For horizontal gathered squares (10.25 X 20 rectangles) cut a length of Wonder Tape 8 7/8’s of an inch and press one end to the left edge and the other to the right edge.
-
Pull center serger thread to adjust gathers to fit length of tape.
-
Press tape down matching gathered edge to tape edge.
-
Repeat for opposite gathered edge of fabric.
-
Repeat whole process for vertical gathered squares (8 7/8” X 20” rectangles) except cut lengths of Wonder Tape to be 10.25”.
-
Note: each square (after gathering) will end up measuring 8 7/8” (W) by 10.25 (H)
-
-
Serge three squares together to form top row (horizontal vertical horizontal) right sides together
-
Press the Wonder Tape that’s already applied to secure edges (no pinning needed!) before stitching
-
Repeat for bottom row (vertical horizontal vertical) and then serge top row to bottom.
-
-
Attach completed gathered front to pillow body (26.5”X19” rectangle) by pinning around all sides and then along all seam lines taking care to straighten and pin seams as you go.
-
Serge or baste along outside edges and then stitch squares to body by sewing in the ditch of all seams.
-
-
To add the additional stitching lines through square centers apply quilter’s tape to center of each gathered square (gathering fabric evenly as you tape) and then stitch over tape.
-
Remove tape by ripping off either side of tape underneath stitching.
-
-
Hem on 19” edge of bath back panels by turning under ½” twice and stitching close to folded edge.
-
Layer front of pillow right sides together to layered back panels (hemmed edges towards center) pin and serge along all sides.
-
-
At this point the pillow is finished but optionally for a bordered edge flip right sides out and then pin a ½” strip of knit about an inch in and stitch down.
-
Allow the strip to tuck and fold as it adds to the texture!
-


