
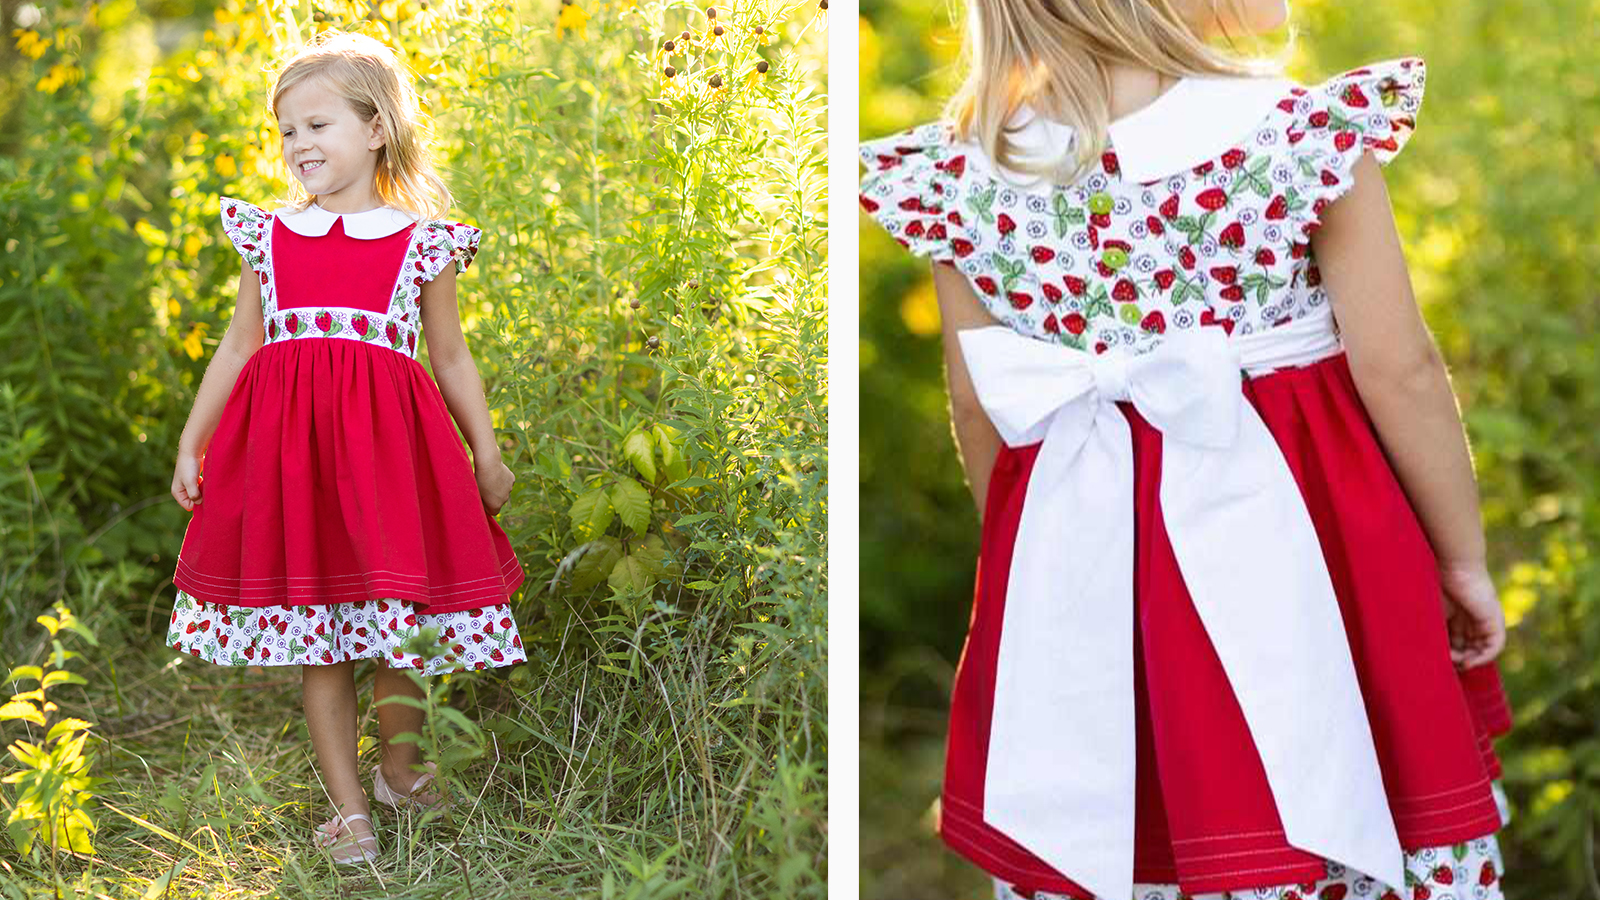
Create this adorable dress (pattern by The Cottage Mama) and customize the sash with a continuous border using your Embroidery Machine! The Strawberry Design is included in the Baby Lock Aurora Sewing and Embroidery Machine but you can use any embroidery design that fits the size of the sash (take seam allowance into consideration) and your hoop size using this tutorial. This technique can really be used for anything you’d like to add a continuous border along.
CLICK HERE TO DOWNLOAD PRINTABLE INSTRUCTIONS WITH ADDITIONAL PHOTOS.
Supplies
Please also see all notes about supplies below the list!
- Baby Lock Aurora Sewing & Embroidery Machine (or other sewing/embroidery machine)
- Hoop Options:
- 4” x 4” hoop
- Or if your machine has larger hoop capabilities you can certainly follow this tutorial with a larger hoop as well. Fill more of the hoop for less hoopings!
- Dress Pattern with Sash (Georgia Vintage Dress by The Cottage Mama was used for this tutorial)
- Fabric and notions amounts based off pattern
- Optional: Lightweight Fusible Interfacing to go behind the front sash piece for extra stability when embroidering
- Variety of Madeira Embroidery Thread
- Baby Lock Tear Away Firm Embroidery Stabilizer
- Embroidery Needles
- Embroidery Design
- Fabric marking utensil that works for your fabric (i.e. Chaco Liner Frixion Disappearing Ink Pen or Air/Water Erasable Pen/Pencil). Make sure it is one you like and is easy to use (and also disappears easily) because the lines we draw with it are important. I highly recommend testing it on the fabric you are using to make sure it fully disappears!
- Small 4-5” ruler or measuring gauge
Notes About:
The Baby Lock Machine: This tutorial was written using the Baby Lock Aurora machine and using the 4” x 4” Hoop. However if you have a different machine with a larger hoop you can place more designs in your hoop but still utilize the technique taught in this tutorial to re-align additional designs.
The Dress Pattern: I used the Georgia Vintage Dress by The Cottage Mama. You can purchase it as an instant download/printable PDF or as a printed pattern you receive in the mail. You can use a different pattern but you may have to improvise a little depending on the pattern. You could also choose a different area to apply a border to – the hem would be super cute!
The Fabric Amount: You might need a little more fabric for the Sash Front (where the embroidery is stitched) because you’ll want to hoop the fabric and stitch it out first before cutting out that pattern piece.
Thread Type and Machine Needle: You can use standard 40-weight Madeira Rayon or Polyester Embroidery Thread. If you want more of a matte finish consider a Madeira Polyester 40-weight Sewing or Frosted Matt Thread. Perhaps even consider Madeira Cotona 50-weight thread. With any of the above options use a Klassé 75/11 Embroidery or Universal Needle. Just keep in mind that you might get a little more lint with cotton threads (not a bad idea to brush out the built-up lint after stitching)!
Instructions:
- For this tutorial you will follow your pattern instructions to construct the dress (though I will include a few helpful tips at the end at least for the Vintage Georgia Dress pattern that I used)! Decide where you’d like to place your continuous border. I decided I’d like to repeat the Strawberry Design that is built into the Baby Lock Aurora (Exclusives>Kid’s Corner>Design 008) along the front of the Sash piece.
- Wait to cut out the Sash Front piece so that it can be embroidered first. I used a lightweight fusible interfacing to fuse to the backside of my fabric before hooping for added stability. Then you’ll want to trace the pattern shape on the top side of the fabric and mark a line down the center horizontally and vertically.
- I started in the center and worked to the right and then went back and worked to the left of the center design. If you start from left to right the designs may look offset from center when completed. But you could do some measurements to make sure it will look the way you desire it to when complete if you wanted to work from left to right. Hoop your interfaced fabric with a layer of Tear Away Firm Stabilizer. Try to line up the horizontal and vertical lines with the center markings on the hoop as best you can.
- Find your desired design (keep size and seam allowance in mind) and Set it to the screen.
- Rotate 90˚ to the left if you have hooped yours like mine (shown above) and make sure to use the Move Arrows to position the Center of the design with the absolute center of the sash front. NOTE: If you hooped yours differently than mine you’ll use a different Positioning Key in the next couple of steps.
- Stitch out the design.
- After the Center Design is complete draw another line vertically lined up with the right edge of the leaf. We’re going to try to get the flower on the left of the next design as close to the leaf (of the first design) as possible without overlapping the design anywhere. If you have Embroidery Software you may be able to print an actual template of the design to help with positioning as well!
- Next you’ll want to slide the fabric over (in the hoop) to make room for the next Strawberry Design to stitch. Make sure to keep that horizontal line aligned with the center marks on the left and right of the hoop.
- Use the Positioning Keys within this button and select the Bottom Center Key (to align the Center Left of the design in the hoop).
- Use the Move Arrows to make sure that the needle is positioned where your horizontal and new vertical line crosses (see pink crosshair below). Ensuring that the Center Left of the design starts at this mark should keep your designs aligned as you continue. Once placed correctly stitch out the design.
- Repeat for the 3rd design and (if you decide to complete) a 4th or more. Depending on the size of your sash (and the dress size you are making) you may run out of room and decide you don’t need a 4th (or more) design(s). I was ok with losing a bit of the design in the side seam of the sash and so I stitched 3 designs to the right and 3 designs to the left of the center design.
- Now it’s time to work on the opposite side. When you work to the left of the Center Design you’ll want to line the leaf of your new design up to the flower of the last design each time. Draw a new vertical line to identify the far left of the Center Design. However you will not use this line to line up the leaf of your new design because it is not the absolute furthest right edge of the new design. The furthest point is the right top flower. So we need to take this into account the difference is about a 1/8th inch for the Strawberry Design. If you line your new design up with the edge of the first design you may have a larger gap than desired.
- Draw an additional line 1/8” to the right of the vertical line you just marked. Use this new line for aligning your next design.
- Hoop the project again making sure that horizontal line is lined up with the markings on the hoop.
- Use the Positioning Keys and select the Upper Center Key.
- Then use the Move Arrows again to position the Right Center of the design where the newest vertical line (on the right) and the horizontal line cross (shown below with the pink crosshair). Stitch the design out once you have it positioned.
- Check that the placement is good as it starts stitching. Then complete the design.
- Repeat until the Sash Front is complete.
- Place the Sash Front Pattern on top of your drawn designs to see if you need to retrace. If the dense designs pulled the fabric in a bit you may need to retrace. Cut out the Sash Front. 20.) Remove all lines according to your marking utensil instructions for removal. 21.) Now follow the pattern instructions to complete the dress.
The following are just a few tips for even more fun during the sewing process!
- Consider using the optional Pearl and Piping Foot (ESG-PP) to stitch on your piping! The foot has a tunnel built into it so that the piping can pass through easily and it assists in keeping the piping aligned as you sew. You simply move the needle position to the right of the piping.
- Consider using the optional Ruffling Foot (SA122) to stitch those gathers! This is my favorite foot! It takes a little math and a little practice but it makes the most beautiful even and flat gathers. You don’t have to pull basting threads and manually gather and space the gathers out either! If you are doing the Vintage Georgia Dress I found that if you set the foot to pleat/gather every 1 stitch at a depth between 1 and 4 (closer to 1) it’s nearly the perfect amount of gather to match up with the bodice (you may just have to cinch it up a bit as you pin and stitch them in place to the bodice).
- There are a few places you have to press something in or up a ½” with the Vintage Georgia Dress. My favorite way to gain accuracy quickly is to stitch a basting stitch at or just less than a ½” from the raw edge. This stitch line quickly gives me my pressing line!
- Another fun detail I added was topstitching with complimentary thread that would stand out. If you feel comfortable with your straight stitching you might give it a try! Change your stitch length to 3.0mm perhaps use a topstitch needle complimentary thread or a heavier topstitching thread to make your stitching stand out. I hemmed my top skirt with a white thread and then stitched two additional lines each a ½” apart. I also topstitched my piping down.


