
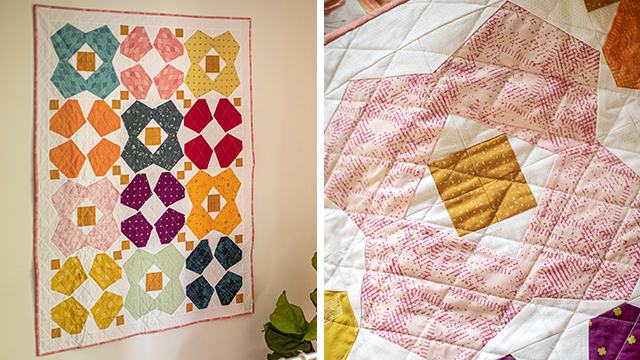
Enjoy making this fun modern quilt using Paper Piecing techniques. This quilt pattern is near and dear to Anna’s heart. The pattern is a modern twist of the traditional foundation pieced quilt block called Tallahassee in which is her home. With its rolling red hills and canopy oaks Tallahassee is a little treasure most fall in love with. The block is reminiscent of those rolling hills and the beauty of year-round flowers.
Finished Dimensions: 40” x 52”
Click HERE to download project instructions with additional photos.
- Click HERE to download the Tally Block Paper Piece Template.
- Click HERE to download the Tally Quilt Pattern.
- Click HERE to download the Tally Quilt Pattern Coloring Page.
Supplies:
- Baby Lock Quilting Machine like the Ballad or Chorus
- Feet:
- J Foot or Open Toe Foot
- 1/4” Foot with Guide
- Compact or Digital Dual Feed Foot
- Fabric:
- Main: (12) Fat Quarters OR 2 yards of fabric for a solid look (have fun with this you can use as many fabrics as you want!)
- Background: 3 yards
- Cornerstones: 1/2 yard
- Border: 1/4 yard
- Backing: 3 yards
- Batting: Full size or 3 yards
- Thread: Madeira Cotona No. 50
- Needle:
- Foundation Paper:
- Suggested: Carol Doak’s Foundation Paper
- OR Copier paper
- Template: Print out 48 copies of included Tally Block foundation template on foundation paper or copier paper. Make sure printer is set to 100%.
- Other: Scissors Add A Quarter Ruler light box or board such as Daylight Wafer Lightbox cutting mat and rotary cutter ruler iron Clover Wonder Pins adhesive spray such as 505 spray glue stick
Cutting:
- Main:
- Cut (48) 6” x 9” for yardage
- If using Fat Quarters cut (4) 6” x 9” per Fat Quarter
- Background:
- Cut (144) 3” x 7”
- Cut (96) 2 1/2” squares
- Cornerstones:
- Cut (48) 2 1/2” squares
- Borders:
- Cut (3) 2 1/2” x WOF
Sewing Instructions:
Piecing the Blocks
Attach J foot to machine. An Open Toe foot is another great foot to try when paper piecing.
Note: For paper piecing you will be building the block on the wrong side of the paper piece pattern and stitching on the right side of the paper piece pattern. It will feel a little strange at first but you got this!
- After making a copy of the Tally Block template trim a ¼" away from the outside line (A B same block shown on the light box). The outside line is the ¼" seam allowance for the blocks please do not cut.
- Flip the template so the right side is down on a light box window or a light surface (C). Light can show through helping to see the lines better.
- Using a glue stick place a dab of glue on the area labeled A1. With right side up place a 2 1/2” background piece on top of the area A1 overlapping the line between A1 and A2 a 1/4” (D). Place a 2 1/2” cornerstone piece on top of the A1 piece with right sides together (RST) (E). Pin to hold in place. Flip the unit over to the right side and stitch directly on the line between A1 and A2 (F). Flip back over and press A2 back over seam to cover A2 (G).
- Flip over again to the right side and fold the paper piece along the line between A2 and A3 (H). Using a ¼" seam trim off any excess. You can also use an Add A Quarter ruler for this process.
- Align raw edges of a 2 1/2” background piece RST with the edge previously cut in step 4 (I). Pin. Flip the unit over and stitch directly on the line between A2 and A3. Flip back over and press A3 back over seam (J). Flip over again to the right side and fold the paper piece along the line between A2 and A3 (K L). Using a ¼" seam trim off any excess.
- Repeat this process with main fabric for A4 and for background fabrics A5 A6 and A7 (M).
- When block is complete flipped to the wrong side and trim directly on the outside line to square up the block (N O).
- Repeat for the remaining blocks.
Piecing the quilt top
- Lay the blocks out for desired look. Feel free to flip blocks around for a new look or use the included coloring page to plan your quilt!
- Sew the blocks together in groups of four to create a 12 1/2” block. To do this start up in the left corner with the top two blocks and stitch together on the inside line press seams open. Next stitch the two blocks below the previous blocks on the inside line press seams open. Stitch these two sections together on the inside line to create a 12 1/2” block. (P Q R)
- Continue with this sewing the blocks together until you have twelve 12 1/2” blocks.
- Next once blocks are in desired position stitch the blocks together three blocks across on the inside line. Press seams open. Now there are four rows. Stitch the four rows together on the inside line. Press seams open.
- Cut one of the 2 1/2” border strips in half to make (2) 2 1/2” x 20 strips. Attach one of the half strips to a 2 1/2” x WOF border strip. Repeat for the other strip.
- Stitch one of the 2 1/2” x WOF border strips to the top of the quilt top. Repeat for the bottom. Even up the edges.
- Stitch one of the longer 2 1/2” strip units to the left side of the quilt top. Repeat for the right side. Even up the edges.
- Layer quilt top* batting and backing. Quilt as desired. Bind with your favorite binding method.
For the quilting I suggest using the Compact or Digital Dual Feed Foot with the Quilting guide. This belt driven foot is a dream when quilting multiple layers together. I also used the 1/4” foot attachment for the Digital Dual Feed to attach my binding this allowed me to finish my binding with ease with no shifting.


