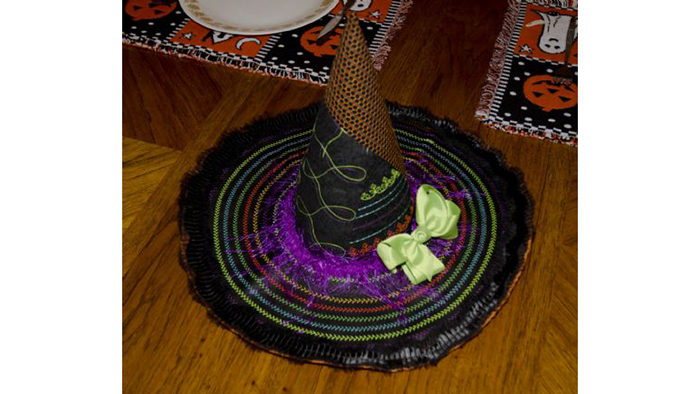
If you've wanted to find a use for your machine's decorative stitches try making this fun Halloween centerpiece. This witchy piece of decor is elegant enough for any dinner party but cute enough to get your kids excited about the spooky holiday! Download printable instructions and template.
Tools:
- Baby Lock sewing and embroidery machine
- Included template
- 1-15” round orange placemat for base
- Green bow
- Fringe trim
- Madeira sewing and embroidery thread
- Tear-Away stabilizer
- Shape-Flex stabilizer from Baby Lock
- Steam-a-Seam II
- Hot melt glue gun w/glue
- Temporary spray adhesive
- Polyester fiber fill
Steps:
-
At the Cutting Table:
-
From the Shape-Flex stabilizer and the black fabric cut one section each the same size as the placemat. Fuse the stabilizer to the back of the fabric using Steam-a-Seam II.
-
Lightly spray the front side of the placemat with the temporary spray adhesive. Finger press the fused section to the top of the placemat.
-
Cut out six sections that measure at least 15” square. These will be cut down to size later after the embroidery has been completed.
-
-
At the Embroidery Machine:
-
Set the machine up for Embroidery and select Embroidery Edit. Select the decorative stitch icon. Select any of the stitches as desired.
-
Click on the Duplicate icon and add additional rows using the same stitch on both the horizontal and vertical lines. Refer to the instruction book for the use of this feature.
-
Thread the machine with orange thread.
-
Hoop the fabric and the tear-away stabilizer in the largest hoop. Place the hoop on the machine and embroider the decorative stitch design.
-
For the remaining five sections change out the decorative stitches while using different stitches and thread colors for each line. Set aside.
-
-
At the Sewing Machine:
-
Set the machine up for sewing. Select Utility and Decorative Stitching option. From the list of stitches select the herringbone stitch.
-
Using the “J” foot and threading the machine with orange thread.
-
Stitch around the outer edge of the fused round section using the width of the presser foot as your guide; place the right edge of the foot even with the outer edge of the fabric.
-
Repeat for the remaining rows while changing the thread color for each row and placing the right edge of the foot even with the outer stitched line from the first row. Set aside.
-
While referring to the included template for the hat cone increase the size of the section 125%.
-
Lay out the embroidered sections and piece the sections together following the stitch lines on the template.
-
From the pieced section cut one section from the template.
-
With right sides together place the straight edges together and stitch the section together using a ¼” seam allowance. Turn right side out. Fill the cone with the polyester fiber fill.
-
Place the cone in the center of the brim and glue to the base using the hot melt glue gun.
-
Glue the trim around the base of the cone and attach the bow to the trim to finish.
-


