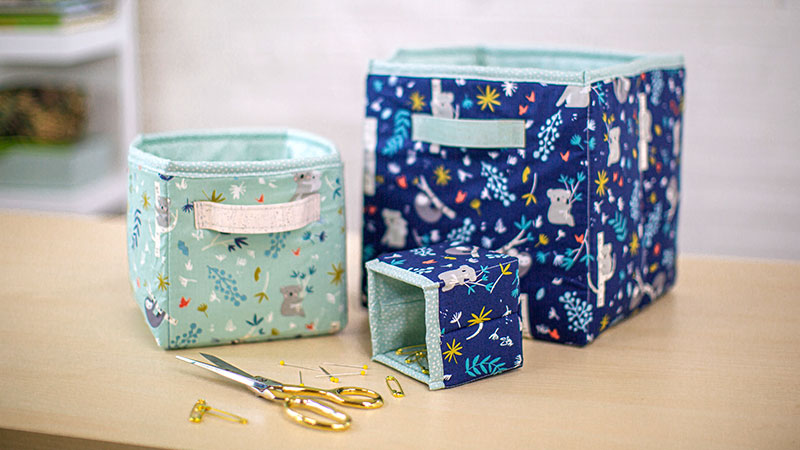
Everyone needs creative storage solutions! Whether it is for your living area nursery or sewing room there is always something that needs its own place. Follow along with Jessica Kapitanski of Sallie Tomato as she shows you how easy it is to create an adorable and useful storage cube using your Baby Lock sewing machine. Download the printable instructions here.
Be sure to check out the bonus tutorial video here.
Materials:
- Walking Foot
- Zipper Foot
- Temporary Adhesive Spray
- Marking Pen
- Sewing Clips
- Pins
- Optional (4) Small Rivets to attach handles
- Rotary Punch or Awl for Rivets
- Basic sewing supplies
Tools:
Steps:
-
Yardage & Cutting Instructions
Measurements are listed width by height. Follow the instructions only for the size you are making.
-
Exterior (42” wide)
- SMALL: 1/4 yard—Subcut into (1) 9” by 12” piece
- MEDIUM: 1/2 yard—Subcut into (1) 15” by 21” piece
- LARGE: 2/3 yard—Subcut into (1) 22” by 31-1/2” piece
-
Lining (42" wide)
- SMALL: 1/4 yard—Subcut into (1) 9” by 14” piece
- MEDIUM: 1/2 yard—Subcut into (1) 15” by 23” piece
- LARGE: 2/3 yard—Subcut into (1) 22” by 33-1/2” piece
-
Sew-In Foam Stabilizer (58" wide)
- SMALL: 1/4 yard—Subcut into (1) 9” by 12” piece
- MEDIUM: 1/2 yard—Subcut into (1) 15” by 21” piece
- LARGE: 2/3 yard—Subcut into (1) 22” by 31-1/2” piece
-
Cork Fabric (27” wide)
You’ll need a 2” strip for any size
- MEDIUM: Front Handles (2) 2” by 6” pieces
- LARGE: Front Handles (2) 2” by 6” pieces
-
-
Sewing Instructions - Let's Get Started!
-
Throughout the pattern the small size is listed first the medium size is noted in brackets [ ] and the large size is noted in parenthesis ( ).
-
-
Prepare The Exterior Cube
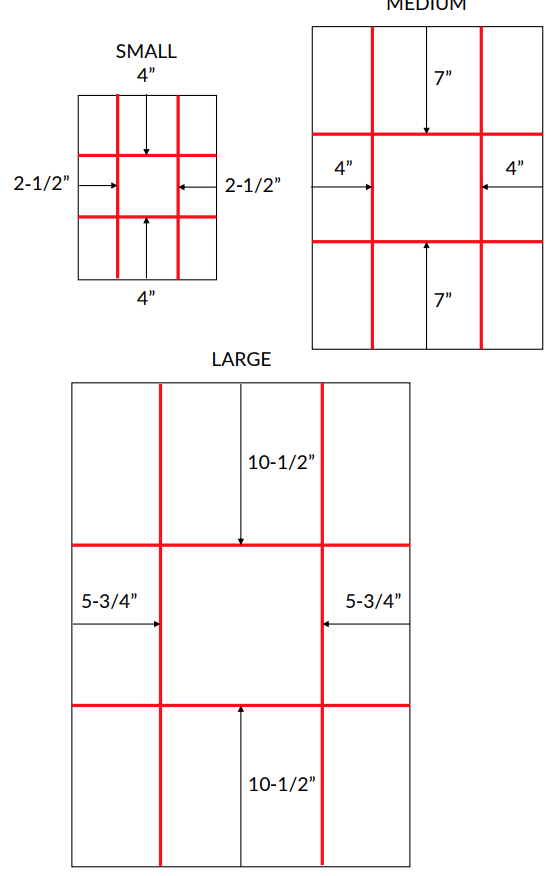
Mark the stitch lines on the RS of the exterior fabric shown below for the size cube you’re making.
Use chalk or air erasable marker so your lines can be removed later on.
-
Mark the stitch lines on the RS of the exterior fabric shown below for the size cube you’re making.
Use chalk or air erasable marker so your lines can be removed later on.

-
With RSU layer the exterior fabric on top of the foam stabilizer and align the raw edges.
Use temporary adhesive spray to hold the layers together rather than pins or clips.
-
Topstitch the exterior fabric to foam by sewing along stitch lines with a 3mm stitch length.
A walking foot will help guide the layers through your machine without pushing the fabric.
-
With RST fold the exterior in half matching the short edges.
-
Sew sides with 1/2” seam allowance.
-
Trim seam allowance to 1/4” wide.
-
With RST flatten each of the bottom corners to create a triangle. This will form the boxed bottom.
-
Sew along the stitch line with a 2.5mm stitch length.
-
Trim each boxed corner 1/4” from stitches.
-
Turn the exterior right side out.
-
-
Prepare the Lining
-
Mark the stitch lines on the WS of the lining fabric shown below for the size cube you are making.
-
Press both short edges of the lining 1/2” to the wrong side.
-
With RST fold the lining in half matching the short edges.
-
Sew sides with 1/2” seam allowance.
-
Trim seam allowance to 1/4” wide.
-
With RST flatten each of the bottom corners to create a triangle. This will form the boxed bottom.
-
Sew along the stitch line with a 2.5mm stitch length.
-
Trim each boxed corner 1/4” from stitches.
-
-
Attach Lining to Exterior
-
With WST place the lining inside the exterior aligning side seams and stitch line marks.
-
Fold the top edge of the lining over the raw edge of the exterior to create faux binding.
-
Topstitch lining in place 1/8” from lower folded edge.
Try using a zipper foot for this step to see the folded edge of the lining better.
-
-
Prepare and Attach Handles
The following section is optional. You can choose to add cork or vinyl handles on the front and back of your cube.
-
With WST fold each Handle in half lengthwise. Each handle should now measure 1” wide.
-
Topstitch 1/8” from each long edge of Handles.
-
Measure [1-1/2”] (2”) down from the top edge of faux binding and [1”] (2-1/2”) in from each side edge on the front and back.
-
Position one Handle on the front of the cube aligning the top corner of each short edge with the placement mark from the previous step.
The Handle will lift up slightly in the middle.
-
Topstitch each end of Handles in place.
-
-
Topstitch Corners
With lining sides together fold each top corner matching adjacent sides. Sew the layers together 1/8” from the fold starting at the top edge and stopping at the end of the faux binding.


