
Hi everyone! I hope all is well with you all. I am sure many mamas can relate to me when it comes to holding onto things that belong to our children. My children are 14 and 12 and I still have all of their artwork from preschool to now as well as clothes they wore when they were little. I am a sentimental mama and I am not ashamed of it lol. Today I am excited to share a few mama creations with you all so keep reading.

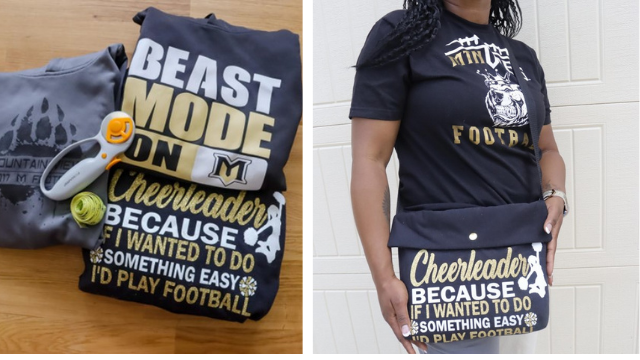
My kids have been involved in sports since they were six years old. While reorganizing their rooms recently I found my son’s football team hoodie from when he was nine and my daughter’s from when she cheered in the third grade. Of course being who I am I did not want to give them away nor throw them out. I then got the idea to turn them into bags so that I can not only keep them but they would also get lots of use.


First cut the hoodies and desired lining fabrics into squares 8.5” in length and 12.5” in width ensuring I added a ½” seam allowance all around. I also removed the pockets from the front of the hoodies. You can also use your own preferred measurements for the bags.

Next you will cut two pieces of fusible interfacing the same dimensions as the fabric. One for the front piece and one for the back piece to give the knit fabric stiffness and structure. For the front flap of the bag I used the fabric from the sleeve of the hoodie. I cut the width of the flap 12” wide the same as the bag and the length is 6” long.

After you interface the fabrics you will place the front and back of the fabric together right side facing and stitch. Once you stitch the sides and bottom of the bag closed you will then turn the bag inside out hold the bottom side seam and form a “V.” Next you will stitch across that v shape about 1.5” from the bottom. Clip the excess seam allowance to ½”. Do the same to the lining except leave a little opening to turn the back right side out.


Interface both sides of the front flap place the pieces right side facing stitch and cut the excess allowance to about ⅜”. Turn the flap right side out. Next pin the flap to the front piece of the bag and stitch. I put my Baby Lock Accord on a stitch length of 3. Today I really came to appreciate the leg lift feature on this machine as I had to lift the presser foot and pivot the bag a few times while sewing.


Attach your strap to each side of the bag. Place the bag inside of the lining with the flap tucked in between the lining and bag. Stitch all the way around. Remember the opening at the bottom of the lining? You will pull everything through that hole and b turn the bag right side out. Once you do that you will slip stitch the opening on the lining closed or topstitch the edge of the lining opening.

Lastly you can add a button or snap to the center of the bag flap. I added a gold snap to compliment the team color of black and gold.

I really enjoyed making this sentimental and fun project. I enjoyed it so much that I decided to make two bags. The second bag was sewn using the same steps. However for the front flap I created a slanted design. I also took the straps from an old bag and sewed it onto this one to give it a little style. These bags have already been worn quite a bit and I am just happy it is washable.

I hope that you all enjoyed this blog post and I hope that I have shown you some ways to hold on and make use of things you hold dear. Have a beautiful day everyone.
Check out more sewing tips and inspiration from Faith St. Jules here.


