
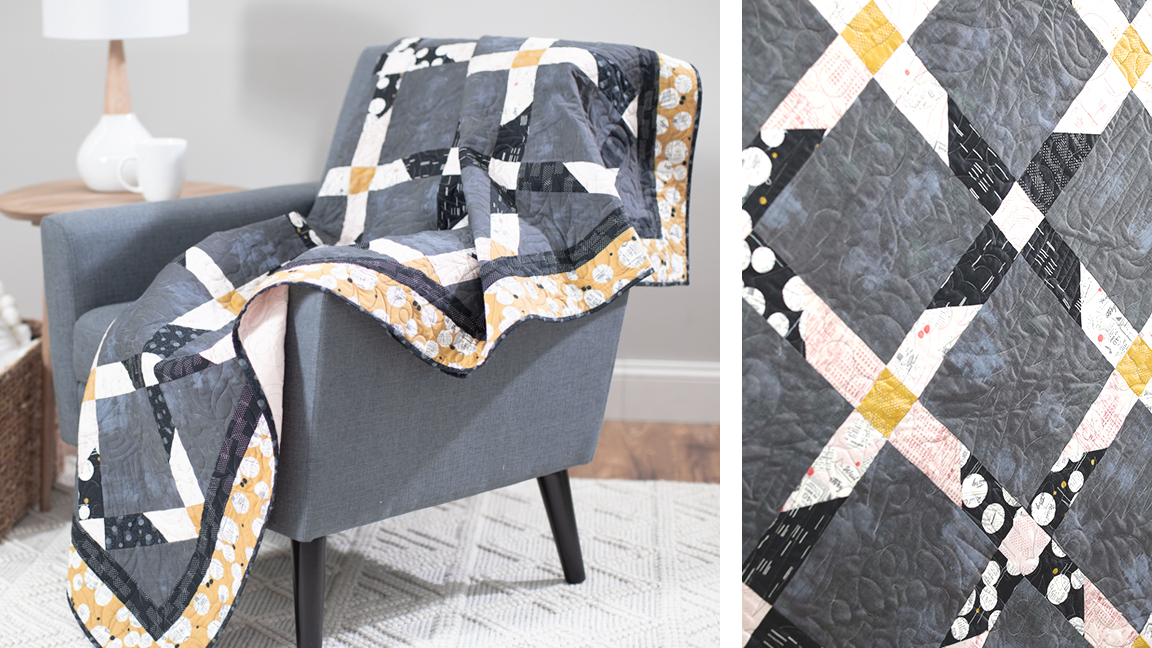
With just a few simple shapes and no complicated piecing you can make this fun and eye-catching quilt. Switch up the colors to match your personality or décor for a completely different look. You are sure to love this pattern and enjoy the ease of construction. Don’t forget the quilting! Choose to do an all fun edge-to-edge pattern or use the large square to showcase unique custom quilting!
CLICK HERE TO DOWNLOAD PRINTABLE INSTRUCTIONS WITH ADDITIONAL PHOTOS.
Quilt pattern and pieced by Mike Johns
Quilted by Denise Schober
Supplies
- Baby Lock Sewing Machine
- Baby Lock Quilting Machine such as the Baby Lock Regalia ST
- Quilting fabric (measurements provided below)
- Quilt Batting
- Neutral Color Thread of Choice for Piecing
- Quilting Thread to Match or Complement Quilt
- Standard Sewing Supplies such as Rotary Cutter Snips Seam Rippers Etc.
Fabric Requirements for Quilt
-
Focus Fabric (Squares) – 2 yds
-
Cornerstone Fabric A (Smaller Squares in Intersections) – 1/8 yd
-
Cornerstone Fabric B (Smaller Squares in Intersections) – 1/8 yd
-
Sashing Fabric A – 1 yd
-
Sashing Fabric B – 1yd
-
Inner Border Fabric – 5/8 yd
-
Outer Border Fabric – 1 1/8 yd
-
Binding Fabric – 1/4 yd
-
Backing Fabric – Approximately 4 yards depending on quilting method used.
-
Fabric measurements are based on the photographed quilt which has a finished measurement of 75 ½” x 62 ½”. Measurements based on 44” wide fabric.
Cutting Instructions
- Focus Fabric (Large Squares) – Cut 50 – 8 1/2” x 8 1/2" Squares
- Cornerstone Fabric A (Small Squares at Intersections – Cut 25 – 2 1/2" x 2 1/2" Squares
- Cornerstone Fabric B (Small Squares at Intersections – Cut 25 – 2 1/2" x 2 1/2" Squares
- Sashing Fabric A – Cut 80 – 5 1/2” x 2 1/2" Rectangles
- Sashing Fabric B – Cut 80 – 5 1/2” x 2 1/2" Rectangles
- Inner Border Fabric – Cut and Piece 1 1/2" Strips Width of Fabric (WOF)
- Outer Border Fabric – Cut and Piece 3 1/2" Strips WOF
- Binding Fabric – Cut and Piece 2 1/4” Strips WOF
Creating the Blocks
Creating the Sashing Blocks (Block A):
- Block A the Sashing Block is created using one piece of Sashing Fabric A and one piece of Sashing Fabric B.
- Fabrics are placed right-sides together with the top fabric rotated ninety degrees in relation to the bottom fabric. Align the top and right-side edges of the two fabrics. Stitch a forty-give degree angle across the overlapping area of the two fabrics.
- Trim the excess fabric leaving a 1/4” seam allowance (SA). Press the block open with SA facing the darker fabric.
- Continue making Block A until all Sashing Fabric A and Sashing Fabric B have been used. This will result in a total of 80 Block A units with each unit measuring 2 1/2" x 8 1/2".
Creating the Quilt Top
- With all of Block A (Sashing Blocks) created the center of the quilt top can be laid out and sewn together. The following diagram shows the lay out (Note this is just a portion of the quilt. Refer to the finished quilt diagram at the end of the downloadable instructions for full layout.)
- This quilt is created on-point meaning the blocks are set on a forty-five-degree angle. The easiest way to accomplish this is to create diagonal rows and then join the rows together.
- As you can see you will have two alternating rows. One row will be made up of the Focus Block with a Sashing Blocks in between. The other row will be made up of Sashing Blocks with Cornerstone set in between.
- To simplify construction it is recommended you make the Sashing Blocks first. Once these are completed the blocks can then be laid out and arranged as desired. Rows can then be created and then these rows will be joined.
- For the partial blocks located on the outer edges full blocks are created and then trimmed down prior to attaching the outer borders.
Squaring and Adding Borders
- With the center of the quilt assembled the excess fabric around the outer edges will need to be trimmed. Using a square edge ruler and rotary cutter trim the quilt as shown (Note image just shows portion of the quilt.).
- IMPORTANT NOTE: As you trim the outer sides make sure you are trimming 1/4" outside of the center line of the blocks. This will take into account the SA that will be needed for adding the outer borders and ensure your seam will align with the center of the blocks when finished.
- The outer borders are all the remain to completing the top of the quilt. Both outer borders are attached in the same manner. Attach the top and bottom of Outer Border A first squaring the ends then attach the left and right sides. Repeat the process with Outer Border B. The diagram below shows a section of the quilt and the steps used to add the borders.
Finishing the Quilt
- With the quilt top finished all that remains is quilting and binding. The example quilt was custom quilted on the Baby Lock Regalia ST by National Training and Education Specialist Denise Schober. The Baby Lock Regalia ST is great for free motion quilting and ruler work. Whatever method you use to quilt have fun with it and enjoy the experience.
- Once quilting is complete the last step is to add binding using your favorite method. A 2 1/4” binding is used in the sample so be sure to adjust the fabric requirements for your binding is necessary.
- Enjoy your new quilt!


