
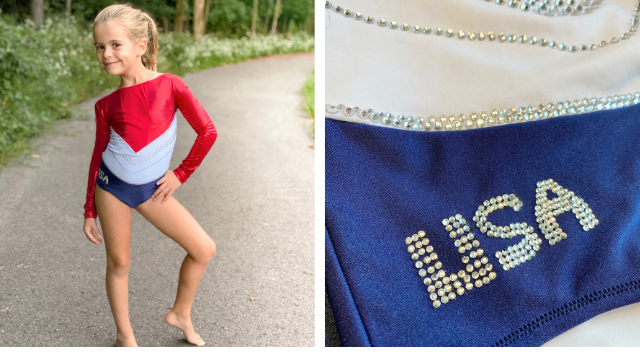
Make your Olympic gymnasts dreams come true this Halloween by creating a custom leotard just like team USA.
CLICK HERE TO DOWNLOAD PRINTABLE INSTRUCTIONS WITH ADDITIONAL PHOTOS.
Supplies
- Red White and Blue knit performance fabric
- Lining knit performance fabric
- Leotard Pattern – Pattern purchased from Jalie here.
- 1/4” wide elastic
- Sewing machine and/or serger
- Crystal Gems
- Beacon Gem Tac Glue
- Basic Sewing Supplies
- When sewing with stretchy fabric it is always important to use a stitch that will stretch. On a regular sewing machine you can use a zig zag stitch or a stretch stitch. Or you can use a serger as those stitches are meant to stretch with the fabric. Unless noted use a stitch that will stretch when making this leotard.
Instructions
- Before cutting out any fabric make any adjustments to the pattern. I cut the front bodice and back bodice at an angle to add in the section for the white fabric. After cutting those pieces apart I added a seam allowance of 1/4” to both pieces at the line I cut. I also adjusted the overlay piece to be in the shape of a rectangle instead of a triangle.
- Once all pattern pieces are cut out find the top center of the overlay piece and the center of the front bodice and match those up. Pin overlay into place.
- Using a zig zag stitch stitch down both long edges of the overlay.
- With the front midsection bodice piece (front white piece) sew a staystitch 1/4” away from the edge 3” up from either side of the V. Repeat on the top bodice piece (Red front).
- Clip into the V midsection bodice without going through any stitching.
- Match up right sides together top bodice front and midsection bodice front at the staystitching and sew V in place without stretching the fabric.
- Using a serger or stretch stitch finish sewing the top bodice front and midsection bodice front together.
- With right sides together match up and sew along the diagonal of the back bodice and back midsection. Repeat for opposite side.
- Place back bodice pieces right sides together and sew along center back seam.
- With right sides together sew the front bodice to the back bodice at the shoulder seams.
Optional: If you have a thinner fabric you can also put in a lining. To do this follow these steps.
- Using the pattern pieces that were not altered to add in a midsection seam cut lining fabric out (doing this reduces bulk from extra seams). You will not need the overlay or arm pieces in lining fabric.
- Using a serger or stretch stitch sew the back bodice pieces right sides together down the center.
- Place the bodice front right sides together with bodice back and sew at the shoulder seams.
- Pin lining WRONG sides together with main fabric matching all edges.
- Baste lining in place.
- Now we will treat this as one piece and proceed normally.
Continuing on with or without the lining:
- Find the center of the sleeve round and match it up right sides together with the shoulder seam. Match up side seams of bodice to side seams of sleeves. Pin in place and sew in sleeve. Repeat for other sleeve.
- Match the front and back side seams from the bottom of the sleeve to the bottom of the bodice right sides together. Pin in place and sew. Repeat on other side.
- Take the front briefs and back briefs right sides together and sew the crotch seam and both side seams. (If doing a full lining repeat this step with lining fabric and then baste lining to main fabric with wrong sides together.)
- Staystitch the V in the briefs and the bottom of the bodice.
- Clip to the staystitching in the briefs but not through it.
- With right sides together pin the bodice to the briefs at the V and stitch in place without stretching.
- Match up notches and side seams and sew the bodice to the briefs all the way around.
- Using a double needle zig zag stretch or cover stitch finish off the ends of the sleeves by turning up 5/8” and stitching in place.
- Finish the rest of the leotard by adding elastic to all openings following instructions below.
Adding the elastic:
- Using the chart given in the pattern find the size of elastic needed for neck opening and leg holes. Cut elastic out.
- Take both ends of one piece of elastic and overlap by 1/4” and stitch together.
- Divide elastic into four equal parts and mark with pins.
- Divide opening in leotard into four equal parts and mark with pins.
- Pin elastic to WRONG side of opening matching up the pins.
- Sew elastic into place by stretching just the elastic while sewing to fit into each section. Elastic should lay flat against the edge of the fabric.
- Fold elastic over matching up the wrong sides of fabric and topstitch stretching the elastic to fit.
- Repeat with other two openings to finish leotard.
To add gems:
- Starting at the center of the leotard and working out to the sides place gems with a little glue on them in place.
- Continue with different shapes and sizes to get desired effect.
- For a more precise design consider using a fabric pen to draw the design and place gems on top.
- Let dry for 24 hours before wearing.


