
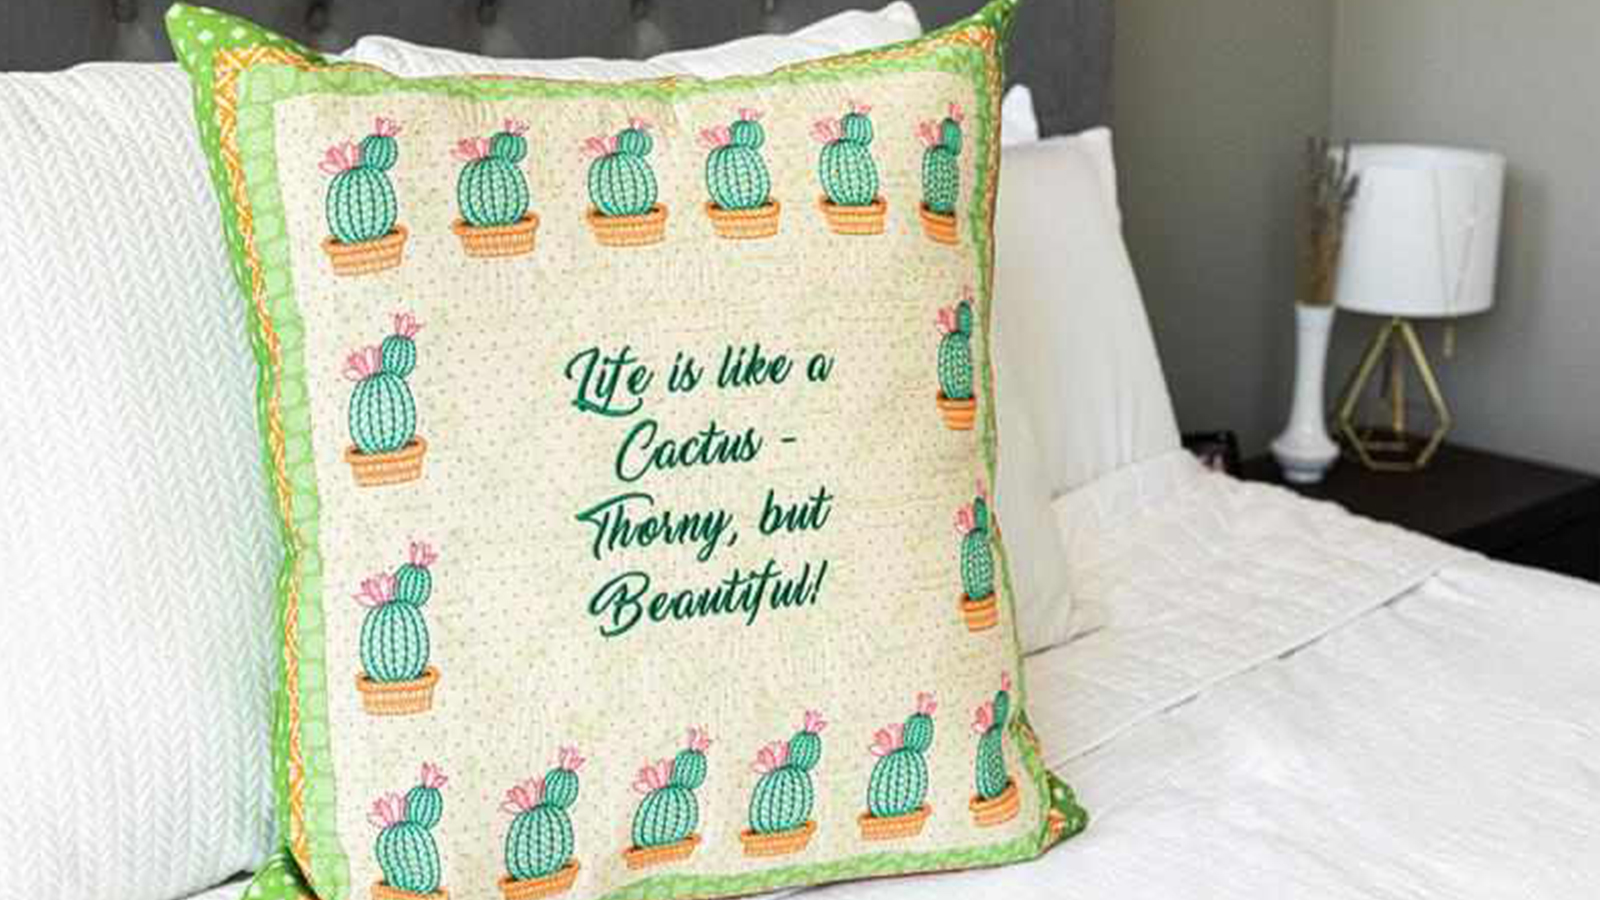
Make a statement pillow that is uniquely yours with the amazing features of the Baby Lock Solaris Vision! By combining features of IQ Designer Palette 11 Digitizing Software and machine embroidery you can create an amazing custom pillow that is sure to express your own personality.
CLICK HERE TO DOWNLOAD PRINTABLE INSTRUCTIONS WITH ADDITIONAL PHOTOS.
Supplies
- Baby Lock Solaris Vision and 10 5/8”x16” Hoop
- Baby Lock Palette 11 Digitizing Software (Optional)
- Fabric of choice – For the sample approximately ½ yard of background fabric 1 yard of backing and accent fabric and 2 sashing fabrics measuring 12”x WOF fabric were used.
- Baby Lock Fusible Fleece
- Madeira Sewing Thread
- 26”x26” Pillow Form
- Water Soluble or Air Soluble Marking Pen & basic sewing supplies (ruler scissors etc.)
- Optional- Snap closure for back of pillow
Getting Creative
These instructions as well as the included Decorative Fill Pattern file will help you to create the exact pillow shown; however these instructions can be used as a jumping off point to create your own wonderful custom project! Using the Programmable Stitch Creator in Palette 11 you are able to create your own unique and custom Decorative Fill Pattern that can then be imported into the Baby Lock Solaris Vision to showcase you own personal style. Standard embroidery designs or even a design you create yourself in IQ Designer or Palette 11 can be substituted in place of the Long-Stitch embroidery designs. Get creative and make the project uniquely yours. The sky is the limit when you let your imagination take over!
Instructions
Creating a custom Decorative Fill in Palette 11
We will be using Baby Lock Palette 11 Digitizing Software in combination with IQ Designer to create a custom fill that will accent the design of our pillow. If you do not own Baby Lock Palette 11 the Decorative Fills preloaded into IQ Designer can be used.
The Cactus Decorative Fill used in the sample has been provided for your use. Click here to download.
- Open the Programable Stitch Creator software found in the Baby Lock Palette 11 software suite.
- From the File/Application Menu (large round icon found in the upper left corner of the screen that shows decorative stitch samples) select “New Decorative Fill”. This will let the software know that you are creating a new Decorative Fill Pattern and will create a file using the .plf file format.
- Using the “Draw” tool create the design of your choice in the given space. The following are tips that can help you with this process: a. To create a point simply left click on your mouse on the location where you want the point to be. As you continue to place points the software will automatically connect the points using straight lines creating your design. b. There is no need to worry about pathing (or when working in Programmable Stitch Creator. The software will decide how to execute the design with the fewest thread trims. This means you can create as many individual shapes/lines as you like and even go over lines multiple times if needed). c. Once you have finished creating a line/shape in your design double left click on your mouse to place your final point and release the drawing tool (this can also be done by using a single left mouse click to place the final point and then hitting “Enter” on your keyboard). d. To create a “seamless” background pattern (meaning the pattern is a constant repeat and will stitch with minimum starts/stops) make sure your pattern touches the four edges of your design space and all edge points have a corresponding edge point on the opposite side of the design. In other words if you have a point that touches the center of the right edge of your design area a design point will be required on the center of the left edge of the design area to create a seamless match. This is also true of the top and bottom edges of the design space.
- Once you have created a design you are happy with it needs to be saved. To save select the “Save As” option from the File/Application Menu found in the upper left corner of the program screen. A file explorer window will open. To use the design in Palette 11 save the file to the following location: Windows (C:)/Program Files (X86)/Babylock/Palette Ver. 11/Pattern. To save the file for use in the Baby Lock Solaris Vision the design must be saved to an external memory stick.
Using the Shape Creation Tool
We are going to use IQ Designer to create the center portion of our pillow. The cactus background fill pattern we created in the previous steps (or using the one provided) will be used to quilt around the cactus design. Since the long-stitch designs have a lot of negative space we don’t want the decorative background fill to travel behind the cactus and therefore we need to create an area in the fill for the cactus design. To do this we will use the Shape Creation or Outline tool.
- From the home screen select Embroidery. Navigate to the long-stitch design category and select the cactus design and set the design.
- Open the Edit menu and select the icon that appears as the outline of a flower. This is the Shape Creation or Outline tool. A new screen will appear asking for Distance and if you want inside shape detection on or off. Increase the distance so that the outline of the cactus design is set slightly off from the design. The amount of this offset is up to you. Make sure the inside detection is set to off. When you are happy with the outline select Memory. A message box will appear saying the outline will be saved to the Saved Outline in IQ Designer. Select OK.
- The Shape Creation or Outline window will close. If you have moved the design from center you need to save the design to Memory.
- Select Home and return to the Home Screen.
- The outline of the cactus is now saved in IQ Designer.
Creating the Background in IQ Designer
The center section of the pillow measures 20”x20” finished which cannot be created in a single hooping. Because of this the center of the pillow is broken into four 10”x10” sections. This will also ensure that our background pattern align and connect seamlessly. We will begin with the upper-left corner.
- From the Home screen select IQ Designer.
- To help with alignment turn on the background grid using the 1” increments. To do this select Settings (blank notebook page at the top of the screen) and navigate to page 8 of 12. From the Embroidery Frame Display section select Grid and then select 1”. Select OK to close Settings. To create the 10”x10” section select the Stamp/Shapes tool (icon on right side of screen with Circle on Square graphic). Select the fifth tab on the top to open the embroidery frame shapes. Select the 10”x10” frame. The offset option located on the center bottom of the screen should be adjusted to 0.00. Select OK to return to the IQ Designer main screen.
- The 10”x10” shape will now appear in the workspace. This shape has no stitch information assigned to it so it will not stitch out in the final product. Open the Stamp/Shapes tool once again and navigate to the Saved Outlines tab (fourth tab on top). The saved outline of the cactus will appear here. Select the outline and then select OK.
- The saved outline will be placed in the center of the workspace. Like the hoop shape the cactus has no stitch information assigned to it and will not stitch out in the final product. Using the grid as reference line up the first cactus outline so that it sits in the upper left corner of the square shape (In the sample photos below a circle shape is used instead of the saved outline). Once the shape is in place use the Duplicate key (two squares stacked on top of one another) to create a second cactus outline. Move this cactus outline into place. Repeat this process until you have three cactus outlines across the top and one on the left-hand side. These areas will not be filled with background stitching.
- Once all cactus outlines are in place we need to add our decorative fill. Select the Properties card from the Region Properties section on the right of the screen (note card icon directly below the bucket icon next to the paint brush). From the stitch selection area select the third icon on the first row (icon shows two rows of circles). This will open the decorative fill selection box. Click on the word Select. By default the Built-in tab will be selected showing the 48-background fills programmed into the machine (A built in decorative background fill is used in the sample images below). To use your own background select the Custom Tab. Insert the memory stick containing the saved background fill into the machine and then select the Retrieve from Memory icon in the upper right corner of the screen (pocket with right-facing arrow). Navigate to the .plf file created in Palette 11 (or saved from the digitizing file) and select OK. This will import the cactus background so that it can be used just like a built-on background fill. Select OK to return to the previous screen. Select your designated color and select OK to return to the IQ Designer home screen.
- Select the Bucket/Application icon from the Region Tools (directly next to the brush icon). Touch the screen inside the hoop shape but outside of the four cactus outlines. This will add the fill to the desired area.
- Select Next in the bottom right corner to advance to the IQ Designer settings screen. Six different attributes of the decorative background can be adjusted on this screen. To ensure the backgrounds align between the sections we will leave all the settings at the default except the Size which we will adjust to 125% (Note – this amount may need some adjusting depending on which decorative pattern you choose. For the best results the pattern on the outer edges should roughly match the corresponding pattern on the opposite edge. There is some play in the alignment once we begin to stitch out so if it is close you will be okay.). It is always a good idea to save your work in IQ in case you need to make edits (remember embroidery files cannot be opened in IQ Designer) so we are getting ready to exit IQ Designer and move to Embroidery. Select OK.
- Add this design to the machine’s memory. We will be using the Pattern Connect feature to align all four sections so we need to have all sections created prior to stitching.
- Once the section is saved select the Home icon and repeat the above steps for sections two three and four making sure to change the position of the cactus outlines as appropriate for the section. Once all four sections are created move to the next section of instructions.
Stitching the Background
Now that all four background sections have been created the last step is to stitch out each section so that they are connected to create the center panel of the pillow. Normally we would take advantage of the Pattern Connect feature built into the machine but the width of the design sections are too large to use this feature so we will take advantage of the built-in camera to align the sections.
- From the Home screen select Embroidery. Recall the first section (upper right corner of the background) from memory by selecting the Memory Pocket (pocket on the third row) and select and set the desired section of the design. Choose Select and Embroidery. Iron the Fusible Fleece (or stabilizer of choice) to the back of the fabric to be used in the center of the pillow. Using a ruler and removable marking pen mark the horizontal and vertical center of the fabric. Hoop the layers in the 10 5/8”x16” hoop so that the upper left corner is in the embroidery field of the hoop.
- Once the first background section is completed add the first cactus to one of the spaces created using the shape creation tool. Because the long-stitch designs cannot be combined with other designs we first need to clear our screen. Select the Home icon in the upper right corner. Select Embroidery. Select the long-stitch design category (category 8) and select and set the cactus design. Select Embroidery. You will receive a warning at the bottom of the screen reminding you to check that you have enough bobbin thread. Select OK.
- The icons for the projector and camera can be found directly about the Layout icon. Either feature can be used. For the sample the projector was selected. The projector window will open the hoop will move slightly and the center of the design will be projected down onto the fabric in the hoop. If you are having a difficult time seeing the design the background color can be adjusted by selecting one of the three options found at the bottom of the screen. The projected image will measure 5”x3” which will not accommodate the entire design so only the part of the design that fits in this area will be seen. The projector can be repositioned by dragging the red box on the screen to the desired location. Reposition the projector so that it is over one of the areas left open in the decorative background for the cactus designs. The cactus design can then be repositioned by using the move icons on the projection screen. Reposition the projector as needed to ensure the design fits within the opening. Once you are happy with the position of the design select OK to close the projector and stitch out the design.
- Once the design stitch out is complete use the projector to reposition the embroidery design to the next opening in the decorative background and stitch. Repeat this process until all designs for this quarter of the panel is complete.
- Next remove the hoop from the machine and rehoop the fabric so that the area for the next quarter of the background is within the embroidery field of the hoop. Although we used the 10”x10” hoop size to create the sections of the background we used the 10 5/8”x16” hoop to help in the alignment of the four sections. The edge of the previous design that you are connecting to needs to be inside the embroidery field as well. Taking extra time to ensure that you are hooping the fabric and relying on your horizontal and center marking will make the connection of the four sections easy. Return the hoop to the machine.
- Select Home from the upper right corner of the screen to clear out the cactus design. Open the next section of the background design from the machine memory. To align this section of the background with the previous the camera or projector (or a combination of the two) can be used. You may find that slightly overlapping the edge of the new section over the edge of the previous section may create a more seamless repeat of the background design. Don’t be afraid to reposition your fabric if you find alignment isn’t working. Again the more precise you are in hooping and aligning the designs the better your final project will look. Once everything is aligned stitch the background design.
- Repeat the above steps to add the cactus to the new section.
- Repeat Step 5 to advance through the next sections and complete the center panel of the pillow.
Finishing the Pillow
Once the center panel of embroidery is complete remove it from the hoop and trim and square the fabric leaving a ¼” seam allowance. In the sample pillow a total of three borders were added to the center panel to build the total size out to approximately 25.5” square. The border sizes both cut and finish sizes are as follows:
- Light Green Chevron Print – Cut 2”/Finish 1.5”
- Orange Print – Cut 1.5”/Finish 1”
- Bright Green Print – Cut 3.5”/Finish 3”
Once all borders have been added the final step is to add the pillow backing. Any method for adding a back can be used. The following steps were used on the sample:
- From the backing fabric cut two pieces measuring approximately 25.5”x20.25”. For each panel on one of the 20.25” sides of the fabric turn the fabric back twice by approximately 1” to create a clean edge. Iron in place.
- With the pillow front facing up place the two halves of the pillow back with right side facing down on the pillow front so that the folded edges are layered one on top of the other. Pin in place and stitch all four sides using a ¼” seam allowance.
- Optional Step – To hold the two halves of the backing in place snaps (Kam Snaps were used in the sample) can be added.
- Clip all four corners and use a turning tool to flip the pillowcase right side out. Add the pillow form and your project is complete! Enjoy!


