
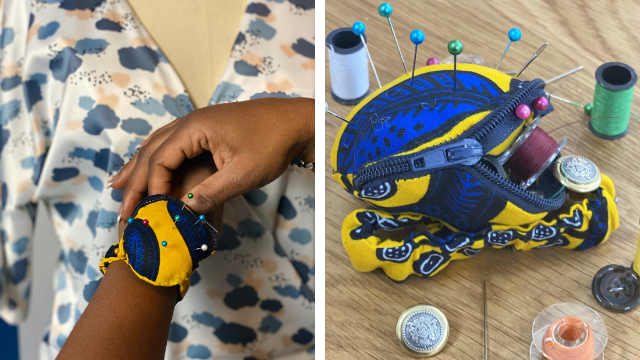
As I was sewing a garment recently I kept thinking that I wish that I had my pins and a place to keep my small notions such as buttons while I am sewing. Why because like many sewers and quilters I lay something down and can not figure out where it walked off to. Well I think that I solved that problem. Introducing “The Pincushion Pouch!!”
CLICK HERE TO DOWNLOAD PRINTABLE INSTRUCTIONS WITH ADDITIONAL PHOTOS.
Created By: Faith St. Juliette of Faith St. Jules
Supplies:
- Sewing machine (I used a Baby Lock Presto II)
- 100% woven cotton fabric
- Scissors and/or rotary blade
- Zipper (Size depends on how large you cut your pincushion shape. You should not need larger than 4”.) You can also use the zipper you have on hand and shorten it.
- Pillow stuffing
- ½” elastic cut to the length around your wrist (not pictured)
Instructions:
- Lay the large side of a small bowl or coffee cup open end down on a sheet of paper and trace a circle. Next place the small bottom of the cup or bowl inside of the first circle and trace that as well. The seam allowance is the space between the two lines of the circles.
- Take the measurement of your wrist and add 1” to the length. Draw a rectangle about 1.5” wide and the length of your wrist with the 1” increase in length. You should now have three fabric circles and two rectangular cutouts.
- Place two circular fabrics wrong side facing and stitch them together. However leave a small opening for putting the stuffing inside. Place the rectangular fabrics together right side facing and stitch the sides. Next use a turn it all or another tube turning tool to turn the fabric right side out.
- Take the third piece of fabric and measure halfway down the circle. Next create a mark on the left and right side of the circular fabric. The distance between the two marks is where you will place the zipper.
- Place the third fabric on top of the two pieces you already stitched right sides facing. Create a basting stitch from one mark to the next. Press apart the seams.
- To allow the zipper tape to curve snip along both sides of the zipper tape at a depth of about ¼”. The cuts should be approximately ⅜” apart. Open up the zipper all the way. Pin the zipper in place on your fabric circle. The sides of the snipped zipper tape should be flush with the raw edges of the fabric circle. Attach a Zipper foot. Stitch this first side of the zipper in place all around. Stitch in a full circle.
- Once you add your zipper cut the excess length off of the zipper. Turn the pincushion pouch right side out with the opening of the cushion portion still open to add the stuffing. Use the stuffing to fill the cushion portion until it is to your liking.
- Turn the cushion wrong side out and stitch the cushion opening closed. Add the elastic inside of the band and stitch the ends close. Next stitch both ends of the band together and center the band on the pouch portion of the cushion and hand stitch the band to the pouch.
- CONGRATULATIONS!! You now have a pincushion pouch!! Slide it on your wrist and start sewing!! I hope that you enjoyed this tutorial and that you will enjoy making this quick and fun project.


